Planning and Design
This was one of the first Style Arc patterns I bought, I really liked the look of the technical drawing. I didn’t have any fabric on hand that I thought would really suit it so it sat on my harddrive for a bit.
After I decided to make a colour coordinated wardrobe, I decided to make a wearable toile using some cotton linen I had bought ages ago for a different top pattern (one that I’ve since decided doesn’t suit me and won’t be making again).
I sized down to an 8 based on the review comments on the Style Arc website and decided to try do flat-felled seams and overall just avoid using the overlocker. So that meant adjusting seams to 1.5cm on the patterns.

Materials
- Pattern:
- Ethel Designer Top (Style Arc)
- Fabric
- Swamp Cotton Linen (Spotlight)
(Yes…they called this colour Swamp LOL)
Construction
Well I started off wrong by cutting the front and middle panels upside-down LOL. I only noticed after I sewed all the panels together. I seem to be incapable of understanding how joining triangles works 😅 Happens with quilting too… Luckily it’s not really that noticeable. I should have realised earlier though when I was placing the pattern pieces on the fabric thinking ‘this looks very wasteful’ 🤣 If I had thought about it a bit harder I would have realised that arrangement made no sense haha. Also my trusty heat erasable marking pen ran out of ink while I was marking and I didn’t go back to check which marks adhered and which didn’t (my bad). But when I went to remark everything I realised I hadn’t transferred all the markings because quite a few were hidden under washi tape when I assembled the A4 sheets…an incentive to get A0 prints…
I also accidentally sewed right sides together but figured it was fine because having the flat-felled seam on the inside is better for this type of garment.
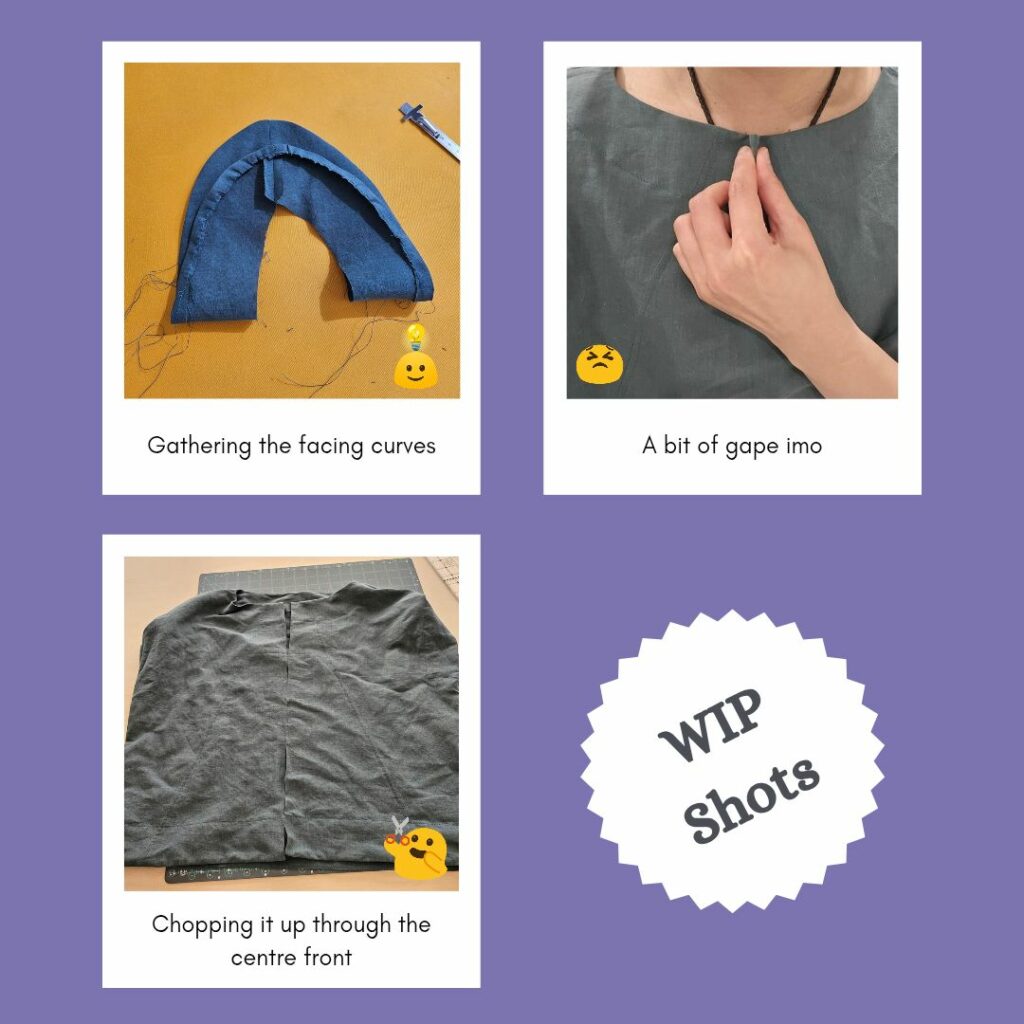
For the collar facing I decided to gather the curved edges. I think I only need to do the shoulder curve and not the entire way around.
I think with the sleeve facing understitching, I should stop 1cm from the edges so that I can more easily turn the side seams for flat-felling. I was worried it would get too thick at the underarm but it was fine. But maybe I should also not trim the seam allowance around 2cm from the top of the seam so I can fold it over and not have to try and conceal the raw edge.
Oh and I omitted the interfacing for the facings because I thought that even my lightest interfacing would make it too rigid (I was right).
I was quite pleased with the outcome, but after wearing it, felt like it could be reduced at the front because it was gaping a bit. Easy, I could just unpick the front panel, recut and resew! Oh but I trimmed the seams so that’s not possible 😝 So I ended up slicing it down the middle and sewing a 1cm centre seam and folding the seam allowance over twice and topstitching. So the front has an extra feature line 😁 In hindsight maybe I didn’t need to cut it and could have sewn 1cm and flattened the seam to fall evenly over the stitch line? But it ended up looking fine so all good imo.
Reflections
It was good to do a practice run. This project made me think I need to do toiles for all new patterns. I know I should in general but in my head buying plain cotton/calico for something I’m going to throw away feels so wasteful and working with old bedsheets brings me no joy 😔 I ended up googling what other people do. And decided that I will take the approach of making wearable toiles from spare fabrics I have on hand. If it’s not quite right for me it’s still a wearable piece of clothing that I can donate (and honestly will probably be better quality than a lot of store bought stuff…). And if it works out I’ll have another item of clothing and the satisfaction of using up my stash 😁
As for the adjustment I made, it looks good and feels fine while I am sitting/standing still, but when I need to move my arms the shoulders feel constrictive. So I think I will leave the pattern as is since comfort is more important than looks, and it was a very minor aesthetic change. I did consider trying to extend the shoulder area since I had removed fabric from the middle, but I feel like at this stage I don’t really understand how to make adjustments and since the design is meant to be boxy, I’ll just leave this one be. Maybe I can retackle it when I have more confidence in what I’m doing.
In fact, this could be a good project once I learn how to make a sloper and design off one 🤔
Things I learnt:
- Get A0 prints to avoid spending time putting together A4 pages and missing markings under washi tape.
- Trust my instincts with interfacing. No need to blindly follow pattern instructions.
- Think before sewing triangles 🙃
- Toiles are good 👍
- I bought The Sewing Book by Alison Smith and apparently some fabrics have no nap so you can cut pieces out ‘upside down’. Cotton Linen is one fabric type they say ‘a nap layout should not be required’. Checks out, actually forgot I cut the middle panels the wrong way, you can’t tell at all 😝
Categories: Sewing
Leave a Reply