Planning and Design
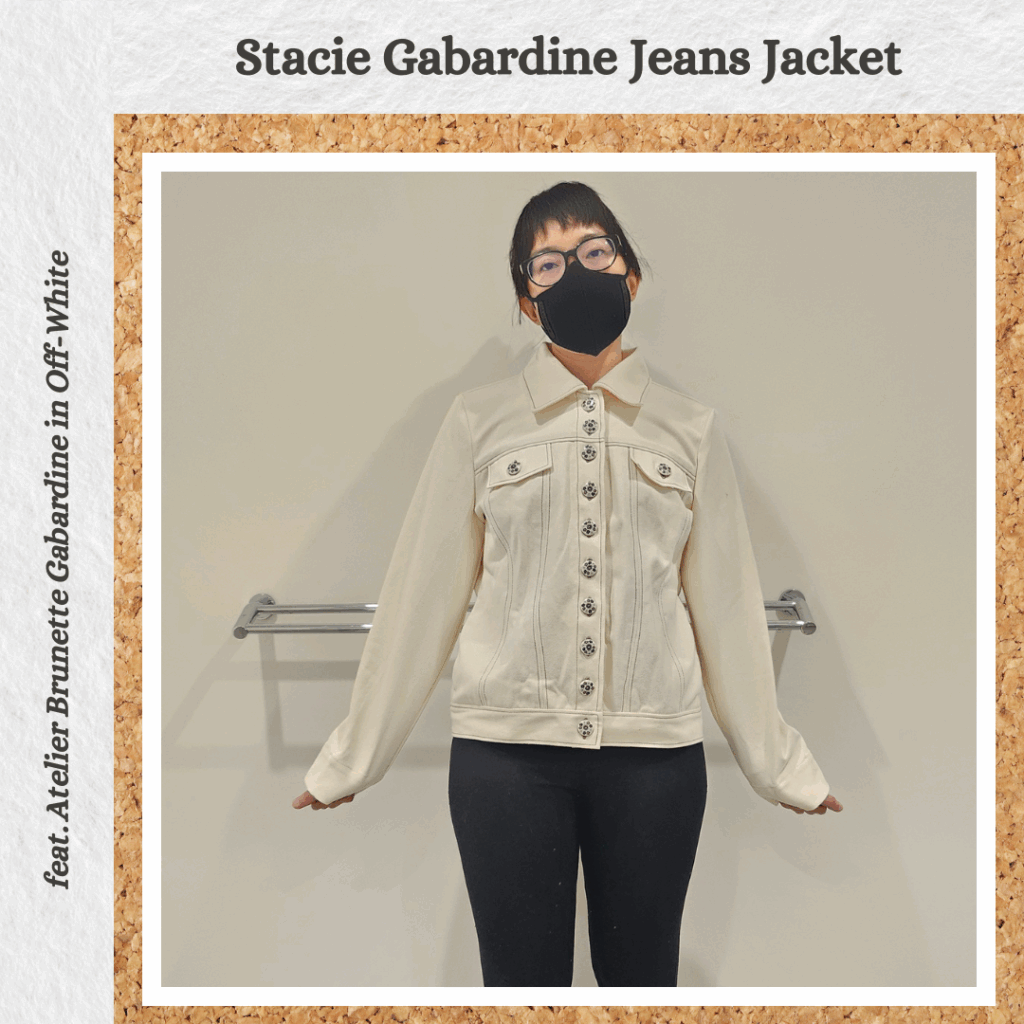
This is my first project designed around buttons haha. Probably over 10 years ago now, I bought a bunch of cute buttons (I’m 99% sure) from Textile Traders. But I never ended up with any projects that suited the button colour and design. So when I rediscovered these while sorting my button stash, I decided that I would make a project for the buttons so I could finally use them 😁 It just so happened that I had started buying fabric from MaaiDesign and they include a couple of fabric samples with each order. One of the samples was for a gabardine, I think it was a purple. I hadn’t heard of gabardine before, it was like a soft drill (durable, woven twill fabric says google), which made me think that it would work perfectly for a jacket.
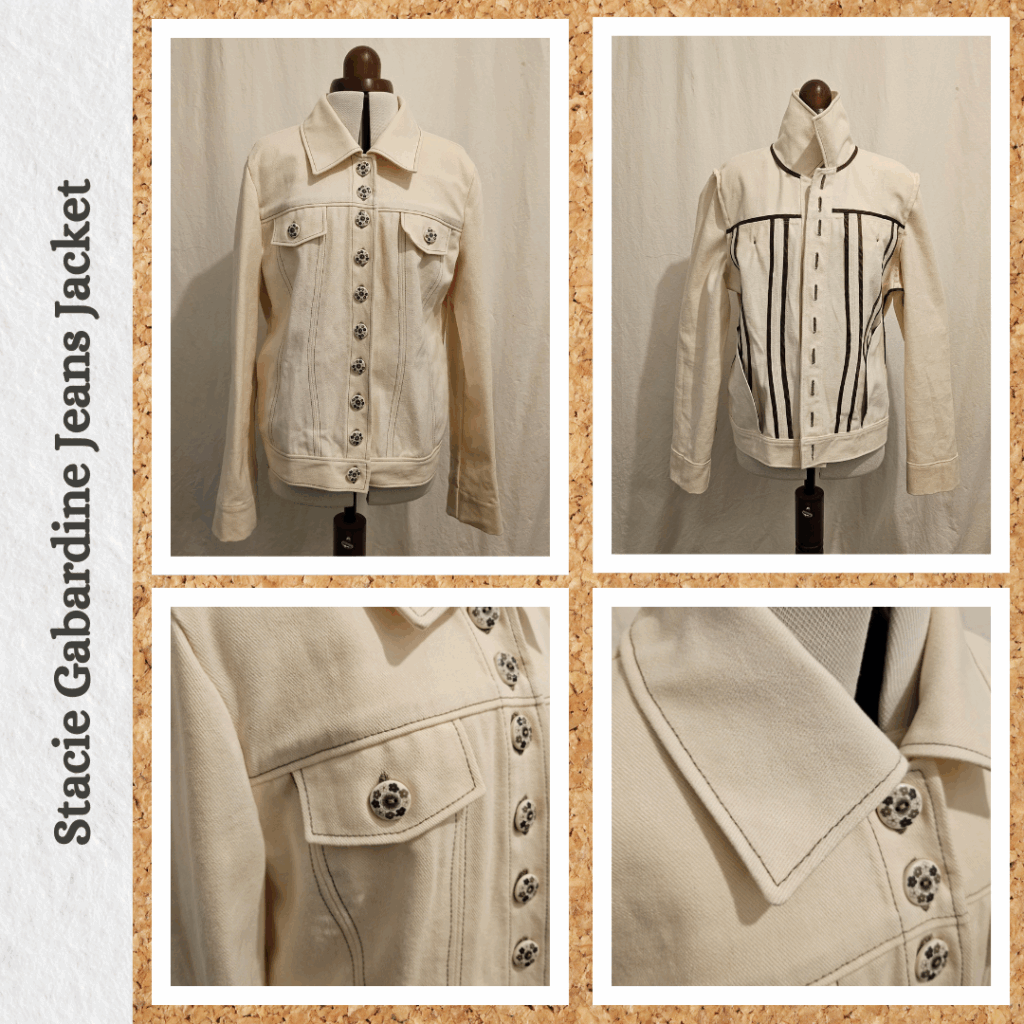
I was also perusing the Style Arc pattern offerings and thought the Stacie Jean Jacket looked cute. So had this in the back of my mind when I was thinking of a project for the buttons and thought it would be a perfect fit since they are both cute 😊 I bought a sample of the Atelier Brunette Gabardine in Off-White and it was a good match to the off-white of the buttons. Along the way, while this project was waiting to be worked on, I made the decision that I wanted to try and make pretty insides and thought that this would be a good project to try bias bound seams. I was so used to lining jackets in a silky lining fabric, I decided to instead make bias binding from a similar type of material. I was also at this point trying to go for natural fabrics so got a bunch of brown cupro lining samples from Miss Maude and chose the best matching one. It doesn’t match the brown of the buttons exactly, but since it’s on the inside it’s not going to be directly compared to the buttons so I thought it would be fine. And it would add a pop of colour to the plain-ness of the main fabric.
Lastly, somewhere along the way I must have read a bunch of topstitching for jeans articles and decided to also get some topstitching thread. Luckily my local sewing store has a huge range of the Gutermann topstitching threads, so I brought my buttons in to get the best matching brown thread. And then all of the above was tested in the Scrappy Denim Stacie Jacket and Stevie Cardboard Cat Jacket Wearable Toiles 😁
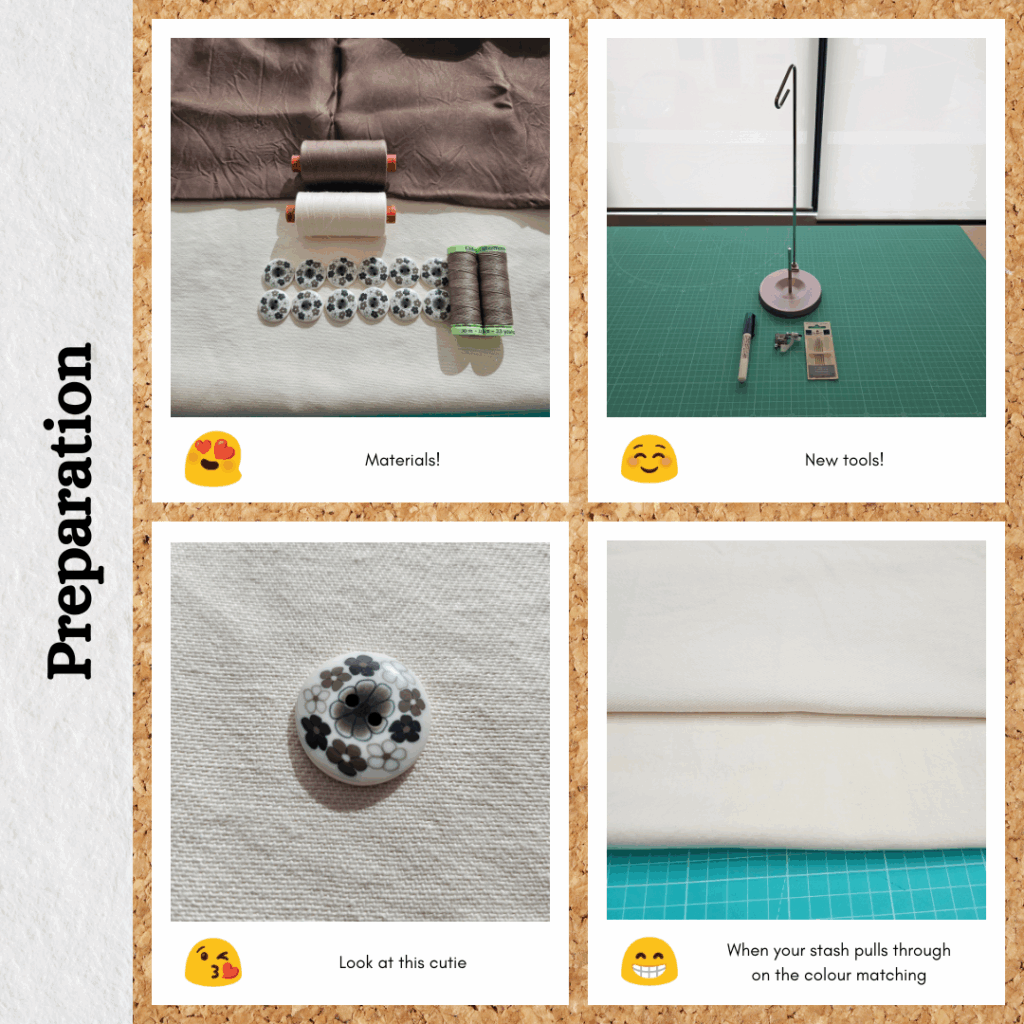
Materials
- Pattern
- Stacie Jean Jacket (Style Arc)
- Fabric
- Atelier Brunette Gabardine – Off-White (MaaiDesign)
- Cupro Light Twill Lining – Bark (Miss Maude)
- Riley Blake Designs – Confetti Cottons – Putty (Fabric Pixie)
- Buttons
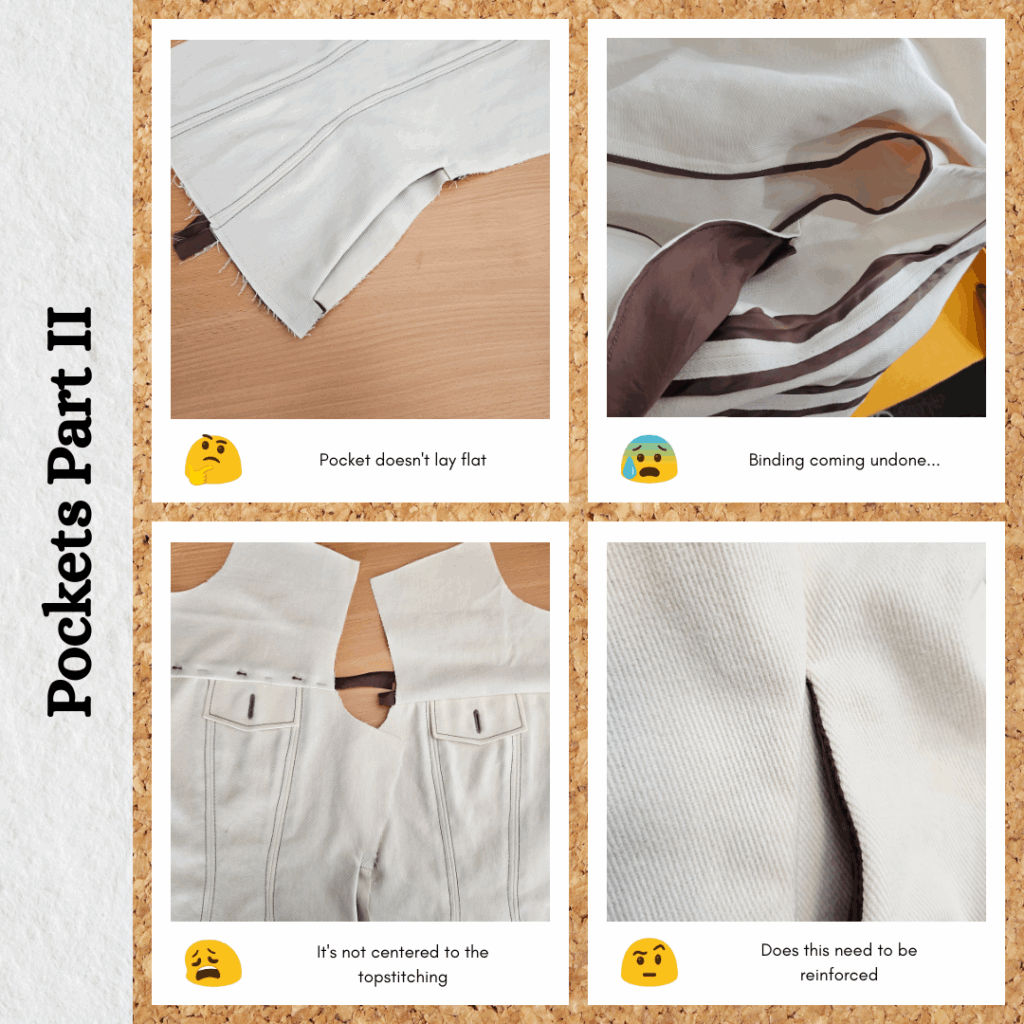
- Off White Flower Buttons (Textile Traders)
- Thread
- Rasant col. 0101
- Rasant col. 1380
- Gutermann Topstitching Thread col. 724
Sustainability Check
👍 Gabardine is 100% cotton so biodegradable. This particular one is also Standard 100 Oeko-Tex and Better Cotton Initiative (BCI) certified!
👍 Cupro is biodegradable too
👍 Quilting Cotton is also biodegradable
🤏 Rasant is Oeko-Tex but not biodegradable. I’ve written this sentence so many times now I thought I’d do another google search to see if anything is available. My last search resulted in the conclusion that there isn’t anything suitable at the moment (based on this post). Re-researching shows that Tencel thread exists at a retail level. I guess I was already aware that recycled thread is available, but I’m not sold on the value of using recycled polyester thread instead of Rasant, if it’s not gonna be biodegradable anyway? The issue with Tencel thread atm is the small colour range and only seemingly being able to buy it in bulk. Perhaps that’s not such a big deal if I decide to invest in the basic colours for those particular projects (especially machine piecing in quilting). I do have a thread stand suitable for cones now 😊 Although I read that cotton (and therefore maybe Tencel too being natural as well) might not be strong enough…
👎 Gutermann topstitching thread is 100% polyester. Digging deeper into the above shows that heavy weight Tencel thread exists, just with the same restrictions (colour range and size). I guess it’s not economical for me to invest in biodegradable topstitching thread at this point, because no way would I make it through a 5000m cone of topstitching thread before it degraded to the point of unusability 😅 But options are likely coming 🙂 However! Gutermann do recycled topstitching thread, so I should switch to this instead of the usual non-recycled version. It does mean one less reason to support my local sewing centre though…being sustainable is full of compromises ☹️
👎 Buttons are likely plastic of some sort
Construction
Preparation
So after my mess-up with grain in the Agate Grey Green Portsea Luxe Sweat, I did a ‘stroke’ test (lol, I dunno what else to call it) and turns out the right side does actually have a direction. Like a very subtle pile. I actually was very surprised at how soft it was. It made me realise that I never want to use gabardine for pants haha. But it fits this project very well, cute and subtly cuddly 🤣
I didn’t realised when making the toile, because I was making do with scraps, but the waistband goes in the opposite grain direction to what I was expecting. I was a bit worried this would make it hard to fit all the pieces on the fabric I had, but it worked out 🙂
I also decided to use some scrap cotton fabric from my Phoenix Wright Cushion Project as the underlayer of the pocket to reduce bulk, since gabardine is quite thick. And just before I started this project, I was browsing the Tessuti store and found their tutorial on adding in seam pockets and decided that yeah, a jacket without pockets is a bit sad. I recently started wearing my Annaki Flannelette Logan Shacket and was pleasantly surprised that that it had hidden in seam pockets, I’d totally forgotten they were included haha. So definitely want pockets for this one. I did have to google to sense-check that it’s possible on curved side seams, I assumed it would be and you would just adjust the pocket to match, but wanted to make sure I wasn’t making baseless assumptions.
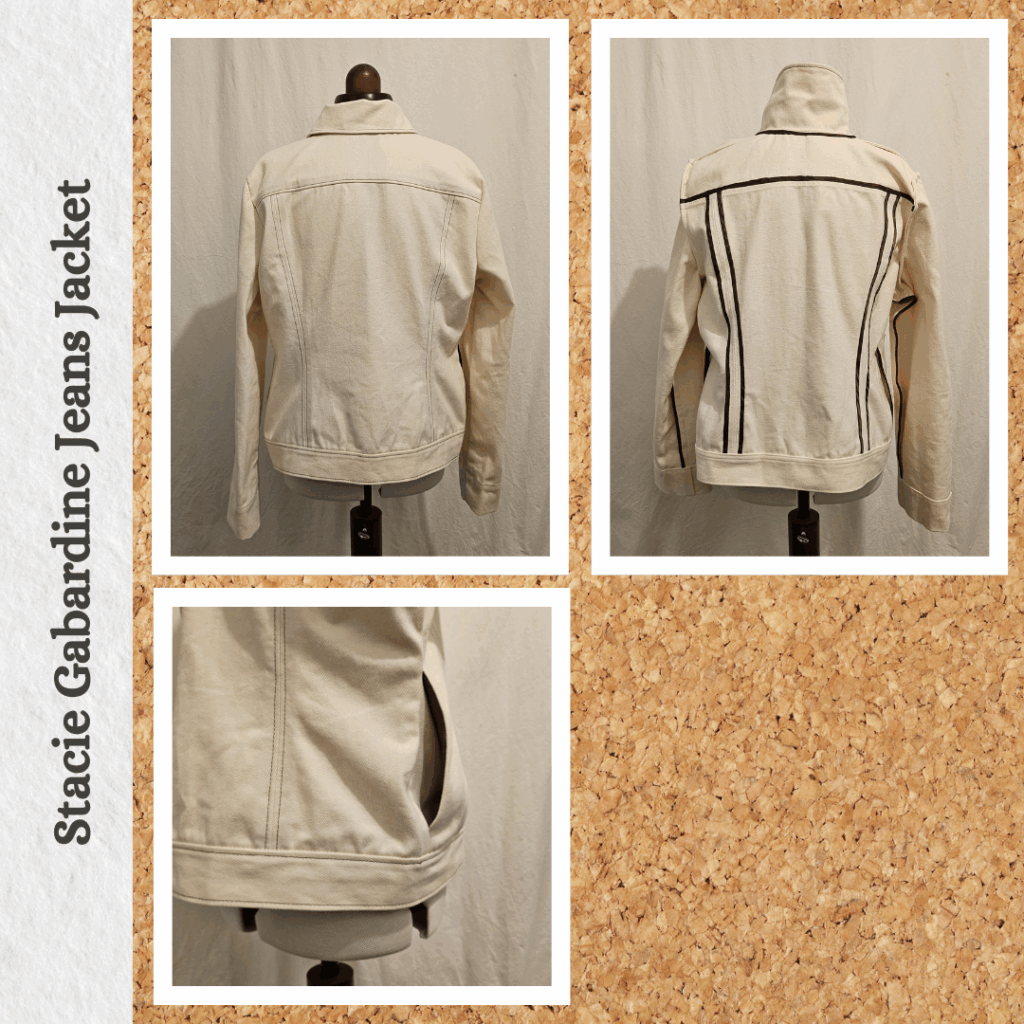
Bias Binding
First up, I tried folding the fabric over to cut the bias when the fabric started getting a bit long for my ruler but that was a BIG FAIL hahaha. So came up with a ruler stacking method which worked pretty well.
So I thought I had figured out the ideal width via the wearable toile, but turns out working with actual bias is very different to straight grain (waaay more give), meaning 4cm was too much. I gradually reduced it by 5mm increments to 3cm which worked best. I also had totally forgotten about the Clover Washable Fabric Gluestick I had bought to baste the interlining to the denim scraps in the wearable toile. That’s because I was able to get by with basting stitches around the outside and across the diagonal for large pieces and didn’t end up needing the glue. But it was helpful here. I found the best approach was to:
- Sew the bias binding to the gabardine with the gabardine on top and using a 1/4 inch foot
- Press the bias binding up using a tailors ham to assist with ironing the curvy parts
- Press the bias binding around the raw edge, no need for the tailors ham here
- Do this for all the seams for that part of the jacket and then leave to ‘let cool’
- Prior to pinning the seams down from the front for topstitching, use the fabric glue to adhere the bias binding to the bottom of the seam allowance. This stops the bias binding from shifting when adjusting the seams to lie flat for topstitching.
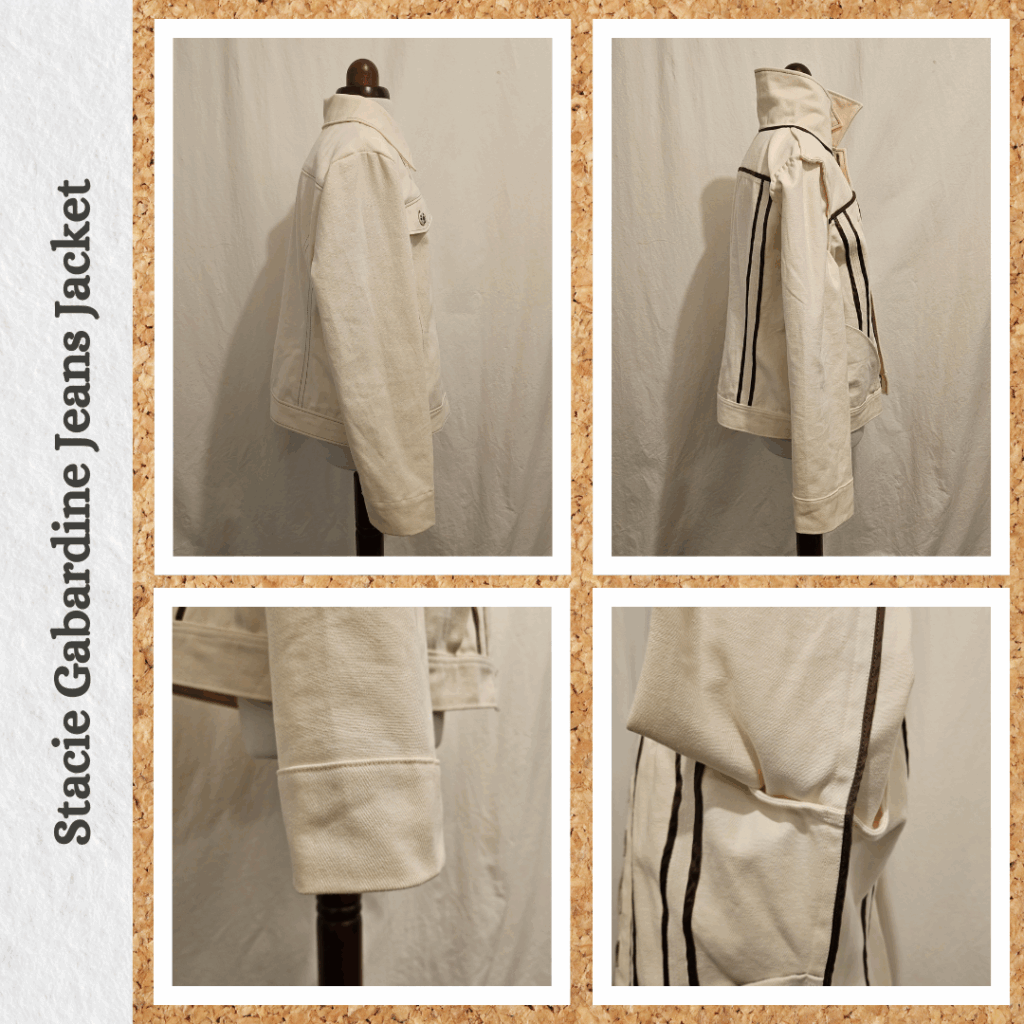
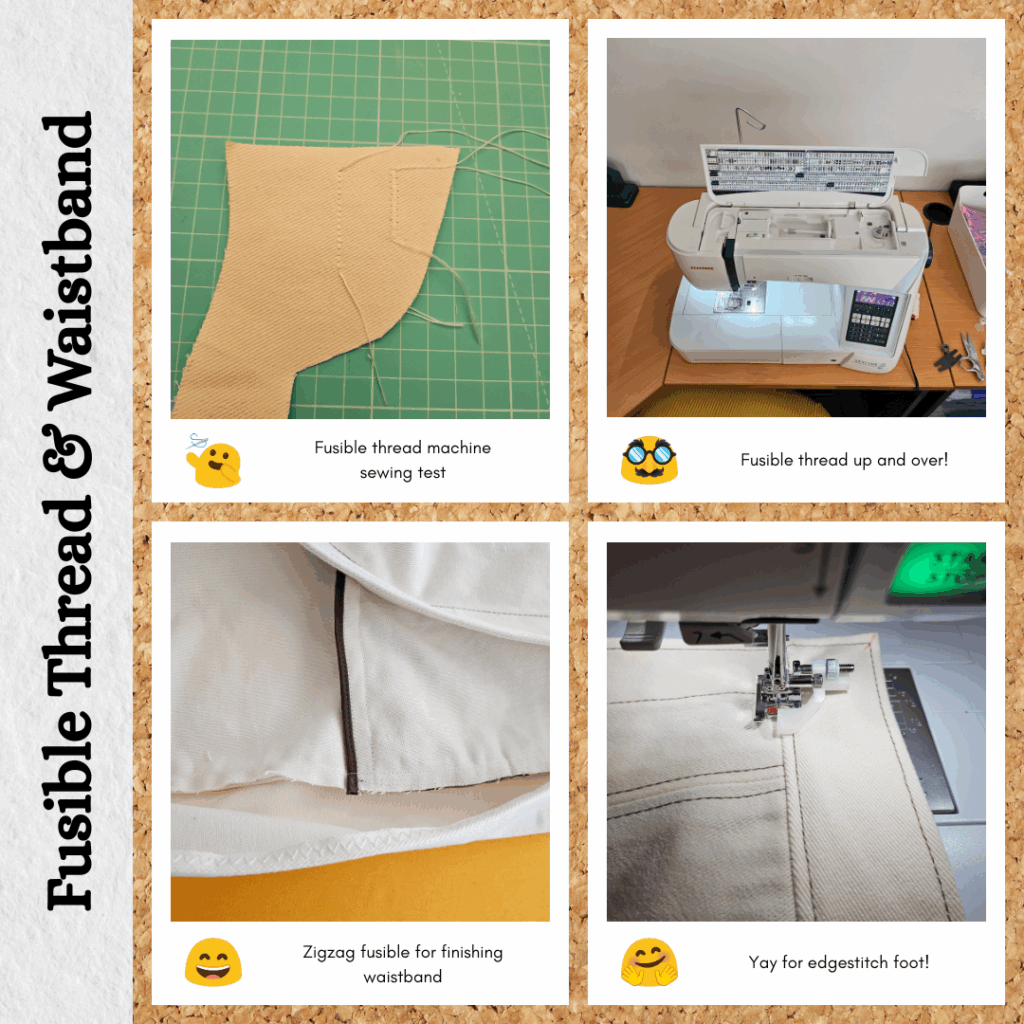
I also used the edgestitch foot for the first time. I like it! I feel like 6mm topstitching is a bit too wide and I was able to do 4mm instead with the foot which I think suits this jacket style better. 4mm would have been doable but annoying without the edgestitch foot since I would have had to adjust the position of the needle each time. And from the Cardboard Cat Stevie Jacket Wearable Toile, I know that my machine doesn’t really like it when I move the needle too much while using topstitching thread 😣
So I thought that the edgestitch foot was able to go over my Dritz comfort pins…and it does for the most part, but did get caught a couple of times, probably due to the angle of the pin head, resulting in wonky topstitching 😅 I need to be smarter about my pin placement next time I use it for topstitching either side of a seam.
In-Seam Pocket
So adding in seam pockets was quite a last minute decision. I downloaded the free Tessuti pattern piece and adjusted it to suit this jacket, after first checking the size against my wearable toile.
I was planning to use one layer (near the body) as the gabardine and the other as a matching coloured quilting cotton to reduce bulk on the waistband, but pre-cut most of my bias (including for the collar and side seams) and judged that I had enough of the cupro to use as the other pocket layer. I’m glad it worked out because now it feels nice on both sides 😁
It took me a bit to work out which way I had to sew each of the layers in order to create french seams. I think I was getting confused because I wasn’t bagging out the whole pocket, because I was going to capture the bottom in the waistband. It took a bit of sewing and unpicking and resewing but I got there 🤣 And then a learning from my Cardboard Cat Stevie Jacket – I decided to finish the seam since it is technically exposed. I bound the long side but just zigzag stitched the short sides. I don’t like the zigzag much but I’m sure I’ll forget about it since I will very rarely see it. It does it’s purpose.
I’m not sure if the pocket will sit nice and flat. I created the pocket piece based on a manual overlap of the front side and front centre panels, but I don’t think this took into account the curve and volume that this creates when the two panels are sewn together. But I don’t think it’s a huge deal.
Decorative Chest Pocket Flaps
For the underside of the pocket, I used the matching quilting cotton I was planning on using for the pockets, for the same reason, to reduce bulk. Since this pocket is decorative, I will actually never see the other side.
I had to redo the yoke seam on one front because I didn’t line up the pocket at the seam line resulting it it not being centered to the topstitching once the seam was sewn…whoops!
Collar & Front Band
I decided with the Stacie Wearable Toile that I didn’t like having the shoulder seams bias bounded, so used french seams instead. When I sewed the collar, I totally forgot to use the fancy corner turn out method haha. Oh well. Once again this is a fairly thick fabrics so it wouldn’t have gotten that pointy anyway.
When it came to binding the collar seam with the bias binding, I found it really tricky to get a consistent width with the curve. I actually think using a ribbon or straight grain would give a better result (like in the Steve Wearable Toile). Because of this, the underside of the bias was too long and didn’t look very nice whenever the seam flipped up (which was fairly often because of the curve and stiffness of the fabric). So I ended up doing a topstitch from the front side, but not in the topstitching thread, in the matching Rasant thread. This helped encase the bias and keep the seam down.
For the front band, I used the water soluble thread to secure it down while I topstitched it. I like how the edgestitch works well finding the band edge from the front side.
Sleeves and Side Seam
Maybe because of the stiffness of the gabardine, I found hard to ease in sleeve. But I was determined to not use a gathering stitch and persevered haha. I used a french seam because I also didn’t like these being bias bound in the wearable toile.
I did bias bound seams for the side seam because I didn’t think it would be very easy to french seam over the shoulder french seams, too much bulk. I cut the bias binding for these seams wrong (4cm, probably should have been 5cm) so had to reduce the side seam. I think this actually looks quite nice, being narrower than the panel bias bound seams. Because it’s not a feature like the other ones. I found that I needed to use fabric glue and pins when topstitching it down. I also found that in the process of attaching the sleeves etc, some of my bias binding on the panels came undone 😭 I think this was a result of changing the topstitching distance to 4mm from 6mm. So I tucked it back in and positioned some fusible thread underneath to secure it back in place. I found out later that I had to do the same thing for the back yoke bias binding too 🙁 So decided to just fuse down all of the bias bound panels. I should have secured it by topstitching it down on the back side before topstitching from the top. Lesson learnt. So because of this, I figured that I should safety stitch down anything when I have the chance. Because these are garments to be worn and ideally chucked in the washing machine, so I need to make them as durable as possible. So for the side seams I did an extra row of topstitching from the front side using a matching thread to the bias binding.
I had also decided that I wouldn’t sew the sleeve cuff in the contrast topstitching thread and used the matching Rasant instead. The sleeve board makes this part so nice and easy, I love it.
Waistband
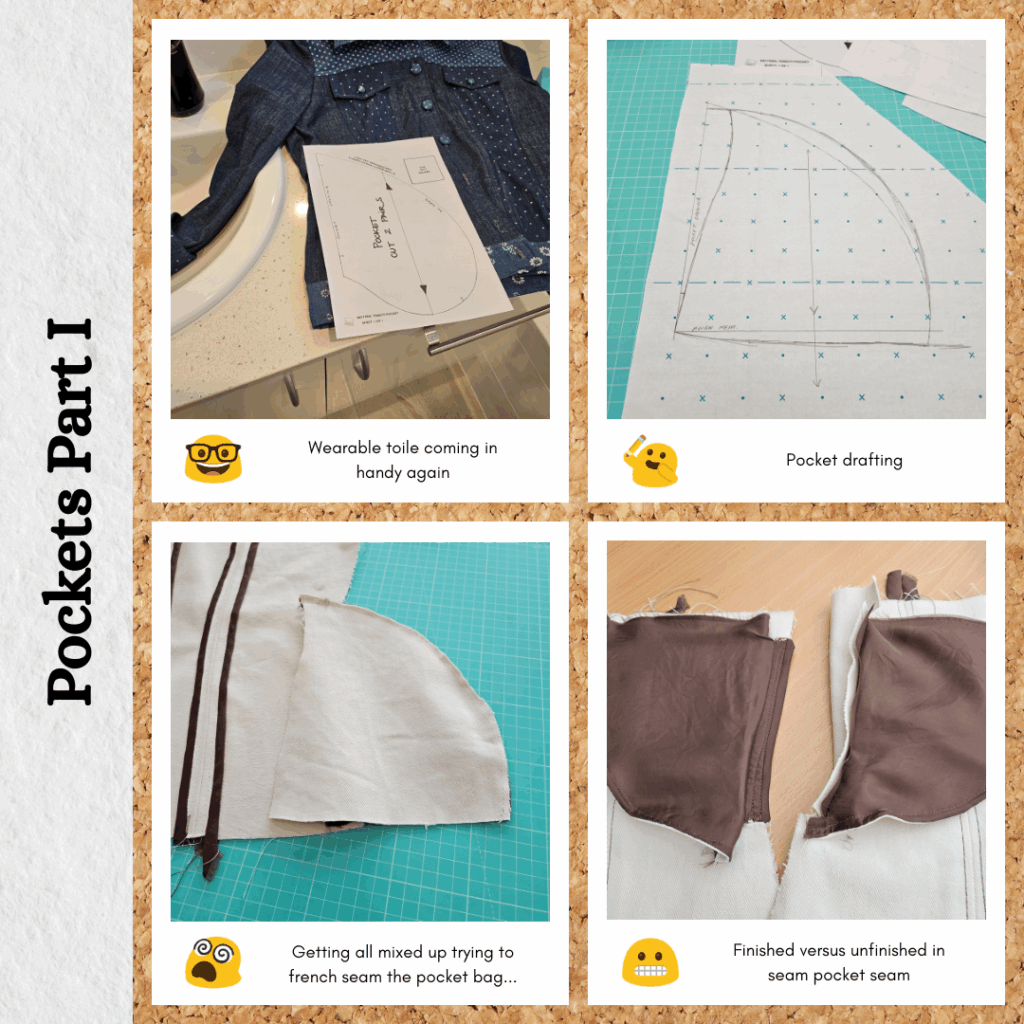
Before starting this project, I tested using my new thread holder to try and fill a bobbin with fusible thread. It…worked better but it seemed to get pretty stuck on the curved path that you’re meant to thread the thread through for tension purposes. I might try a different method next time, but I’m kinda hoping that I won’t ever need to have fusible thread on both top and bottom and get away with just using it as a top thread.
I also tested using it in both top and bottom threads, with a straight and a zigzag stitch. Straight stitch is pretty fine. zigzag works as well, but I don’t think I’ll be able to use it in the buttonhole stitch since it kinda self shreds a bit as it feeds through the sewing machine. So I don’t think I’ll be able to use my method where I do a machine buttonhole using fusible thread, hand sew the topstitching thread and then iron to fuse. But based on my Stevie Wearable Toile, I don’t think there is danger of the topstitching thread unravelling so it’ll probably be fine.
For the waistband, I did an offset (0.5 machine needle position) 1cm stitching fold guide. Then I attached the waistband leaving 1cm overhand either side. I then pressed the seam allowances down, and did a zig zag stitch with the fusible thread in the top. I ended up not threading the fusible thread through the first lot of tension curves and just went straight into the *googles it* take-up lever. I also slowed the stitching speed down to 1. It was a bit nerve-wracking using this thread because of the way it kinda self shreds itself as it goes through the machine, but it doesn’t seem to ever actually break or cause a build-up that forces you to stop sewing.
I then folded the waistband over and iron it down. Then I topstitched it from the front using the edgestitch foot and finished it off by stitching-in-the-ditch, also with the edgefoot (with a different edge positioning), using the matching Rasant thread. The offset stitching fold guide worked really well positioning the inner waistband edge just over the seam stitching line. So very pleased with this result.
Buttonholes and Buttons
Now for what I thought was going to be an issue with number of buttons. I had 12 all up and was using two for the decorative pocket flaps. Which leaves 10 which felt like a lot for the front of the jacket. But when I marked out the two buttons on the yoke (which ended up being quite close to each other due to the size of the buttonholes), the first button beneath the yoke (at 5mm below seam) and the bottom buttonhole on the waist band, when I used the button gauge, it actually gave me enough buttonholes for a total of 10 buttons on the front band. I’ll take it! Because the buttons are the main feature, I don’t mind using more and using all is good because then I don’t have orphaned buttons which tend to be hard to use.
I think I’m starting to get better at hand-stitching the buttonholes. It helps that I have chenille needles (I was right, this was the type of needle I needed). I’ve figured out how to do the curve nicely and how to position the stitches so there is no space between them. But even though I tried to neaten the buttonholes nicely before sewing, I often end up with ‘fluff’ that shows through the stitches 😣 Also using the snippers for neatening the buttonholes is kinda tough. Maybe I need embroidery scissors or something really dainty to really get in there and remove all the stray threads?? 😅
I used topstitching thread to attach button because I wanted it to match the button hole. I left a long tail when I started and tied it together with the end tail and hid both tails inside the front band. I hope this is secure enough.
Reflections
So even though I did a full wearable toile before tackling this project I still learnt so much 😂
Things I learnt:
- How to spell gabardine
- Gabardine has a grain
- Don’t try to fold and cut ‘slippery’ fabric on the bias
- Secure bias binding by stitching in the ditch or doing an extra row of topstitching on the bias itself, even if eventually topstitching from the right side afterward…just in case
- Be careful when placing pocket flaps that will be incorporated into a seam – need to align on seam line point, not edge of fabric
- Use a ribbon or straight grain binding when binding the collar seam
- The loop/hook bit of the sewing machine that goes up and down is called a take-up lever
- Don’t thread fusible thread through the initial thread guides as it gets caught and doesn’t feed through well
- Need to find a way to prepare a bobbin with fusible thread
- Maybe get embroidery scissors to do detailed trimming like with buttonholes?
The cupro lining on the bias has a nice feel and helps the jacket slide on and off really easily. But I think I would like to try bias binding using a colourful cotton sometime. Maybe on something looser where the silky feeling of the cupro isn’t as necessary.
I feel like I had to fudge a couple of things with this project which makes me feel a bit dejected, but I have to keep reminding myself it’s a learning process. If my bias binding comes apart despite the fusible thread, I will sit down and hand tack everything down.
But outside of these disappointments, I’m happy with the way this project came together. I think all the fabric and thread choices complement the buttons and jacket style really well. I’m looking forward to wearing it a lot 😊
Categories: Sewing
1 reply ›