Planning and Design
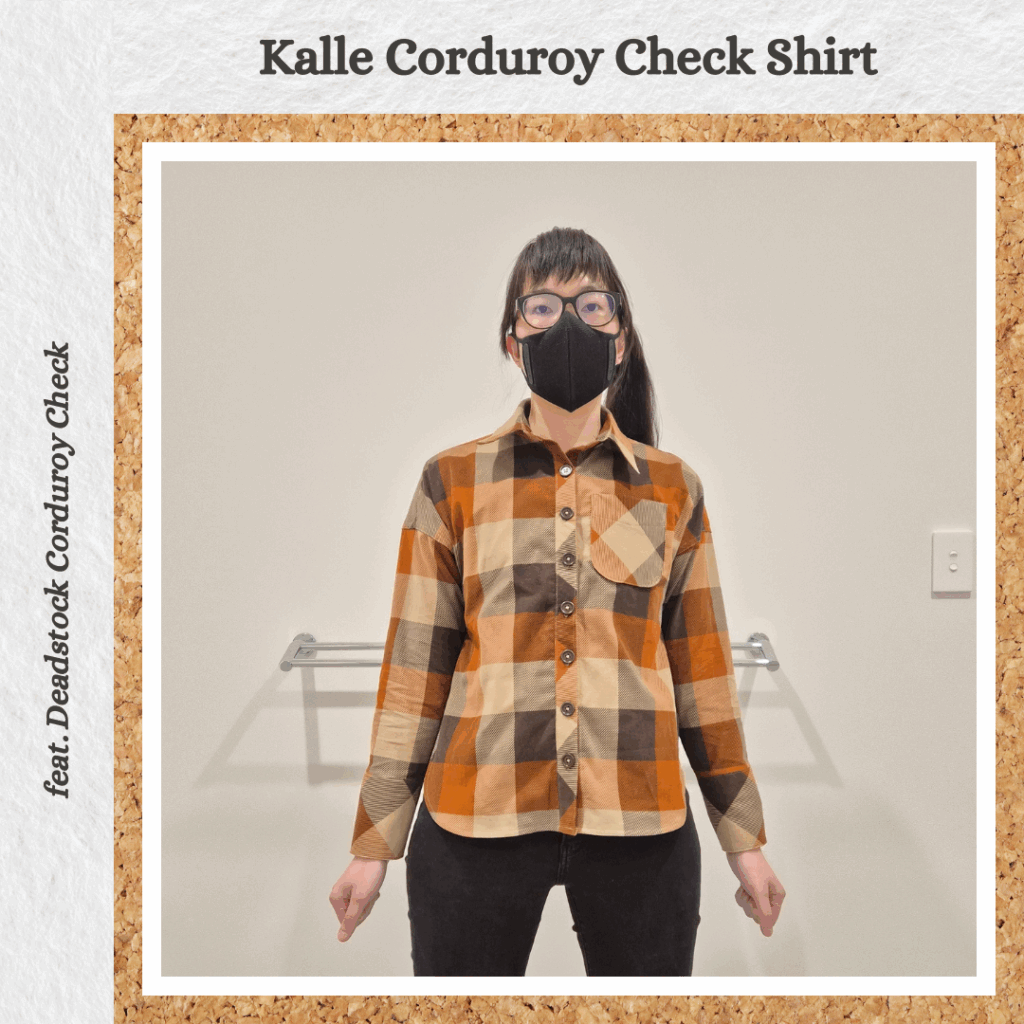
I bought this fabric during a Miss Matatabi sale, intending to make a Matchy Match Sewing Club On-Deck Popover top. I was expecting it to be a much weightier fabric, probably because all the corduroy I’ve ever seen has been on the thicker side. But it was actually very light and so I abandoned that project. I don’t know what made me decide to use it for the Kalle shirt. I had bought the Kalle shirt pattern for the short sleeve version (it looks so cute), but I think I got the sleeve extension for free as part of the shirt-making course. And once you have a pattern, you start (consciously or subconsciously) thinking about how to use it LOL. So I think the intent behind this project was to test the Kalle pattern before doing all the short sleeve variations I originally wanted to do.
It also ended up being good practice for matching checks. I have quite a few other checked fabrics (that I like even more than this one) that I don’t want to screw up as well as a flannelette for a shirt for my husband (he will either totally notice if checks don’t match or not notice at all if they don’t match hahaha, could go either way).
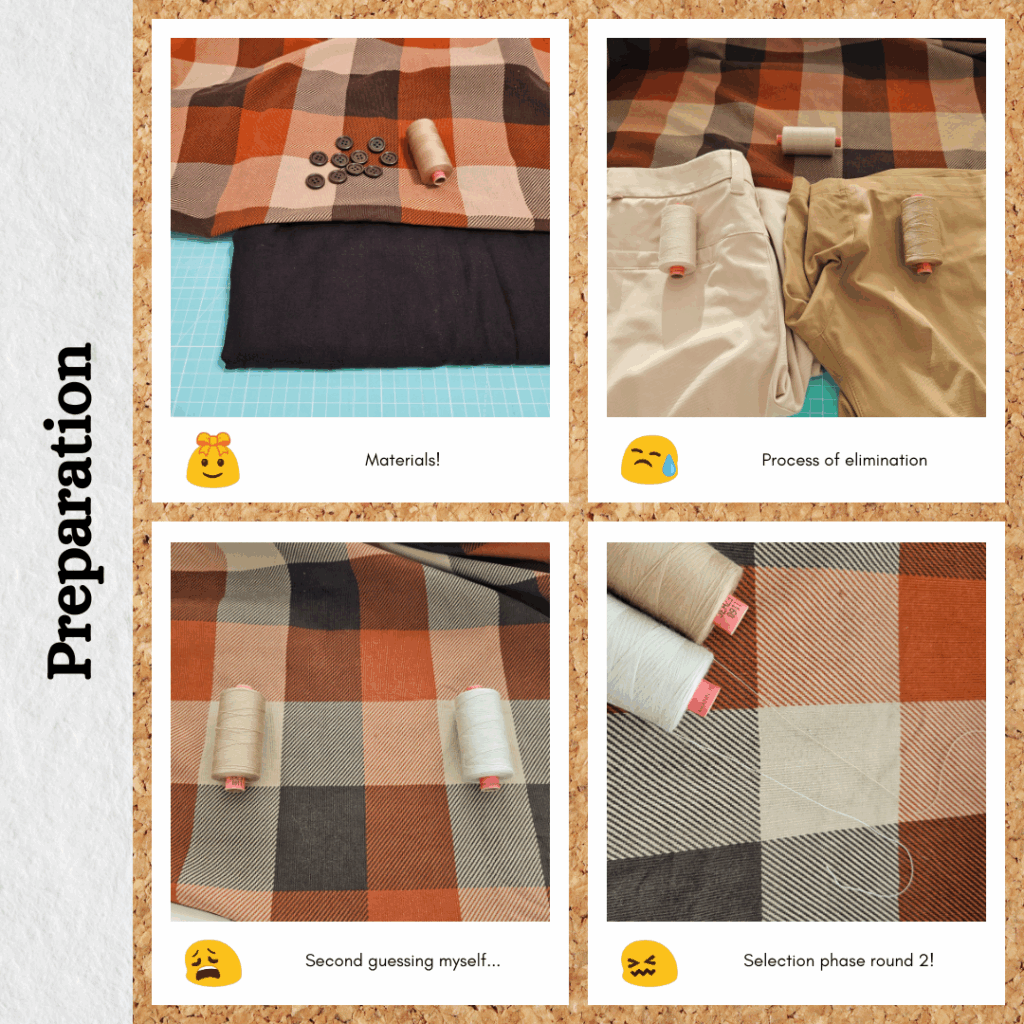
Materials
- Pattern
- Kalle Shirt with Sleeve Expansion (Closet Core)
- Fabric
- Deadstock Corduroy Check (Miss Matatabi)
- Sateen 100% Pure Cotton Sheeting – Black (Homecraft Textiles)
- Buttons
- 4-Hole Classic Rimmed Wooden Button – Dark Oak (Homecraft Textiles)
- Thread
- Rasant co. 1160
- Interfacing
- Non-Woven Interfacing Fusible/Iron on Fine Light – White (Homecraft Textiles)
Sustainability Check
👍 The corduroy is 100% cotton as is the cotton sheeting
👍 The buttons are wooden
🤏 Rasant is OEKO-TEX but not biodegradable
👎 Interfacing is 100% polyester
Construction
Pattern Adjustments & Thread Matching
So I had pre-marked the 12cm shortening line on the pattern pieces I wanted to use after doing the wearable toile. I think I put the line relative to the dress version rather than the tunic, for the front band piece, so need to review that afterwards. At least it was too long rather than too short.
I also had bought colour-matched thread for this project but thanks to my continuous reorganisation of my fabric stash, I had it mixed up with the other brownish threads bought to fix the hems on my husband’s shorts. So the only way to figure out which one was the right one was through process of elimination LOL. Although in the end, I decided the thread I had bought was too light and went with the darker one from my short-mending project instead. I think in general a darker thread is better than a lighter one, if I want it to be less obtrusive?
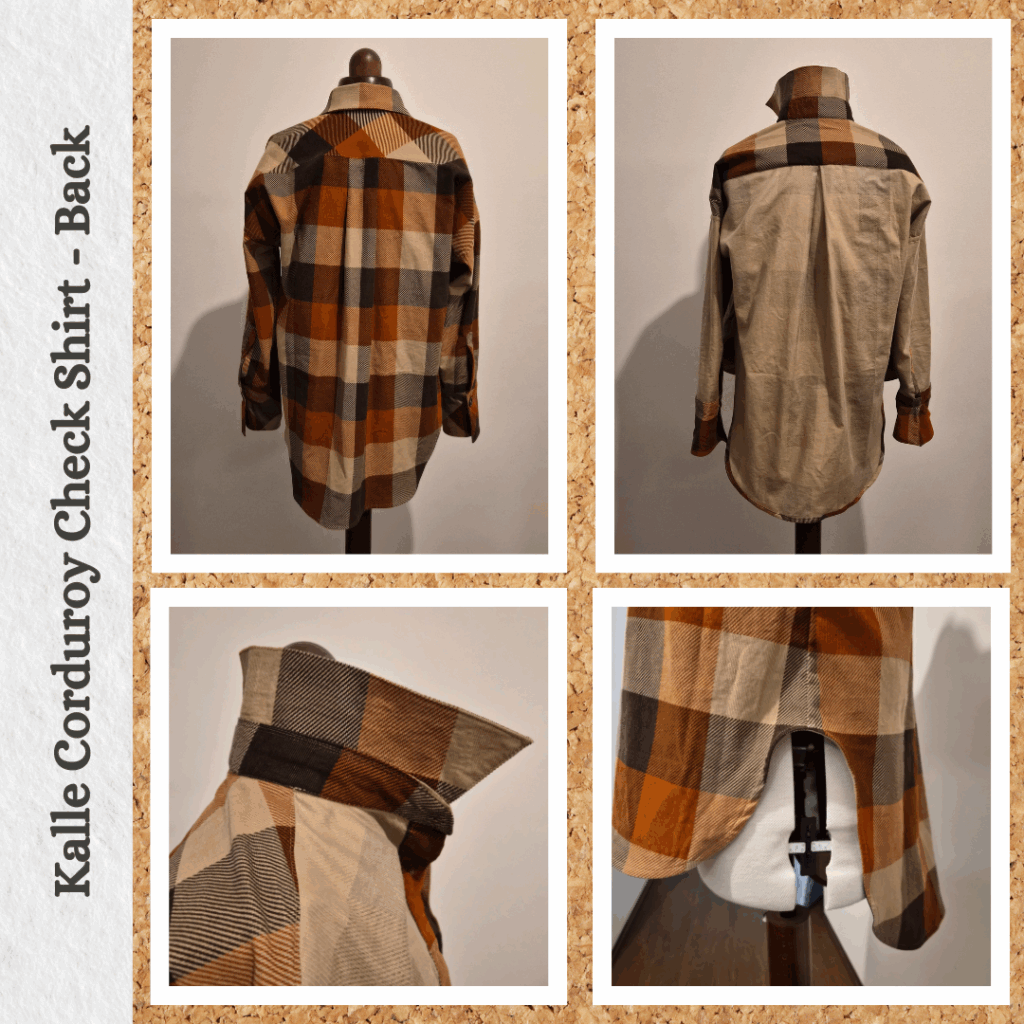
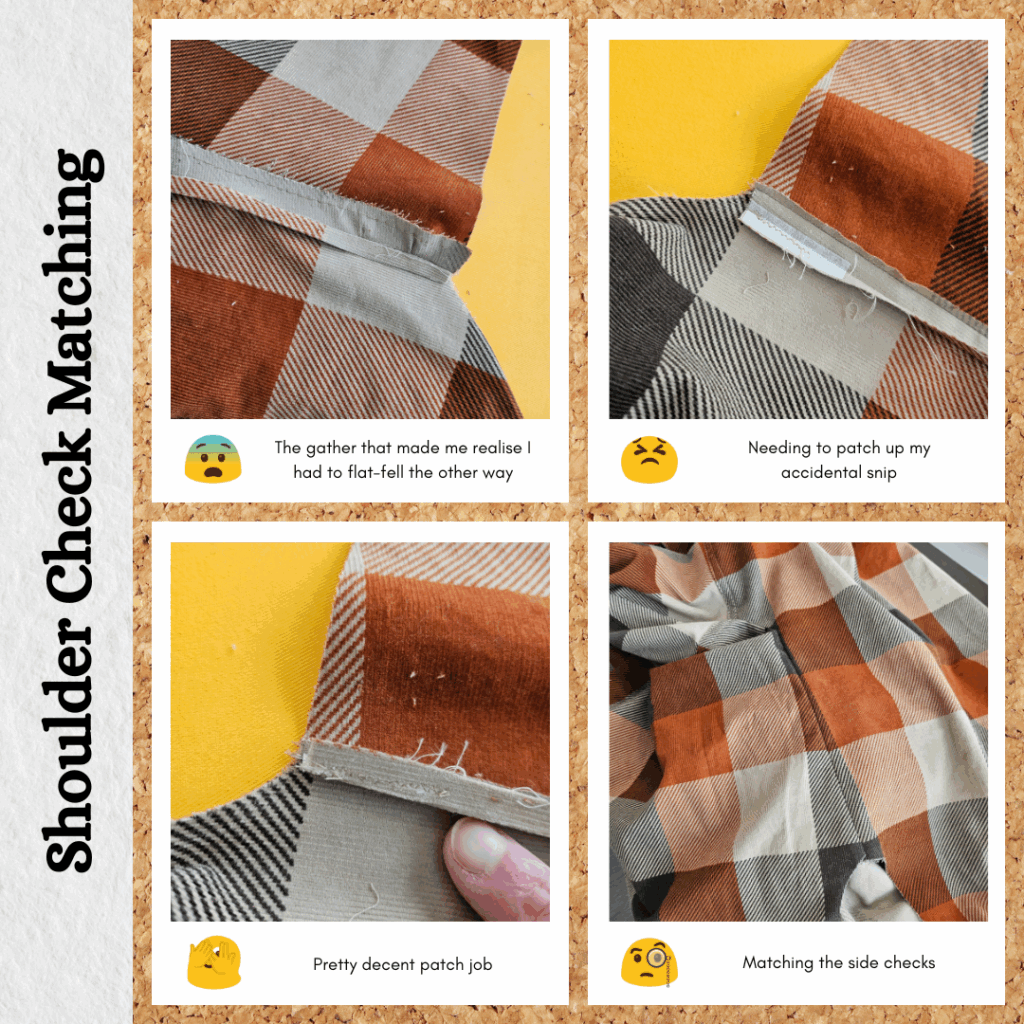
Check Matching – Side Seams
I was quite apprehensive about plaid matching so did a bunch of pre-reading on methods of doing this. I liked this tutorial by LLADYBIRD the most, I felt like it made practical sense. A lot of other tutorials talk about ‘matching the plaid at the seam allowance’ and I just couldn’t wrap my head around how to easily do this 😣 Since I started using a rotary cutter and a cutting mat for cutting out fabric, I’ve mostly just weighed down the pattern pieces with washers and cut around the pattern paper. But for this project, not only did I cut single fold, I also traced everything out first. Super paranoid haha.
I went to apply the tutorial’s instructions and realised that my plaid pattern wasn’t symmetrical. Does that make the plaid matching easier or harder… (I think harder). But I figured this shouldn’t matter for the side seams, I just need to match the colours. Which I did following the instructions and cut out, and then realised I actually needed to place the back piece upside down for it to actually match the front side it was going to be attached to. This wouldn’t be an issue with the checked pattern in the tutorial. I didn’t stress too much though, I figured I could cut some of the smaller pieces out of the discarded piece.
So after figuring out the best way to align an upside-down piece on the right side up fabric I wanted to cut, I traced out my second pass of the right front piece. And realised that it wasn’t on grain haha. What I needed to do was mark out the main anchor/corner points, take away the back piece and then adjust to ensure the piece was straight. So I remarked with another pen colour. But ended up accidentally following the wrong line on the sleeve edge when I was cutting. Shouldn’t be a big deal since I’ll be flat-felling the sleeve to the body later on. At least I had the right methodology for the left piece. One of the advantages of cutting single fold meant I didn’t have to cut out the unnecessary front band part for the right side. Saving just that little bit of fabric (every bit counts when matching plaids!)
Then I started cutting pieces out on the bias. The LLADYBIRD tutorial recommends not going overboard with on the bias, but I thought I should probably do as much on the bias as possible and tone it back from there according to preference. After cutting a few pieces, I realised that the blocks in the plaid are rectangles not squares LOL. So some of the pieces probably aren’t 100% on the bias. Also may not a big deal? Since they aren’t square anyway, there will be no nice diamond shape and I’m putting on the bias for visual purposes not actual stretchy bias purposes (with the exception of the bias binding for the hem, but I think I’ll be able to deal). Also, since it’s a corduroy fabric, there is a nap (which I did take into account for the front and other on the grain pieces), but this makes direction REALLY confusing when put on the bias (or not quite bias). So another reason to go completely in on making adjacent pieces the opposite grain haha. Hence I cut the under cuff on the grain LOL. And I cut the inner yoke cross-grain, just because I wanted to save fabric for when tried to match plaids on the sleeve piece.
So non-symmetric pattern + nap + non-square plaids probably means I accidentally gave myself hard mode 😅
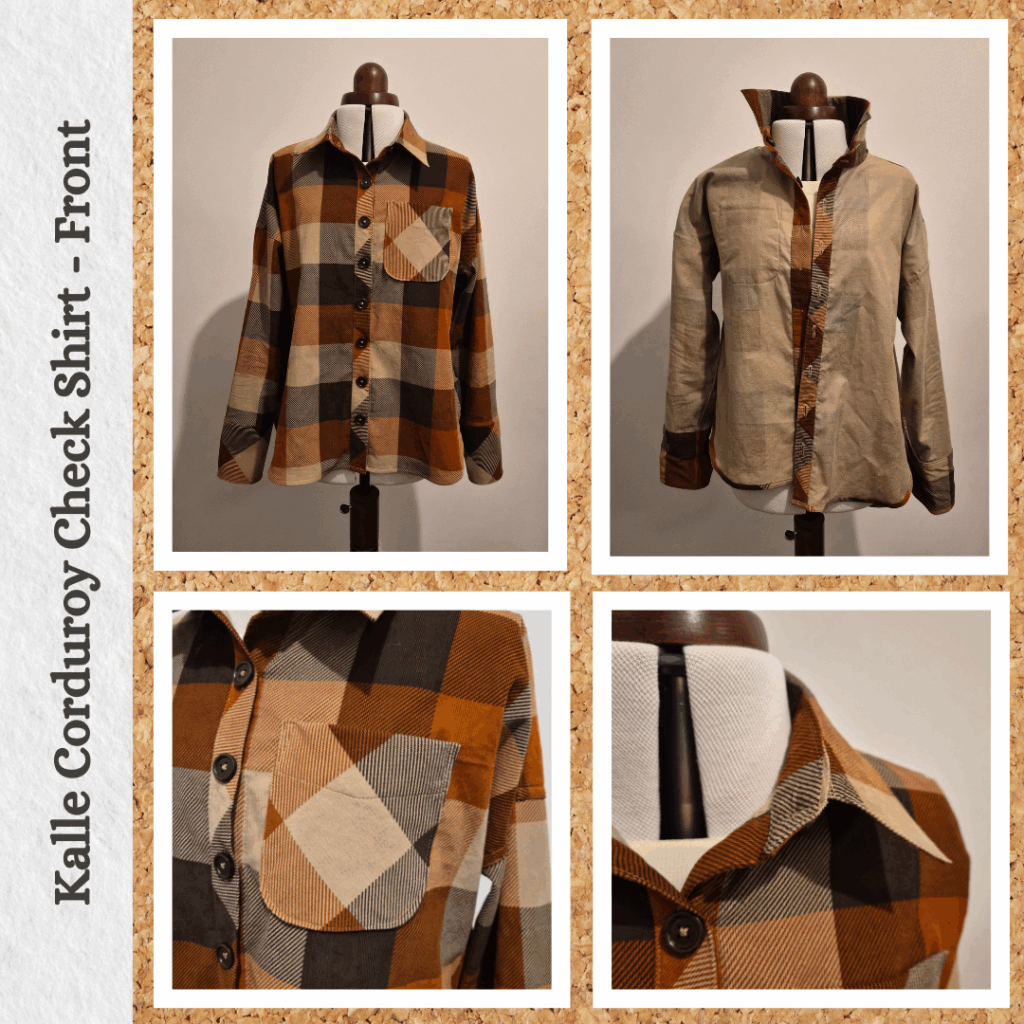
Front Band & Yoke
I wasn’t sure how to position the sleeve pattern pieces based on the unsewn components, so sewed the front bands, shoulder seams and yoke. I used wonder tape for the front bands. I realised after I had topstitched the front band down that I had forgotten to grade the seams. And then realised I should have topstitched from the front, not back, so unpicked it, removed the wonder tape and took the opportunity to grade the seams. Blessing in disguise? I love the edge stitching foot. So easy to quickly adjust (compared to manually moving the needle). Plus, it does a better in stitch-in-the-ditch than the actual ditch foot haha. I just need to not wuss out and not have the guide all the way up against the edge like it should be 😝
I actually reviewed the instructions for the burrito method and realised that I usually do the right side yoke shoulder seams first, but Closet Core advise doing the wrong side yoke first and I think this makes more sense? So I tried this, but confused myself and sewed it wrong. Luckily, as I was doing the burrito rolling to pin and sew the second lot of seams, I felt like it was different to usual and actually looked deeper into why and was able to avoid semi-disaster (if I had kept going and graded the seams…hard to go back from that). I think this plaid matching is both making me more cautious but also over-thinking things LOL.
Check Matching – Sleeve Seams
Now that I had my joined front and back, I laid this open on my remaining fabric and positioned my pattern piece so that it would mostly match up with the plaid borders of the main body. I was hoping that I could ease the sleeve in a way that would allow me to match the borders at the seam allowance.
Interfacing & Pocket
I finally actually made a card pressing template for the sleeve placket and curved pocket haha. As I was pressing the placket along the fold lines, I was thinking about how fiddly it was, then corrected myself, just in general plackets are fiddly LOL. And then remembered I had the placket piece on the bias too, so I only had myself to blame haha. I also took a new approach to cutting the interfacing strips for the placket. I measured the interfacing width on the pattern piece and took 1/8 inch off. This is to make sure that it will fit fully within the two folds because the folds themselves take a bit of ‘space’. I think this worked pretty well, but it’s a bit hard to tell when it’s on the bias haha.
After the wearable toile, I decided to use the lightest weight cotton I have for pocket lining so that it wouldn’t be too bulky. I trimmed the seam allowance without clipping triangles because I don’t have pinking scissors, but this along with the template allowed to to get a nice curve anyway. The template also helped to ensure the lining doesn’t peek out to the right side. This was put aside to be put on at the very end, so I could make sure I was happy with the placement.
Collar
You’d think that by now I’d have the process memorised, but I still had to open up the trusty guide to double-check I was doing things in the right order. One thing I learnt this time ’round was that when working with 1.5cm seams, eyeball marking a diagonal at the corners of the collar doesn’t really work, I accidentally started sewing the top at 2cm allowance because that’s where the diagonal took me. I think eventually I should switch some of the Kalle seams to 1cm (or whatever most of my other patterns are, so everything is consistent). Maybe something to do before trying out the short sleeve versions.
I’m gradually getting used to the burrito method. No fudging required this time. But I feel like I still have a little ‘bulge’ at the point where it attaches to the front. I used to think this was due to the bulk of all the fabric on in the inside, but now I think it might actually be my stitching line. Maybe I need to curve it in ever so slightly as I get close that section?
I also did a 1.3cm stitch guide for the inside collar band, but I think I can get away with 1.5cm. I ended up doing an additional topstitch on the actual collar in order to catch the excess seam allowance in the inside collar band resulting in 3 lines of stitching LOL. The kinda thing most people won’t notice but I’ll remember…
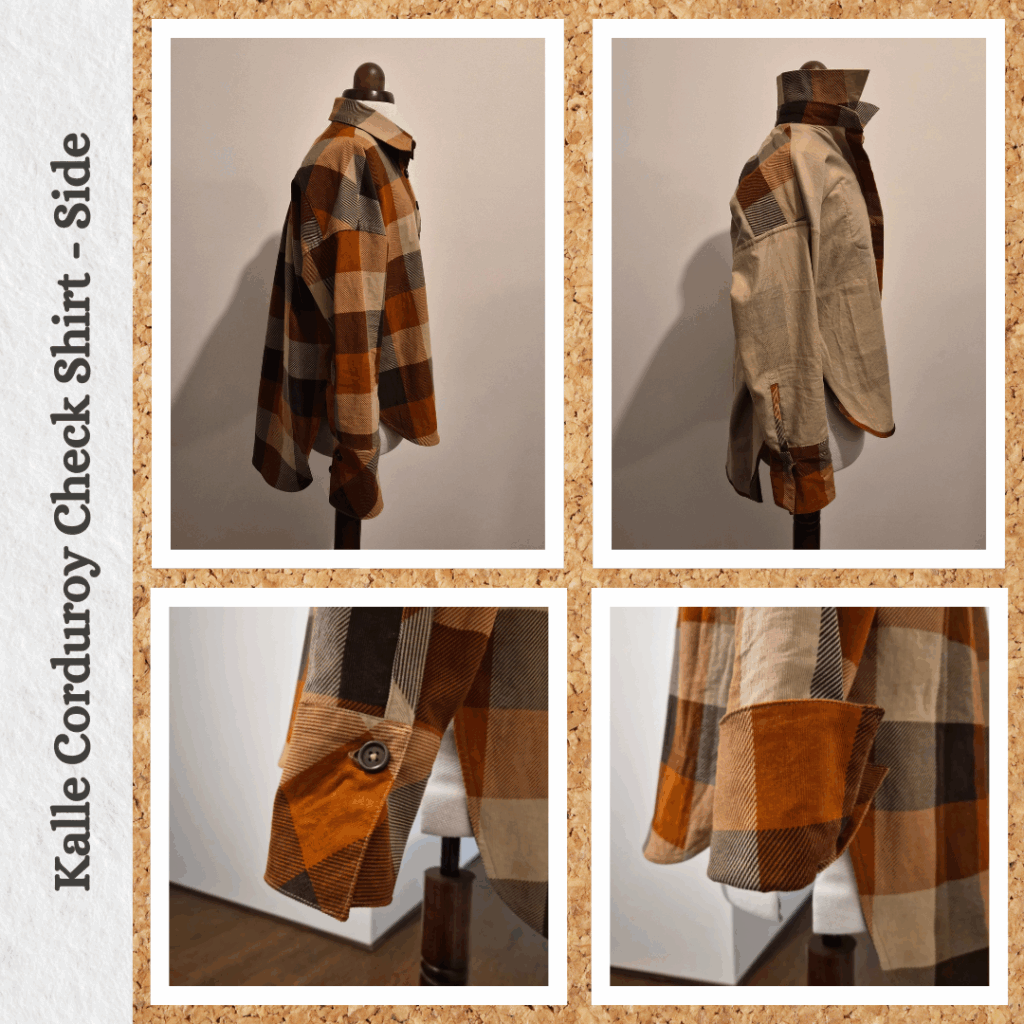
Sleeve Placket
I’ve done this quite a few times but it was made super easy this time thanks to wonder tape and the edgestitch foot. Man, the edgestitch foot makes topstiching the tower no longer an exercise in juggling needle offsets. I think once I figure out the most efficient stitching path, this is gonna become a breeze. One thing I think I should do for future though is make a card template for the tower so that I can make it closer to the same shape. I did much better this time in terms of making the topstiching match as well as all the lengths. But another improvement I could make is to get the bottom topstitch line closer to where the tower ends on the wrong side. But very happy with the outcome this time.
Matching Shoulder and Side Checks
Now the part I had been a little anxious about. I did a gathering stitch on the sleeve top to help me ease the sleeve to match the checks on the body. This wasn’t too bad, maybe I could have also done a gather stitch on the body too. One thing I realised as I was trying to pin the two pieces together was that if I did a flat-fell seam on the right side, I would be able to see the check lines and pin things like I do when piecing quilt blocks 😋 But then I realised that when I folded the flat-fell part of the seam I would need to make this match the check lines…which actually wasn’t too bad. Except that I usually fold the sleeve seam toward the body, but due to the gathering I did, I did it the other way around so that the flat-fell would actually lie nice and flat. I don’t think you can tell the difference so all good. In future, I think the checked fabric I have has the pattern visible on the right and wrong sides, so this process will be a lot easier.
I did a french seam for the side seams so that I could do the same check line matching and pinning, assuming that when I completed the french seam it wouldn’t be too offset at the joining points. One side (the one where the print happens to line to up, the other side doesn’t because the check design isn’t symmetrical) is pretty much perfect! And the other side is within acceptable tolerances 😁
Cuffs
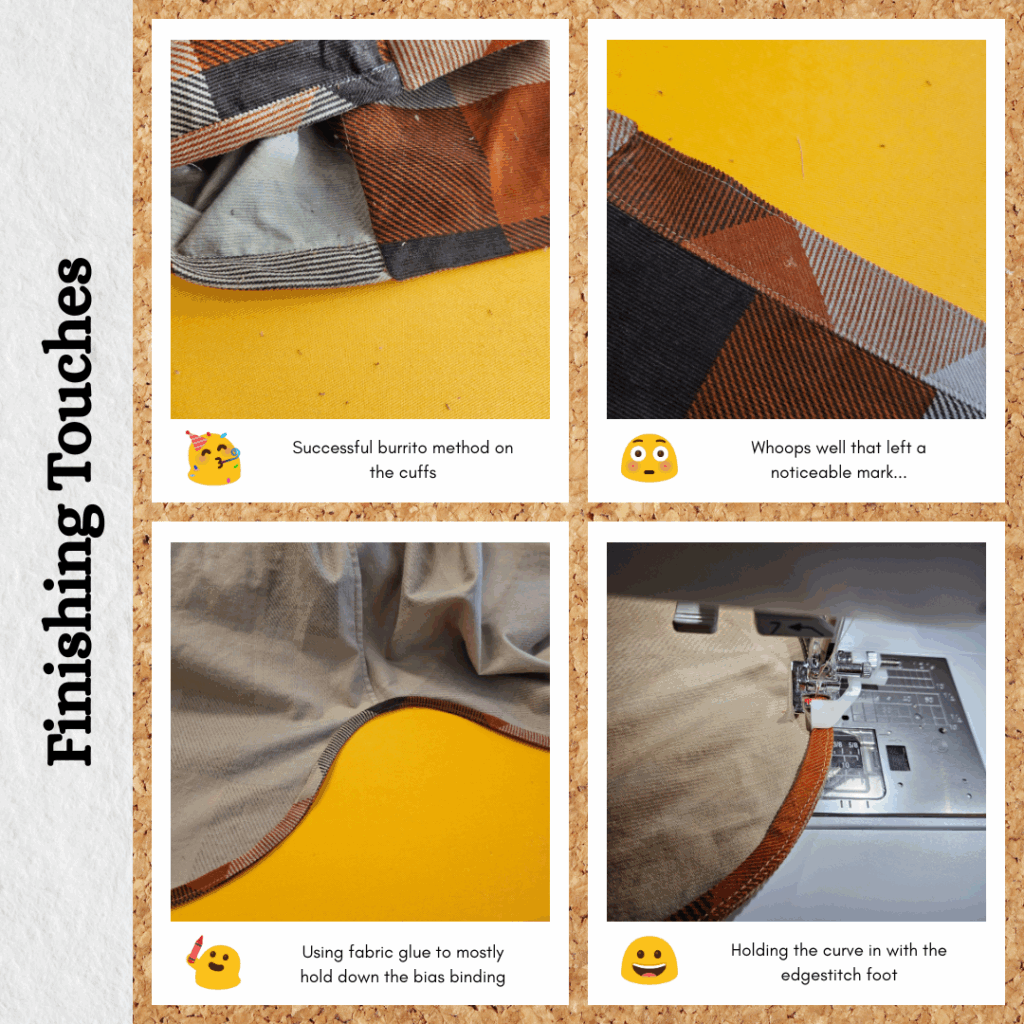
I decided to try the burrito method again. I’ve been using my own method for cuffs/waistbands for the jackets I’ve been making recently, but this is because the fabric is quite bulky already, and trying to turn multiple layers of this thicker fabric just sounds painful. But for shirts I think it would be nice to reduce bulk by using the burrito method. I think I have a better idea of how to fold/burrito the main sleeve part out of the way and in conjunction with wonder tape, was nice and simple to do. I’m still trying to figure out how to get nice topstitching at the corners of the cuff where I don’t have any fabric to try and help feed the cuff through the feed dogs 🤔 It’s probably a case of using the hump jumper a little bit offset from the fabric edge with my right hand and manoeuvring the fabric (as well as holding it straight) with my left hand.
One nice win though was the 1.3cm stitch guide was perfect, didn’t even need to ditch stitch afterwards.
Buttonholes
I decided to do the front band first so that I could align the collar band buttonhole so that that button would sit in a straight line with the band buttonholes. However, I accidentally forgot about the collar band button and miscounted, so tried to remove the markings I had made, but due to the fabric nap you could see where these where. Took the opportunity to do the buttonholes in the opposite direction and omit the very top button (to use on the collar band instead.
I followed the pattern piece for the cuff buttonhole placement. I thought this was weird when I did the wearable toile (and ignored it anyway because I had 2 buttons to use for the cuffs) but looked at the cover photo for the sleeve expansion and now understand why it’s done this way. And figured I would give this style a shot.
Bias Hem
The tailors ham was very handy for all the pressing of curves. And the fabric glue was useful for the curves as well, since wonder tape wouldn’t really work in this scenario. It didn’t adhere super well, but well enough. I did learn that I need to use the edgestitch foot in a certain arrangement when doing curves. This explains why I had such poor outcomes using the ditch foot for topstitching curves. I like how the little hook keeps the fabric of the curves in place so that it gets caught by the topstitching 😊
Buttons & Pocket
Previously, I have used washi tape to secure the buttons while attempting to align them under the button foot. I didn’t really want to use it for these buttons since they are wooden (and honestly, from Homecraft Textiles, so not sure how sturdy they will be) and I was worried the washi tape might strip some of the lacquer or paint. Also, the tape is a bit fiddly and needs to be thrown away afterwards. So I tried using fabric glue and it worked! Held the button in place enough to manoeuvre it around without it going completely out of alignment.
I saved the pocket for last since I think I’m super fussy about placement. I think the shirt actually looks better without it (maybe because of my rectangular checks), but I do often use the top pocket since I have a flip phone that can actually fit in it LOL. So practicality over fashion.
Just like the sleeve placket tower, the edgestitch foot was very handy for doing the little reinforcing triangle at the top of the pocket. I think I overdid it going around the curves, but it’s fine since my entire pocket is lined, I don’t have to worry that I didn’t catch or secure any snipped curves within the seam allowance or anything like that. Also I don’t think it’s that noticeable since the shirt checks are so busy already hahahahaha.
Reflections
Now that everything is attached and I can compare the check patterns, I think next time I will make the under collar and inner yoke on the bias too. And maybe the under sleeve cuff too, especially if the pattern is designed to be rolled back.
Things I learnt:
- How to cut out pattern pieces so that plaids match
- Better way to burrito the back yoke
- Better way to interface a shirt placket
- Make a template to make better placket towers
- Edge stich foot is amazing for topstitching sleeve plackets
- Bias binding a shirt hem
- Best alignment of topstitching foot guide for curves
- Using fabric glue to hold buttons down temporarily
- I have been using plaid and checks interchangeably in this post so decided to look up the difference. I think this is a plaid. Even though the fabric name says check. But I’m too lazy to go update the rest of the post.
Categories: Sewing
1 reply ›