Planning and Design
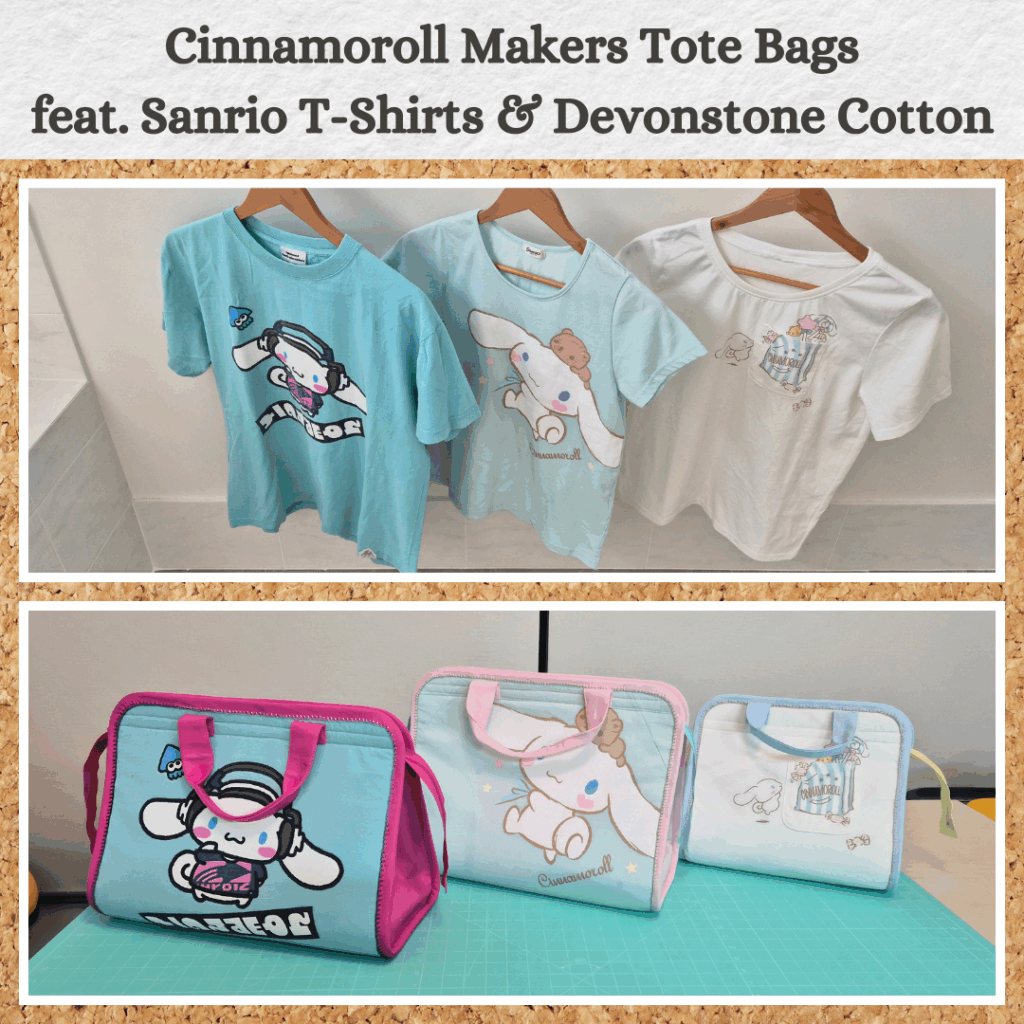
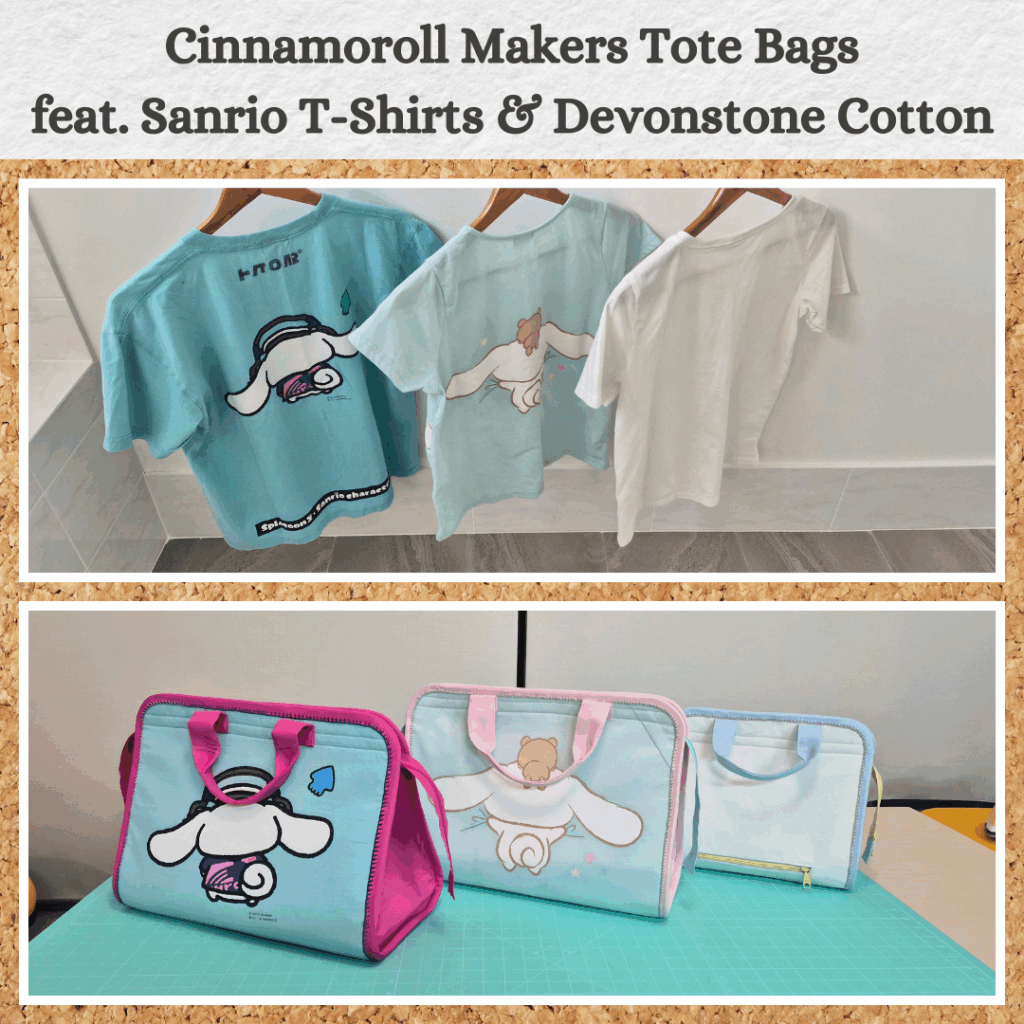
I like the designs on my Cinnamoroll t-shirts, which makes me want to upcycle them into usable items when they start getting a bit worse for wear. I’ve attempted making fabric boxes and I can’t say they worked that well. So the plan changed to trying to make more structured bags. I was actually thinking of a more simple drawstring bag, but then Modern Makers introduced a bag making challenge which just happened to coincide with a Noodlehead sale, where I found the Makers Tote pattern. And it seemed like such a good bag for my knitting projects as it has pockets for me to keep all the miscellany related to these projects. Plus it looked super cute. And I really need to get around to sorting out storage for my knitting projects, so felt there were many good reasons to tackle some bag making.
Materials
- Pattern
- Makers Tote (Noodlehead)
- Fabric
- 3x Repurposed cotton t-shirts
- Devonstone quilting cotton in Kylie, Light Blue, Duck Egg, Blobfish and Partly Cloudy
- Thread
- Rasant cols. X2000, 1603, 0018, X5050, 2052 and 5096
- Notions
- ByAnnie 30″ Handbag Zip in Robin’s Egg Blue, Butter Cream and Raspberry
- Matilda’s Own Bag Batting
- Interfacing
- G710 Woven and Fusible Interfacing
- Various medium weight fusible interfacing
Sustainability Check
👍 T-shirts are all cotton and being upcycled 😁
👍 Quilting cotton is biodegradable
👍 Woven interfacing in cotton
🤏 Rasant is OEKO-TEX but not biodegradable
👍 Bag batting is polyester but also is scraps from my Grandad’s foot cushion so getting put to use.
👎 Zips are likely polyester
👎 Medium weight fusible interfacing is polyester. I’ve pretty much used up my whole stash of medium weight fusible interfacing so now to replace with cotton woven interfacing wherever possible.
I don’t think bag making will be easy to do sustainably because of the batting. Although I think I’ve seen recycled polyester fusible bag batting so something to look into for next time. I do have enough batting left for another small bag though, so need to use that up first.
Construction
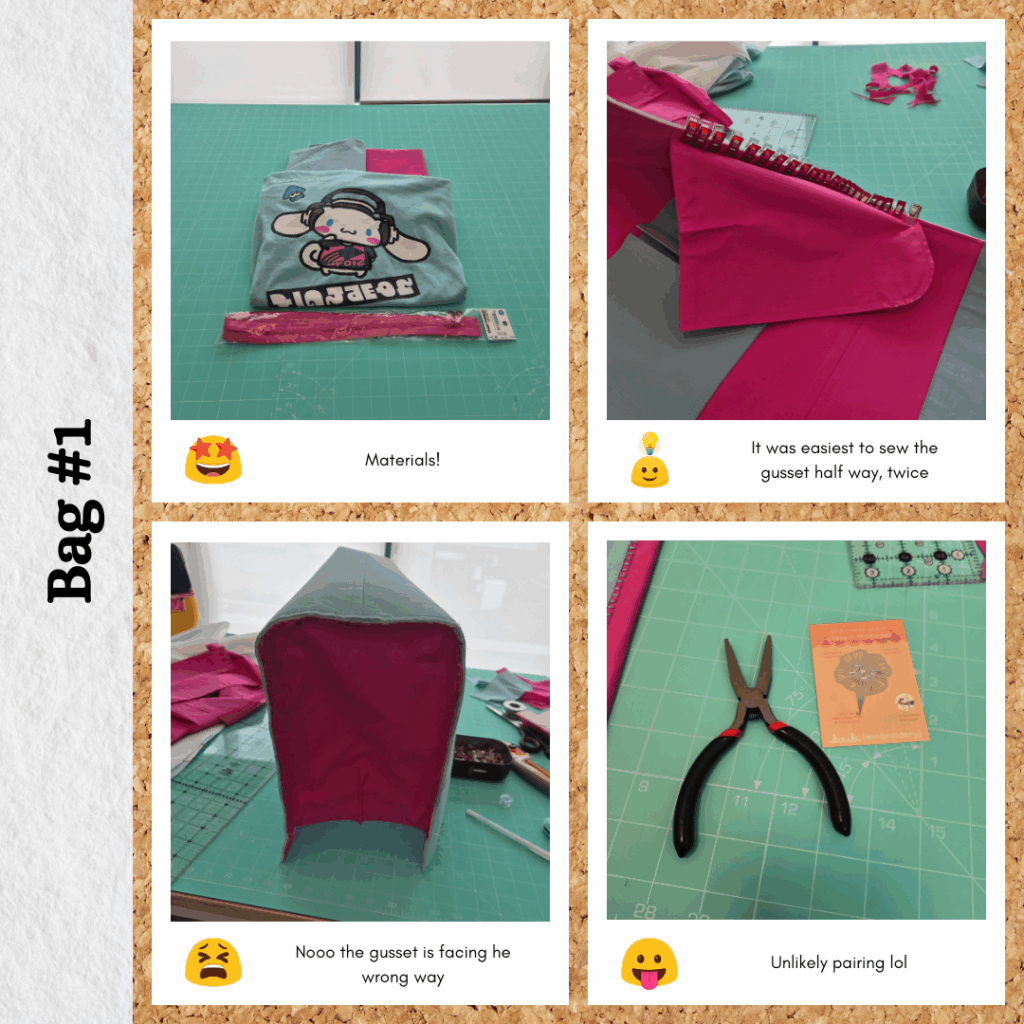
Preparing the T-shirts
I thought about unpicking the seams but it felt like a daunting process so just cut it apart by removing the seams instead. I also thought about saving the sleeve fabric just in case, but the sleeves were too dainty, I figured it wouldn’t really help. Then it was just a matter of using my heat press to apply medium fusible interfacing. Sounds easy but it was a really tedious process haha. And it really dawned on me just how much interfacing was required….
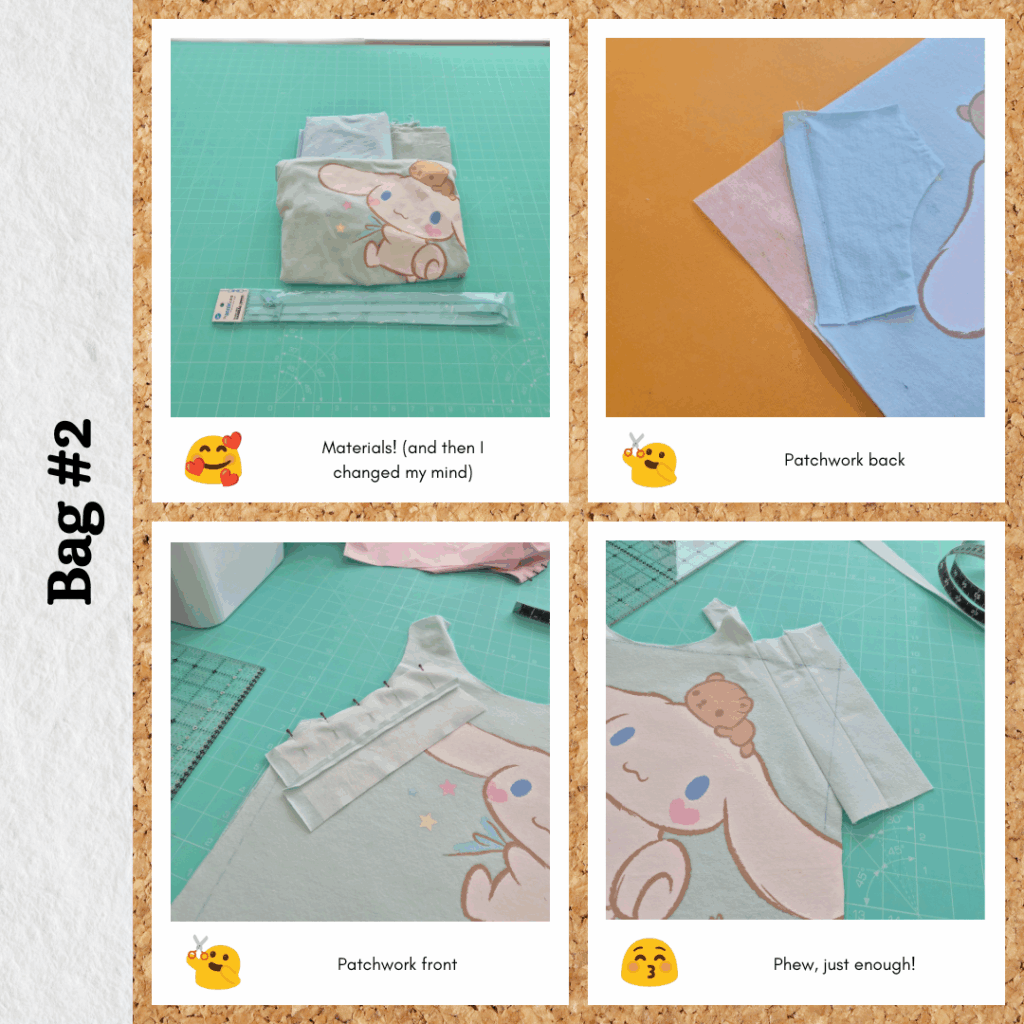
Bag 1
Man, applying the interfacing took soooo long. It was a bit demoralising to be honest haha especially after going through the process for all three t-shirts beforehand. But once that was done, assembling the pockets was straight forward and quite rewarding to see how the pleats fell into place. I even started thinking bag making wasn’t that bad lol…
Then came time to put the main fabric together the the lining + pockets. I had sewed my t-shirt panels along the bottom edge and placed it on the batting, cut the batting to size and basted together using my walking foot to keep things nice and flat. All good on that part. Except that I got the orientation wrong and the 17″ was top to bottom, not side to side. WHOOPS. So I ended up having to trim everything to 16″x16″.
Then for the gusset. I probably made this super hard for myself by making everything very bulky due to:
- T-shirt fabric is already thicker than quilting cotton
- This also had medium weight interfacing applied to it
- The batting used wasn’t Soft and Stable but something much firmer
- The lining had medium weight interfacing applied to it instead of the woven interfacing suggested
So definitely will not interface the lining for the next bag, as the interfacing on the t-shirt fabric should help keep the structure of the bag in the same manner.
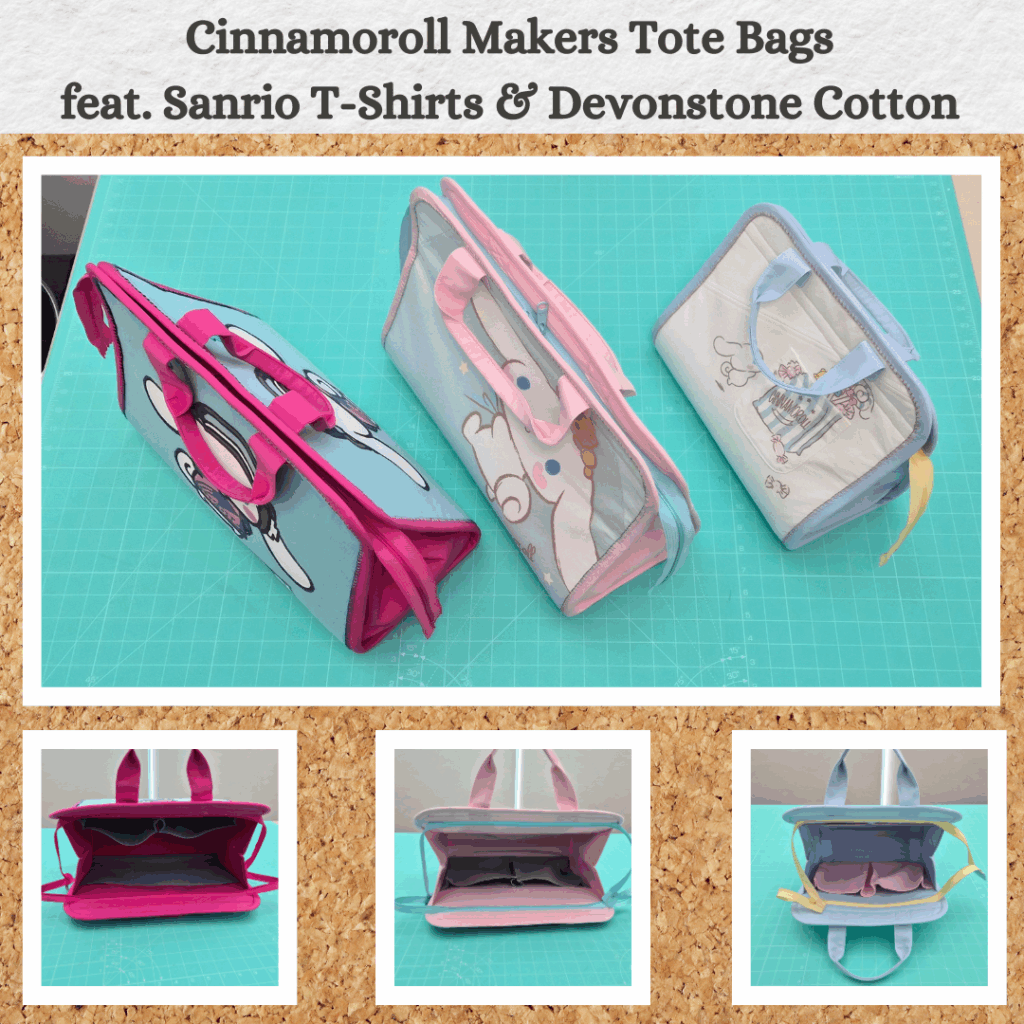
So after a huge workout I got the bag assembled and it was onto the zip. Upon which I belatedly realised I was meant to buy an open end zip. I had assumed that since it was a bag I would want a By Annie’s zip since that meant I wouldn’t have to worry about sacrificing any needles since you can sew through them just fine. WHOOPS #2. I wasted about 15 minutes looking up if I could buy colour matched open end zippers but damn, colour matching is just so hard. Got the right colour? Well it’s not in the right size. And vice versa… I swear colour matchings zips is one of the few actually frustrating things about sewing. So I figured, since the open end zips were meant to overhang the bag anyway, why not just do the same with the closed end zippers. Luckily the length was long enough that opening both sides all the way allowed for normal access to inside the tote, but at the same time it wasn’t too long that the zipper ends were longer that the height of the bag. In the end, it kinda feels on design since Cinnamoroll has long ears haha.
I didn’t want to make double fold bias the way the instructions said to, so did some testing on how to do it By Annie’s way. I settled on 3.25″ but I think when I sewed it to the bag, my seam was 1/2 inch or smaller, so the binding does look a bit wide at parts. But better wide than not wide enough. I basted the bias binding at both stages and then did try to attempt topstitching it by machine (the instructions say to use an invisible hand stitch) and that failed spectacularly. I also struggled a lot trying to join the bias on a diagonal instead of the straight edge the pattern instructs…I understand why they specify this way now…
I really didn’t want to handstitch the bias down because the t-shirt fabric is a knit, so I felt like the threads would pull on the knit fabric and it would look bad. I pretty much hate hand sewing unless it’s blanket stitch or chain-stitch, so I did a blanket stitch using 6 strand DMC cotton from my stash. I had actually planned to do some sort of embroidery with this, but it’s been quite a few years since I bought it, so might as well use it here. I found that I really needed to apply the thread conditioner to ensure the embroidery thread didn’t get tangled, but this had the unintended result of the needle becoming really slippery too haha. So I used pliers to help drag it through when I got stuck LOL. And got to use my new needle threader from Sewing Gem. It’s so cute! I always thought needle threaders were only for people who didn’t have good enough eye sight to thread a needle themselves, but when I saw these on the website and read the description, it made me realise that I do tend to have a hard time with certain threads because they tend to fray or the multiple strands don’t want to stay together. So this now makes it so much easier (and it’s cute, I know I already said that, but I love it haha). I ended up using the entire skein (I had to google what it was called) which was unexpected and kinda lucky….
For the handles, I interfaced it with medium interfacing and not the woven they suggest. Which I think made it a bit too bulky at the seams. My sewing machine handled it fine until I was sewing it onto the bag. It couldn’t handle the bulk when back stitching. So I either need to use woven interfacing (like the design intended) or if using medium interfacing, don’t interface the seam allowances and maybe also switch to a denim needle for this stage.
I felt like I had a bit of hard time with this and I’m putting it down to using the wrong type of interfacing. It was mostly when trying to sew the gusset curves, it was too bulky and stiff 😣 So for the other bags I decided to not use interfacing for the lining fabric to try and counter act this.
Bag 2
So this time I used woven interfacing for the inner pockets and handles and omitted interfacing for the lining. I also had to piece together the t-shirt pieces to make up the 16×16 inch size (I decided to match it to my mistaken dimensions for Bag 1). I really had to scrounge but managed to make it work 😁
Construction went much more smoothly now that I knew what needed to be done for each colour fabric, so was able to streamline things a bit and avoid having to change threads a lot. Although false confidence meant that I doubled up on stitching in some parts (I accidentally topstitched both top and bottom of the inner pockets when I only needed to do the top, stay stitched the gusset pieces before joining them and I machine sewed the zipper down when I was actually meant to sew this at the same time as the bias binding) but it was all very minor. Omitting the interfacing for the lining made a huge difference when it came time to attach the gusset. I think woven interfacing would have been fine too. The use of woven on the handles made it less rigid, so I think this one is down to preference. But I definitely see why the pattern specifies a mixture of interfacing types.
I changed my mind before I starting sewing this and decided to use the pink as the lining and binding fabric because there wasn’t enough contrast between the blue and duck egg. I was a bit worried about having enough fabric for the binding since it did actually need to be on the bias, so decided to make the bias according to instructions. And I see why this is a better method, not just because it saves fabric, but because the construction of it means that I can manipulate the fold to cover the stitch line.
I also decided to try 4 strands of embroidery thread and I think it is the right thickness, the other one was a bit too bold. But trying to remove 2 strands from a long length of thread is a bit annoying haha.
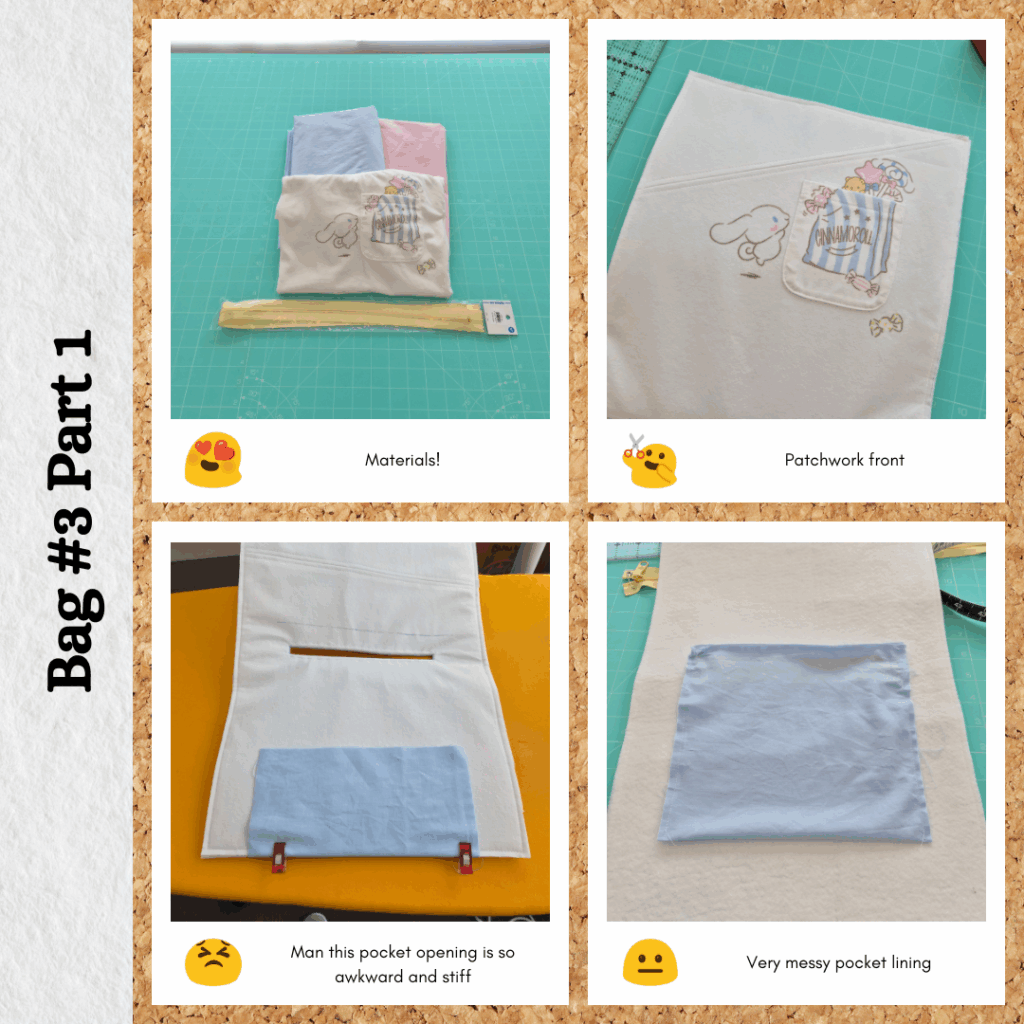
Bag 3
So you’d think this one would end up the best since I’ve had heaps of practice right? But rather, I think I’ve gotten a bit fatigued with the whole bag making endeavour and so made a lot of mistakes hahahaha. But because I’m kinda over it I don’t really care much??? So alls well that ends well LOL.
So this one also needed piecing, but only for the front since the back has no design. No issues with this step.
The first mistake occurred when I added the outer zip opening. For reasons I cannot fathom, I measured from the join and not from the edge of the back piece??? So the pocket is at the base of the bag LOL. I wasn’t planning on using it so not fussed. It was also annoying to sew the pocket bag. I think I understand why there is so little extra on the sides, but it would help to make it easier to sew the bag. But since it’s on the inside I didn’t really try to hard to make it nice and neat. I also marked the zip before cutting it but somehow got that wrong too. Oh well.
I thought I had pockets down fine after Bag 2, but more on that later. Gussets went on fine too.
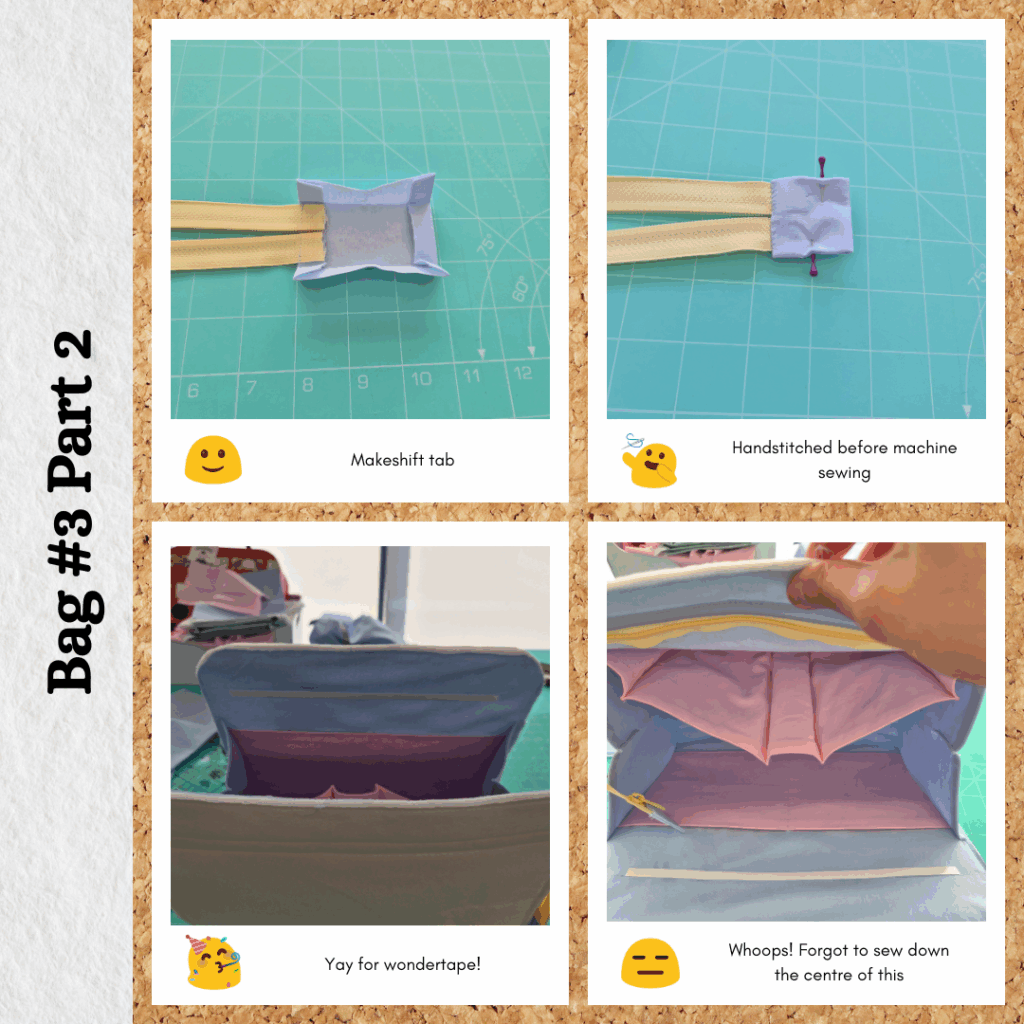
Since I cut the zip so that I could use part of it for the outer pocket, encased the raw edge with some interfaced fabric. I cut a 2×4″ square and sewed 1/2 inch to the zipper end. Then I pressed the sides in to try and match the zipper tape and pressed 1/2″ on the opposite raw edge and folded it over to create a tab of sorts.
Then I used wonder tape to hold the zip in place so that I could align the bias and sew through both at the same time. Which was when I realised I forgot to sew down the centre of the pleated bags. Too late now, I had attached the lining to the main and batting already. I planned to just sew a bar tack at the top but decided to give Fuse and Stick a go instead (ended up doing both).
Given my learning regarding the bias binding, I did normal double fold for this and used 4 strands of embroidery thread again. I had lots of trouble trying to separate the threads and started wondering if I needed to look up a tutorial (???) but came to the conclusion that the problem is probably my thread is too old. I don’t want to just throw them all out though, so I just need to be patient haha.
Reflections
The bag design is really cute! I think they all look quite good and will definitely be useful. The overhanging zips aren’t an issue aesthetically (to me) but we’ll see if they get in the way when trying to actually use the bags.
It was an interesting experiment to learn (by feel) the ways different interfacing behave. I went into this project thinking that the interfacing specifications were a guide and it would come down to personal preference, but I do think they are the ‘correct’ choices, with the exception of maybe the handles.
I would like to make this again but using woven fabrics throughout and not blanket-stitching the binding down (and the correct zip types haha). I would be a lot more comfortable doing an invisible stitch on wovens and was only really doing this because the outer of the bag was a knit fabric. I do think it detracts from the nice clean lines and curves of the design. But I’m happy to have three usable bags and to have repurposed three t-shirts as well as use up a little bit of my embroidery thread stash 😊
Things I learnt:
- Reducing bulk is important in bag making (for my sanity if nothing else)
- How to make a pleated pocket
- First time inserting a gusset
- First time doing a zippered pocket bag (this will be useful for other projects)
- Be patient with old thread (and other materials, I’ve come across a similar issue with vinyl)
- Needle threaders are awesome (and can be super cute)
- Use thread conditioner when doing embroidery (cos why not)
Leave a Reply