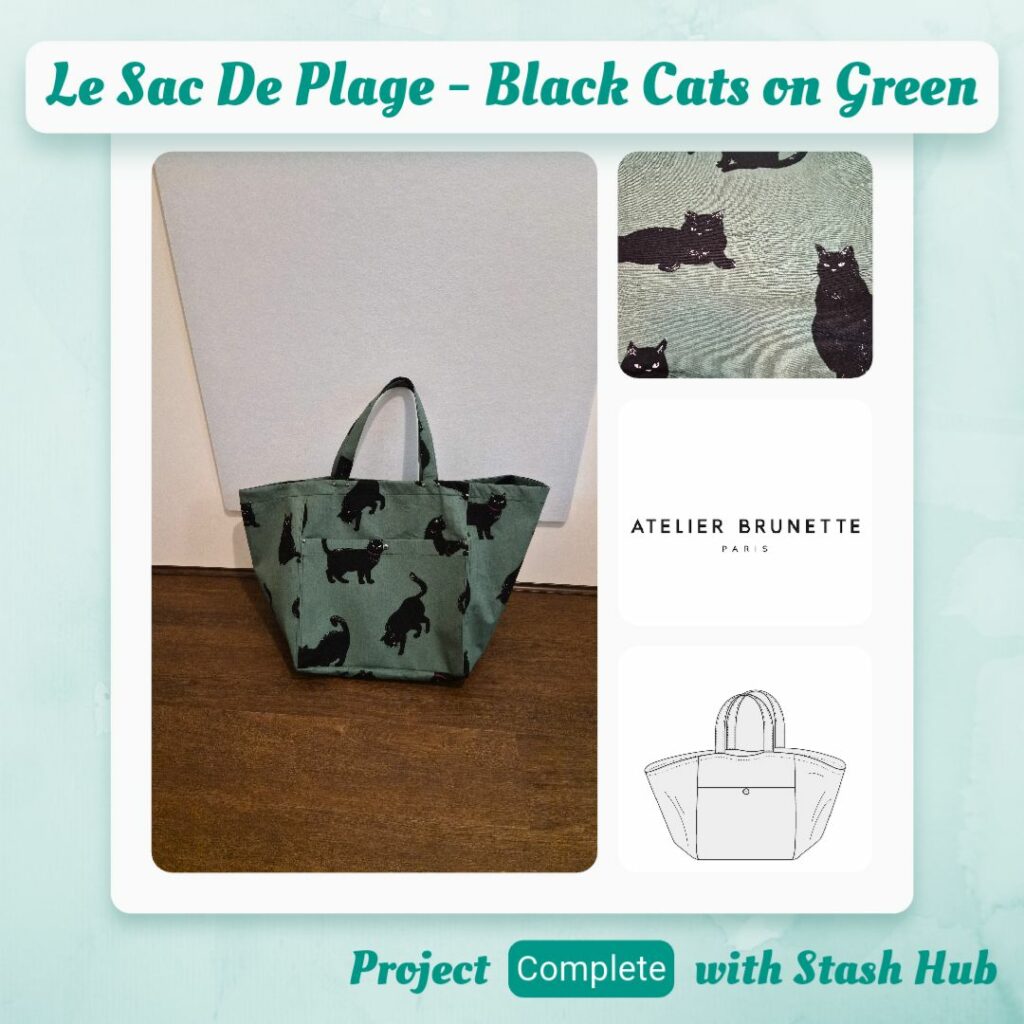
Main Fabric: Black Cats on Green Background (Tomato)
Lining Fabric: Waterproof Polyester – Black (Remnant Warehouse)
Interfacing: Fusible/Iron on Non-Woven Interfacing Heavy & Extra Heavy – White (Homecraft Textiles)
Notions: Rasant col. 4000, Metal Fashion Snap Button (Size 20) – Gunmetal & Double Cap Rivets (9mm) – Gunmetal (Snaps Australia)
I cut out fabric for this project immediately after finishing the Cubistics version, but because I planned to line it, that meant twice as much cutting, so I definitely wanted to do this on a separate day from actually sewing it. This was another classic case of ‘oh I definitely have enough materials in my stash’, except that I only had 1m of the heavy weight and whatever was remaining from the Flower Tote project (extra heavy weight. By the way, I totally forgot I used it for that haha). Luckily between the two I had enough. I decided to use the heavy weight for the body pieces and the extra heavy for the pocket and base.
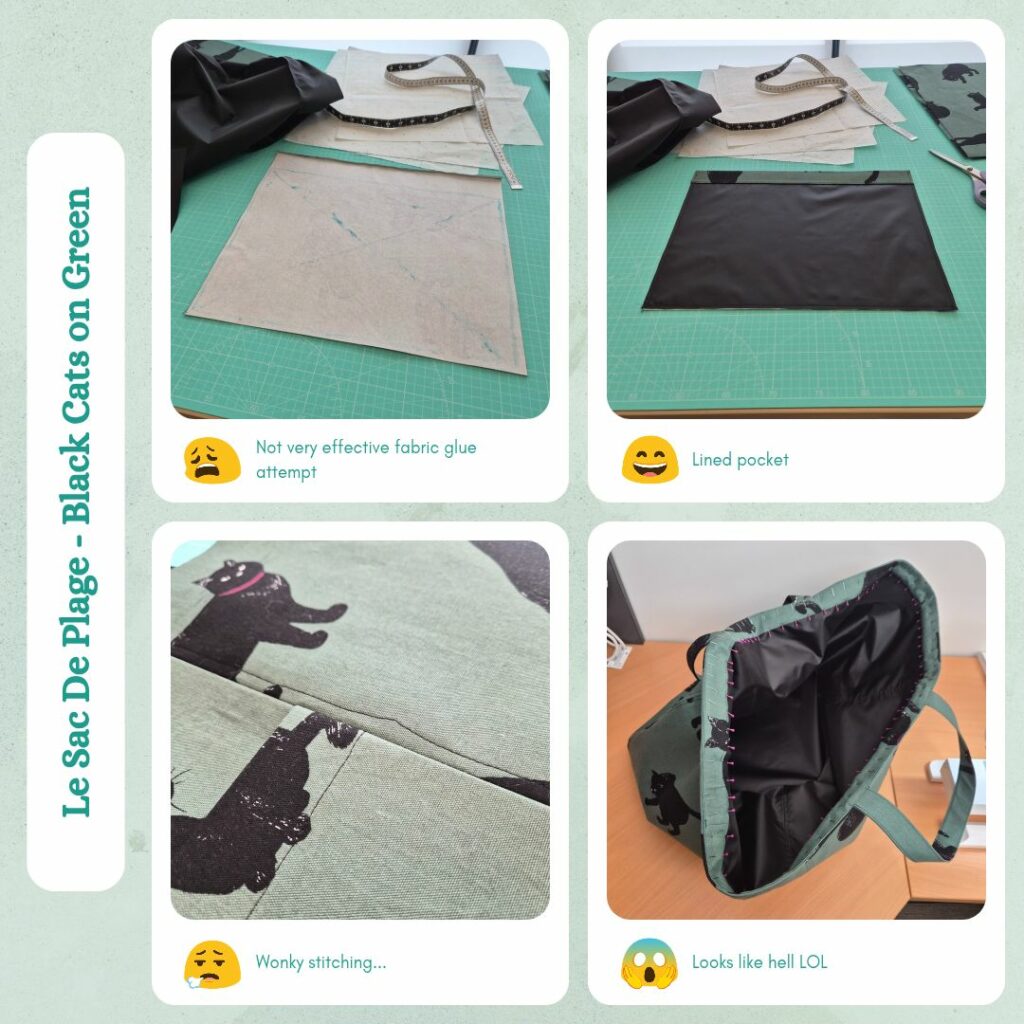
I marked out the pattern pieces on the interfacing with a normal pen, because I thought it would be easier to mark it up before it was block fused to the fabric. Basically I wanted to manhandle the fused fabric/interfacing as little as possible. Wrestling this under my heat press was not quite an ordeal, probably because I kinda knew it was going to be difficult going into it, so my expectations were in check. Since I had marked out the pattern pieces, I was able to cut the fabric excess so that I didn’t need to fight with so much length. The whole process was worth it because the pieces looked very nice once I had cut them out. Although while I was block fusing I did have the thought that I had seen a heavy weight woven cotton interfacing somewhere (Weft & Warp? Circular Factory?) and resolved to use this in future. Then I could pre-apply it with my iron without needing a pressing cloth, and secure it with the heat press. And I’m assuming it would have a bit more drape since it’s woven.
Then a break and onto cutting the lining fabric. I was very much dreading this, but I think it’s because I have made so many fabric boxes, before I had a cutting table or long quilting rulers. I always had an issue where my rectangles would turn out wonky, but not having to kneel on the floor and being able to square everything up helped IMMENSELY. So it wasn’t the ordeal I thought it was going to be. Although I had a near miss where I marked out the base pattern piece 4x instead of the body/side pieces. Thankfully I checked before I cut and was able to add the extra, phew!
So prior to cutting the lining, I had thought very long and hard about how I was going to attach the lining, given this was a departure from the original pattern. I was thinking of doing the usual bag-out method, meaning I would shorten the lining piece and join to the facing to form the full height of the bag. But this would make it tricky to understitch the facing and I would have to close up the hole from the bag-out process, which is doable, but didn’t feel that neat to me. And I actually quite like the effect of the facing from the original. So the only change I made to the lining was to shorten it on the pocket piece to the fold line. The bag lining itself will be basted to the top of the bag and then treated like they are one piece. I was intending to use fabric glue or similar in the area where the facing would lay to make sure everything stayed nice and flat.
As for assembly, I wasn’t lazy and did change the needle to the Universal 80 for the lining. I assembled this all first and it was essentially like making my fabric boxes so was very easy. The only difference was I did use my Clover roller to try open the seams, which helped a little to allow me to overlay my pressing cloth and press with the iron on the synthetic setting. And I know I probably didn’t need to topstitch the seams allowances down, but I really want everything to STAY IN PLACE DAMMIT so did it for my own satisfaction haha.
Then I moved onto sewing the main fabric and switched back to the Denim 100 needle. It seemed to handle the extra thickness due to the interfacing well. I started with the pocket and used the fabric glue to attach the lining to the interfacing. And, it didn’t work that well to be honest haha. Well enough for me to secure the pocket top hem with wonder tape (which also didn’t work amazingly) and topstitch this down, then baste the sides. The results are still better than if I hadn’t used fabric glue so will use it in future still unless I have a light-bulb moment and think of a better way. I also did the handles the usual way and prepared the facing piece. Which I forgot to topstitch the seam allowances down for, but it’s such a narrow piece it doesn’t matter. I will be very impressed if those seam allowances manage to shift haha.
Then I ran into troubles attaching the fashion button. I often get confused about which parts go with which LOL. But even after I got it right, I had two top button failures and I couldn’t figure out why. Especially since the third time worked fine. It must have been a positioning issue, perhaps because the interfaced fabric is so stiff, it doesn’t drape over the die like most other fabrics would. I didn’t use the button square since this is a fully lined back, but realised that it probably still need to be used because now the bottom button is only secured through a single layer of fabric, whoops. Although it is still interfaced so it’ll probably be fine, but I would feel better if it had that extra layer. Lesson learnt…
I had to be very careful when assembling the body of the bag because the print did have a dominant direction and did fine on this count. And decided to be strategic about the process and didn’t sew the very last seam that would make it into a round, because I figured I could more easily press the seams open and topstitch them this way, so would only need to ‘battle’ the stiff fabric-in-the-round for one seam instead of 4. I used the clapper once again to keep the seam allowances open flat. And ran into troubles topstitching the seam allowance next to the pocket 😅 Even though I wasn’t stitching over the bulky part of the seam, the presser foot was half on it and ‘fell off’ at a certain point haha. It immediately made me think ‘this is a job for my yet unused bi-level foot!’. After confirming I had indeed bought said bi-level foot, I had to think about how to manage topstitching both sides of the bi-level, since the foot is designed for the bulky seam to be on the left. So I topstitching the pocket side first, adjusting the needle position to get the offset closer to 6mm (I think it might be more like 4mm). And then aligned the left edge of the foot to this topstitching, so the bulky seam was still on the left and then adjusted the needle to the right to try and match the offset of the first lot of topstitching. And it all worked as intended yaaaay!
Then I did a whoopsie and attached the base to the top of the bag 😣 Despite having marked out the position for the handles on the topside. I guess since I decided to not attach the handles yet (to make sewing the base easier) and I was pinning from the base side, not the bag side, I didn’t notice the marks. Although I should have noticed that one edge wasn’t thicker due to the additional fabric from the base of the pocket. Ah well, unpicking and reattaching it wasn’t too hard.
Then I placed the lining into the bag and pinned it so I could baste the two layers together. Followed by attaching the facing, pressing, understitching and turning to the inside. At this point I resigned myself to pinning the facing since wondertape and fabric glue don’t work well on the lining. Sometimes you just gotta do things the old-fashioned way LOL. Surprisingly I only poked myself about 2 times sewing it all together, and not enough to draw blood. And since it was all rectangular, I was able to keep all the layers in position pretty well. So also surprising that I did it properly first go 😳 I’ll take it!
Then the final step of adding the rivets and all done!
I prefer the structure of this version of the bag, although it does make it look very big! I do think a woven interfacing would be that good level of structure without the stiffness though. I showed my husband and he said the rivets looked like you could snap them together and that’s a thought. Maybe such a wide bag could do with some top snaps, although I probably would add 3 – one in the centre and two either side, halfway between the strap and side of the bag. Also, I got fairly lucky with my pattern placement for the pocket…if it was all decapitated cats that wouldn’t be a good look LOL. Something I need to keep in mind for any projects with large pattern prints.
While I was making this I though of a couple of variations I would like to try. One will definitely be for me, but I’ll need to think of an excuse to make the others 🤣 Although I did show the two versions of the bag to my sister-in-law and so she’s requested one for her birthday, but with an inner pocket as well.
- Quilted main fabric with waterproof lining. This one will be for me and I already know that I can use scraps from another lot of projects. I was originally thinking I could use the gridded interfacing for easy assembly of the squares, but I think it would be stiff since it’s a non-woven type of interfacing as well. It will be interesting to see if bamboo batting will give it enough structure.
- Cotton main fabric with heavy woven cotton interfacing with waterproof lining. I want to see if heavy weight interfacing is good enough to give it the structure I want. I have another large cat print fabric that would be perfect for this.
- Canvas main fabric with light woven cotton interfacing with patterned lining. I want to see if adding a light interfacing to canvas will give it the structure I want. I want to use a plain canvas fabric so I can use topstitch thread for a decorative finish on the seam allowances. And therefore the fun/pop-of-colour will come from the lining fabric, which means that it will probably be a quilting cotton of some sort. I don’t currently have any fabric in my stash that would suit this.
- A Modern Maker’s member reminded me that Decovil is a thing that exists, which is specifically designed for bags. It’s quite expensive though so maybe I’ll just look into this if the woven interfacing doesn’t work out (or is equally as expensive).
- I started doing the Closet Core coat making course and learnt about the existence of weft interfacing. So maybe another potential option since it gives stability while providing drape. Something to try if the woven interfacing ends up being too stiff.
Categories: Sewing
Leave a Reply