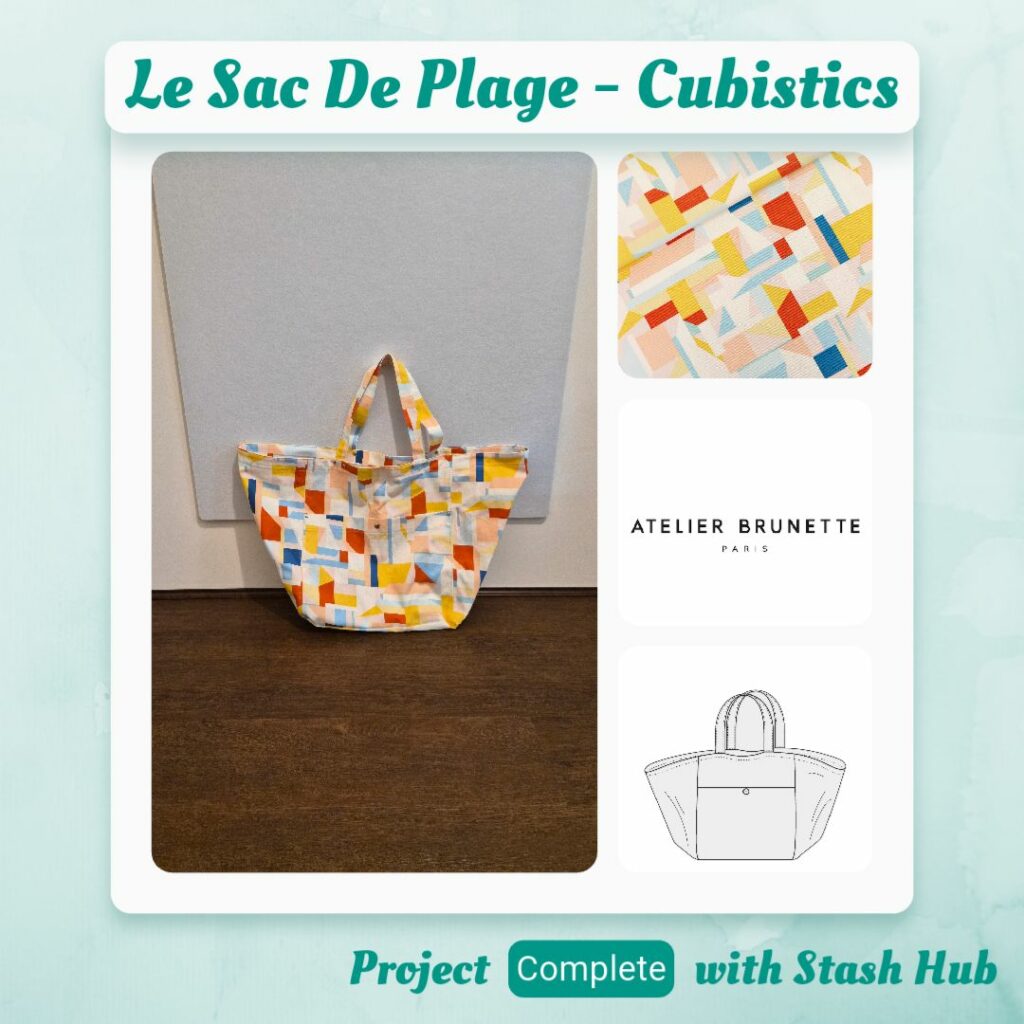
Main Fabric: See You At Six – Cubistics – Cotton Canvas Gabardine Twill (MaaiDesign)
Interfacing: Fusible/Iron on Non-Woven Interfacing Medium – White (scraps, originally from Homecraft Textiles)
Notions: Rasant col. X2000, Madeira Aerolock Overlocker Thread – Super White, Tool Free Snap Buttons – Gold (Studio Mio), Cap 9mm x Stem 4mm Rivets – Gold (Studio Mio)
This is a very belated birthday present for a friend. Recently, we made plans to finally meet up with some friends we haven’t seen since September last year. And it got me thinking, did we actually buy anything for friend-whose-birthday-is-in-October??? And the answer was of course, no😅 Since I was planning on making a Le Sac De Plage for a different friend (whose birthday is in February), I thought I could maybe make one for born-in-October friend too. Bags are useful right? I hope I’m not projecting my own biases onto my friends via handmade presents LOL.
I thought about what fabric to use, keeping in mind that it would need to be something that could be delivered fast. But then I realised, I had the perfect fabric available in my stash. I had bought it to make a Riley overalls wearable toile, but even though I really like the idea of that outfit, the sensible side of me knew I probably wouldn’t really wear it. Which would be a waste of such a nice fabric. And of course, See You At Six showed this particular fabric as a bag in a lot of their promo photos. So I totally was influenced haha.
I was thinking that it might be nice to incorporate flat-fell seams into this pattern, but I didn’t have confidence that my ideas would actually be good, so figured I should just make it as intended the first time. When it came time to cut the fabric out, the geometric design totally messed with my head. So I ended up drawing the pattern pieces onto the fabric starting from the selvedge. And then I tried using my Merchant and Mills heavy duty scissors since this is quite heavy weight fabric. I figured out that this scissors works best for cutting straight lines because then you can lean the bottom of the scissor on the cutting surface and not have to carry the weight with your wrist. But it was still very heavy and I ended up switching back to my normal lightweight scissors, which cut the fabric fine (even better I feel…). I really want to get use out of these Merchant and Mills scissors, but even just using it for five minutes made my index and middle fingers feel sore 🙁 It makes me wonder who these scissors are actually made for. Maybe they will come in handy if I ever decide to work with leather. I feel a bit guilty because they were a gift and they were the scissors that were recommended to my non-sewist friends, but so far I haven’t found a practical use case for them 😣
Then I started setting up my sewing machine and was going to use size 90 Universal needles, but had a thought, would these cut it for this fabric? And that’s when I remembered I had just received my Minerva Fabric Guide! And one of the reasons I bought it was for the needle guidance for each fabric type! So pulled that out and turned to gabardine. Although since gabardine can come in a lot of shapes and forms their guidance ended up being a bit vague (90+ needle), so turned to the internet for something more specific. I wanted to find something that would tell me what size for what gsm, rather than ‘light/medium/heavy’ weight descriptors. I couldn’t find what I was after but I did find website with a table that listed ’twill’ as requiring size 100 for workwear/home goods. That’s sounds about right! So installed a denim needle. Because I’m assuming Universal needles don’t come in size 100. Which I could easily fact check myself on, but it wouldn’t help me for this project since I needed the needle right away haha, so would have to use what I have on hand already. And then double-checked the gsm of the fabric – it’s 310 gm which definitely would fit into ‘heavy weight’ I guess. I just like having numbers sometimes.
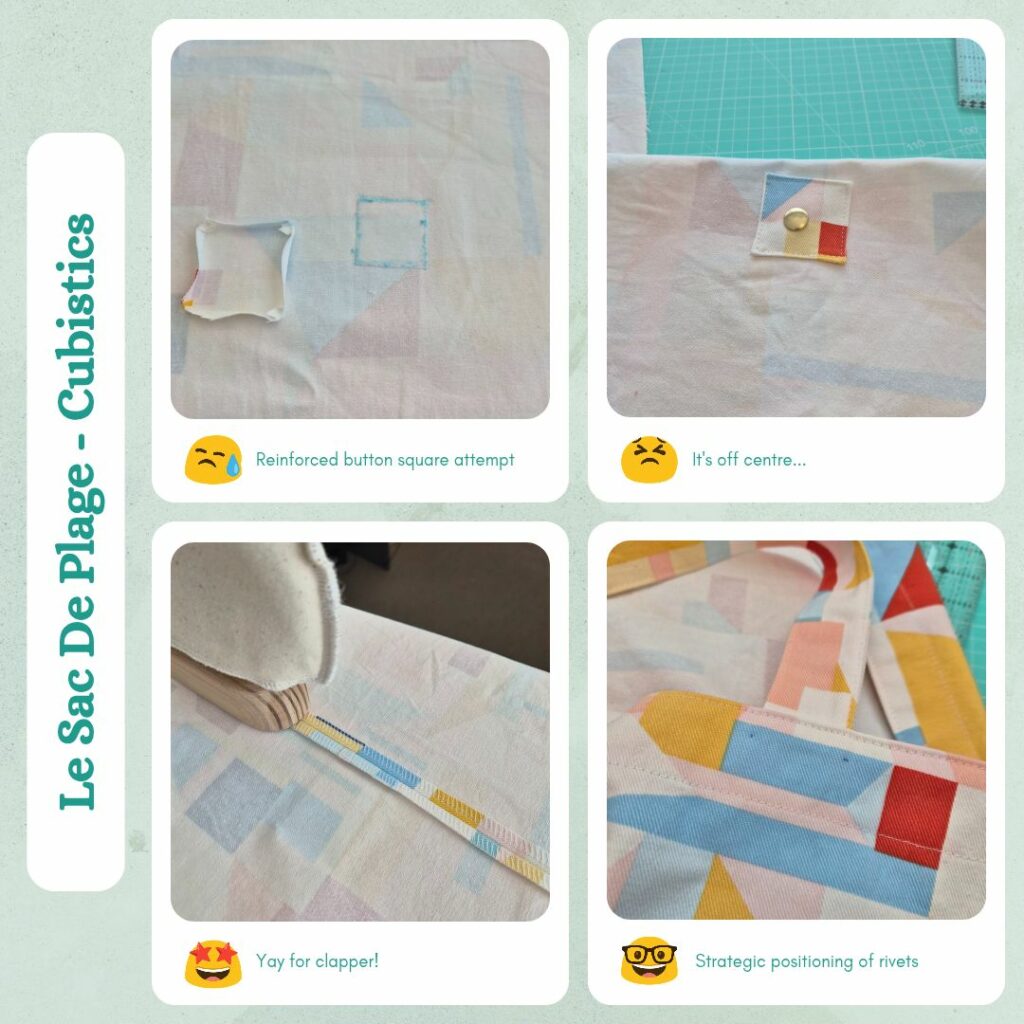
I found the inner button square a bit fiddly. I did the guide stitching but it was hard to get it to stay flat. Maybe using a clapper would have helped, but I feel like the edges would have shifted before I had a chance to clap it. Given interfacing is required on the inside as well, maybe it would be easier to sew the two together and turn inside out and sew that to the inside. Especially since I think next time I will mark the buttonhole through the pocket and front layer and then apply the button square, so that I can make sure the button will be in the centre. Mine is a bit off because I aligned the square to the piece of interfacing I attached (based on the pattern markings), and obviously something was a out of whack. I also tried using the fabric glue since applying wonder tape to such a small piece would be frustrating and I didn’t like it much because I kept getting the glue on my fingers trying to position. So I think my proposed change would help with this as well, I could apply the glue to the centre of the square which would be enough to align it so I could topstitch it down.
For the button I got to use my last gold snap button! Still trying to find a fully metal gold snap button to use moving forward.
No way was I going to try turn out handles on this fabric, so followed their method (which is the same as mine except with wonder tape too) to assemble these. I also decided to attach these before I sewed the bag panels together, because I had marked the placement with a heat erasable pen and was paranoid they would disappear while I pressed the seams open.
I’m glad I didn’t add the extra seam allowances for flat-felled seams because I realised that I wouldn’t want such a bulky seam when I attach the base. And for this same reason, I decided to overlock all the edges (and meticulously secured the ends on the wrong side, no one will be able to tell the difference make it makes me happy that they will be hidden underneath the opened seam) and press the seams open instead of to the side like the instructions say. I did use the clapper for the bulky part where the top pocket overlays the front piece. I understand why they recommend pushing the seam to the side, that way you see only the wrong side of the fabric on the inside of the bag, but I reckon it would be more fun to have ‘feature’ seams. I started thinking about how in future versions. I could bias bind the seams or if I had a coverstitch machine, do decorative stitching to secure the opened seam allowance down (I have coverstitch machines on the brain because I was recently looking up if it was possible to do a chain stitch with a home sewing machine and apparently some coverstitch machines can do this). But for this project I topstitched the pressed open seams 6mm from the seam line. And then realised I had introduced a weakpoint on the front where the pocket top is. So got out my button press machine and added some rivets. I love how shiny the gold rivets are 😁 And it’s ‘bag hardware’ so makes it feel more premium.
I’m pretty used to added a square base to a (*looks up the term* what is a 3D rectangle called lol) cuboid shape because of all the walk-in-linen storage boxes I’ve made, but decided to check their instructions to see if their method is better. I kind of disagree with their order. I prefer to attach opposing sides then move to the remaining sides. If I do it continuously I feel like there is more scope for things to get wonky. It was actually quite simple to attach because I’m so used to attached slippery lining fabric, not structured cotton fabric like this. I realised I should be able to overlock the seam without too much hassle. I’m not 100% happy with the positioning around the curves, but it will do the job. I feel like this is another part of the bag I would like to bias bind instead of overlock and also wonder if it would be too hard to topstitch the seam to the base of the bag? I feel like it would be a painful process but worth it for the stability. Something to look up.
Then it was pretty much just a case of adding the facing! I was a little surprised the instructions didn’t recommend under stitching the facing. I feel like this is a simple way to make sure the facing doesn’t end up peeking out as well as securing the handles a little more. Speaking of securing handles, I also added rivets to these. I didn’t think the rivet shanks would be able to make it through 6 layers of this fabric, so made the insertion hole right at the corner of the handle seam allowance inside the facing.
I’m very happy with how this turned out! I have never bought or held a beach bag before, but given their recommended fabrics include linen (which I’m sure this fabric would be heavier than most types of linen), I guess this is the level of structure intended. The print is nice and cheerful and the metal look button and actual metal rivets make it look a bit fancier than how I would expect a store bought beach bag to look. I may be wrong here. But I have no intention of ever shopping for a beach bag so this will remain a unconfirmed statement.
Categories: Sewing
Leave a Reply