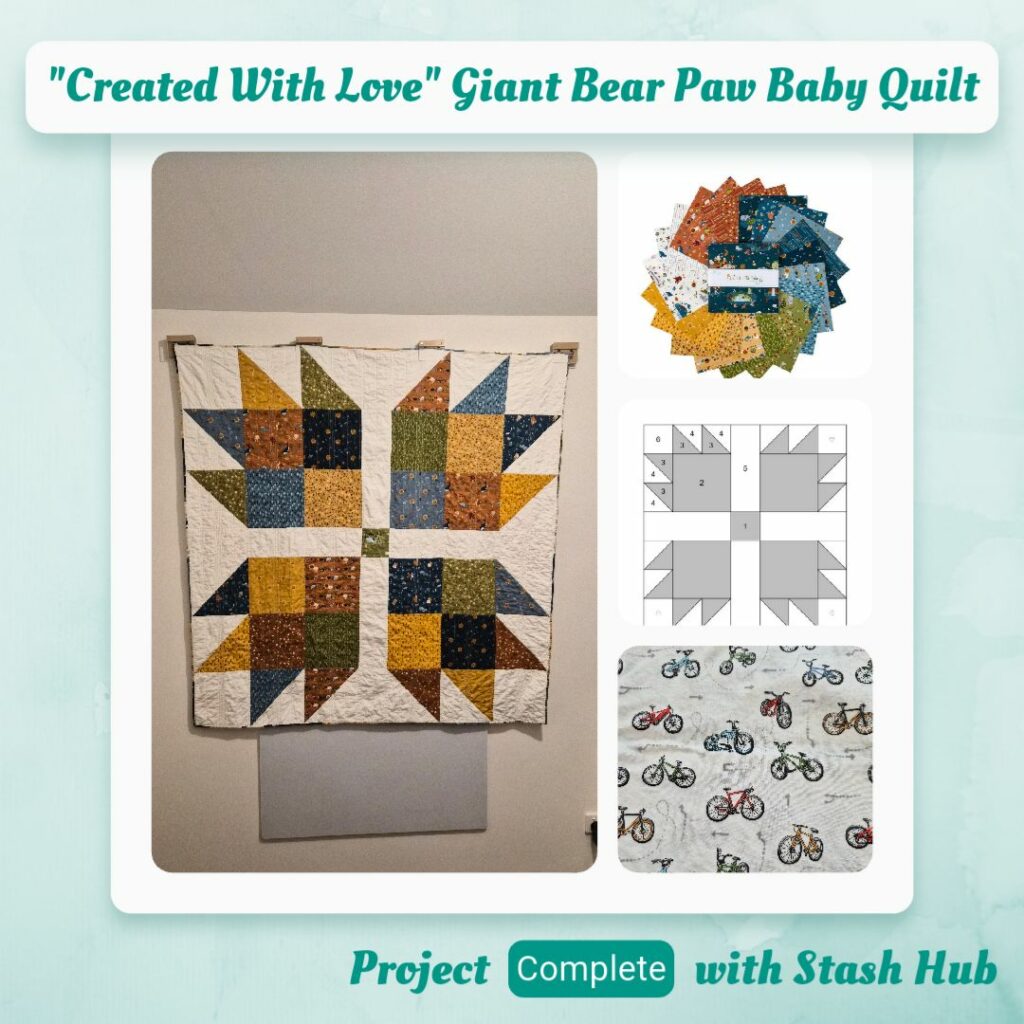
Main Fabric: Created With Love Layer Cake (Cozy Corner Quilts)
Filler Fabric: Emma Louise – Vanilla
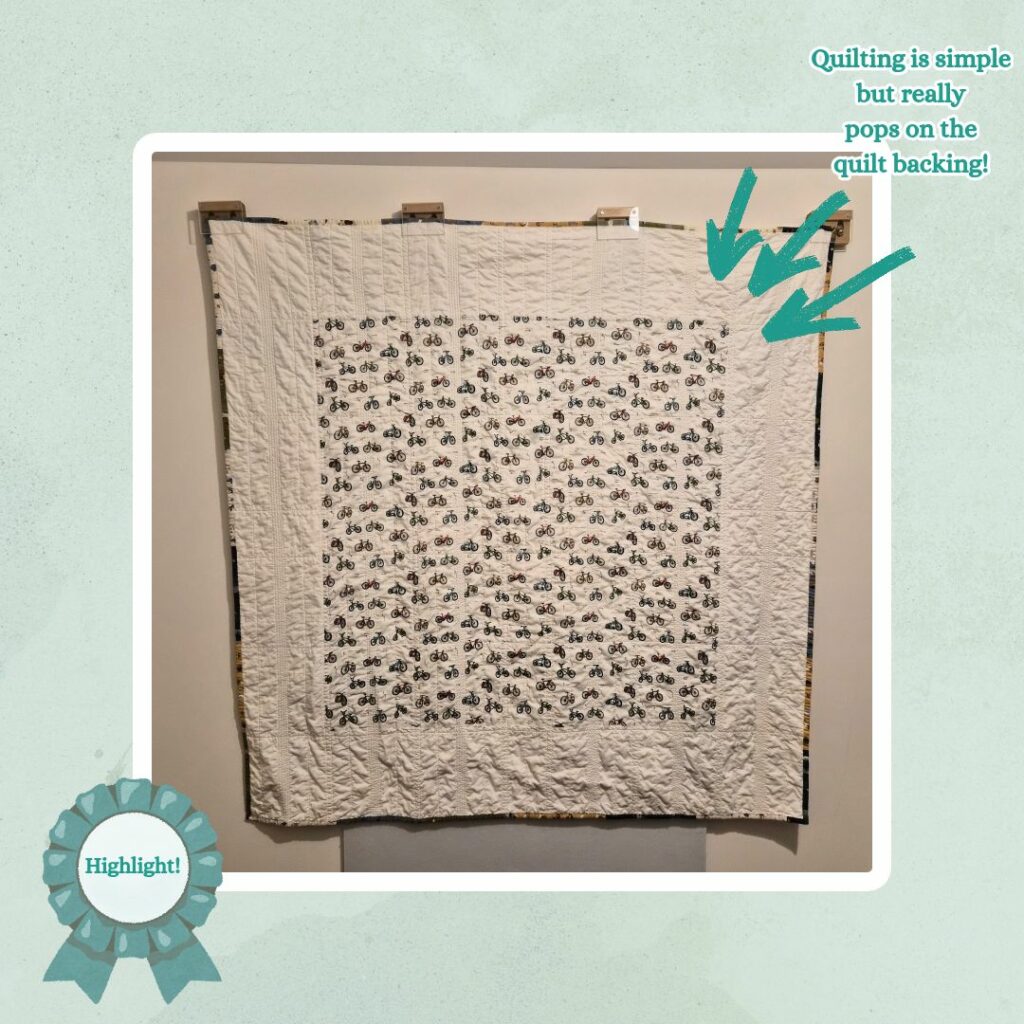
Backing Fabric: Bicycles on White Bikes Cycling on Two Wheels Sport Quilting Fabric (Find-A-Fabric) & Emma Louise – Vanilla
Free-motion Quilting: Straight Lines in Tutti – Lamb
My husband’s other cycling friends are having a baby in May and were included in his request to make cycling baby quilts. The design of this quilt kind of worked backwards from the backing bike fabric LOL. Since we knew the baby was going to be a boy, I knew I probably couldn’t use anything cute or floral (I don’t believe in the blue = boy, pink/flowers = girl, but I feel like this seems to still be the default for most people, so not gonna rock the boat). Which made the bike fabric search trickier…compounded by the fact that my husband said it needed to be road bikes. Like seriously? It’s hard enough finding bike related fabric let alone a specific type of bike 🙄 At least this one seemed to be acceptable… Then I bought a layer cake since the colours seemed to match the bikes on the backing fabric pretty well. What I didn’t realise though was that Created With Love didn’t refer to handmade, it was biblical 😅 I have no idea if these friends are religious or not, so removed all the obviously God related prints.
I was originally planning on using the Creative Grids Crazier Eighths templates but two things happened. Firstly, I was going to start this project on the March public holiday long weekend, but then we found out that the baby shower was actually going to be that weekend… Which gave me just over two weeks to make the quilt. I suppose I don’t necessarily need to have it ready by the baby shower, but it feels weird going to that kind of event with essentially an IOU lol… So time to simplify things. Besides, the second thing was, I have rearranged my sewing room so I have a pretty good idea of where everything is now. But I couldn’t remember where the Crazier Eighths templates were. And then I searched my emails and maybe I hadn’t actually bought it yet HAHA.
Since I had a layer cake to work with, I looked up baby quilt designs for layer cakes. And decided to go with this Giant Bear Paw one. Surprisingly, I actually had the exact amount of squares for this design (minus the centre square) after removing all the biblical pieces. Although I decided to remove the two white squares in favour of a more coloured print, because the white wouldn’t stand out against the filler fabric enough.
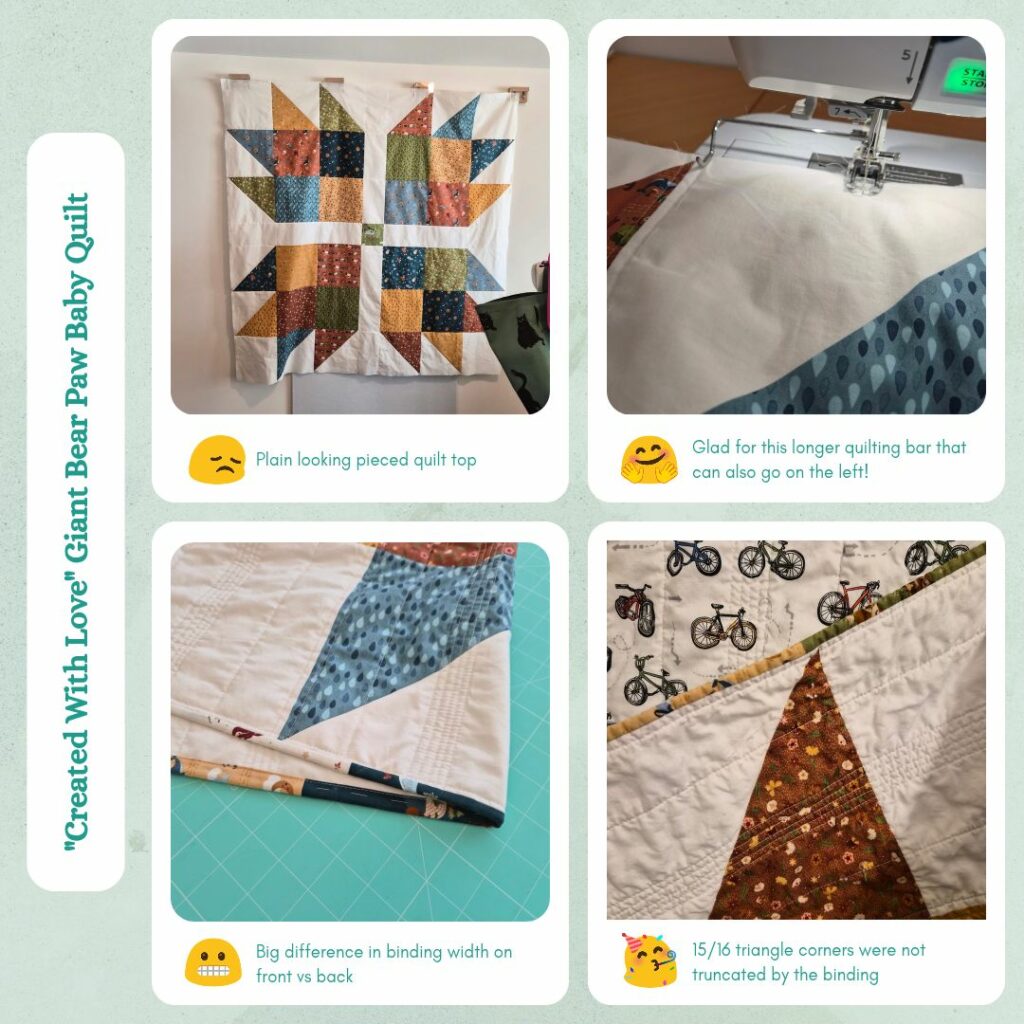
My construction method for this quilt was a bit different to usual because it was a single large block. Also, some of the prints were directional, so I pinned entire rows together, whereas usually I would chain piece. This was to make sure I didn’t accidentally rotate any prints or piece the wrong prints together, since I was going for a deliberate random placement (no placement of print design or print colour directly adjacent). And I would usually lay out all my blocks to figure out placement, but the blocks were too big, so took a bit of a leap of faith and designed it as I went. I figured that the directional prints and my two placement rules would limit the arrangement (and I was correct).
For the half square triangles, I wasn’t too sure how to do a 1/4″ seam from the centreline, so just marked out the diagonal line as well as 1/4″ offset either side using a Frixion pen. But then I went to change my presser foot and ended up using the Adjustable Clear View Foot, which has markings on it for 1/4″ 😝 Ah well, there weren’t that many squares so it didn’t take that long to mark them up.
I assembled the top and bottom halves and saved the centre row til last because I wanted to choose a fabric that would be different enough from the 4 blocks diagonal to it. And ended up going with a green biblical one, that was cut specifically to cut out Adam and Eve LOL.
The final top ended up being a bit underwhelming imo…it felt…kind of plain? This might just be my preference for more going on visually.
For the backing, I cut the bike fabric to be square and added sashing around. This time I decided to try be more economical with the batting and cut it closer to the backing piece dimensions. Usually I cut a huge amount of excess which I then trim off. I thought I gave myself quite a bit extra but it ended up being really tight… But I don’t think I will be doing anymore quilts with a sashed feature print for the backing, so in future won’t have to think about lining up the print in the centre of the quilt back, which means I can go back to having a lot of excess which will make things easier/less stressful.
Because some of the prints were directional and in order to do ‘fast’ quilting, I decided to just do vertical lines. I didn’t want it to be boring and uniform though, so wanted to group bunches of lines for some visual interest. I also wanted to test using variegated thread. I had bought some Tutti thread for an upcoming project, but in the meantime had discovered Invisafil, which I think would be more appropriate for that project, so used it for the quilting of this baby blanket instead. The variegation is super subtle, I can barely notice the changes in colour. I don’t know if that is a good or bad thing haha. I started by securing the layers with 6mm offset stitching from the patchwork seams. Then I sewed a line in the middle of each block and 6mm offset stitching on this centreline. Basically I was paranoid I wouldn’t have enough Tutti haha. But I had plenty so did another lot of 6mm offset stitching for a set of 5 lines. Then I did a single centreline between this 5-line-set and the original offset stitching from the seamline. I measured the distance to find the centreline and marked with a Hera knife at the top of the quilt. And then used my quilting bars and positioned these based on the original offset stitching. And used this for the rest of the centrelines. I felt better about the design of the quilt once the quilting was done, it was enough to elevate it from ‘boring’ haha.
To prep the edges for binding I used a 3 thread overlocker stitch to hold everything down. This was thin enough to be concealed in the eventual 6mm seam allowance of the binding.
Since I had so many leftover layer cake squares, I decided to make a very colourful binding by piecing these together. In order to not lose too much fabric I didn’t cut or join these on the bias. I had a very fail moment when trying to calculate if I would be able to make enough binding from the number of squares I had, where I forgot how to convert cm to m LOL. But it ended up fine, I needed around 6m of binding and I would be able to make around 10m. Since I had so much extra I removed all the pieces that had Adam and Eve again haha. And the amount I ended up with was good, plenty extra but not a crazy amount that I felt like I wasted fabric. I was careful when piecing the binding, to join ‘dark’ colours with ‘light’ colours so that it alternated. And when it came time to attach the binding, I tried to make it so that the mitred corners would fall in the ‘middle’ of a strip so that it wouldn’t be too bulky. Although it couldn’t be helped with one of the corners, since that’s just how everything fell into place… I cut my binding based on the Sew Fast, Sew Precise guidance, although I didn’t end up using this method since my materials weren’t the appropriate colour. One day I will be organised enough to apply this method. My binding ended up being way too wide, but it’s not a big deal. Since the foldover was so wide compared to the front (6mm), I decided to topstitch it from the back (usually I stitch it down from the front, which is always a bit of a gamble in terms of if it will catch the backside at the appropriate places). I used the ditch foot and offset the needle position by 1.0 and I think it was fine. I was planning on using the Tutti for the binding too, but since I was sewing it from the wrong side and I couldn’t be bothered winding a bobbin with the Tutti (or testing if it works well as a bobbin thread), I just used normal Rasant.
And with the binding, I feel like the quilt actually comes together quite well! I guess because the pieced design was so simple, it needed the visual interest of the quilting and busy-ness of the binding.
I learnt a couple of things from this project. One is I think charm squares are my preference for largest size fabric block (as in non-pieced block). Another is I should use my Math for Quilters booklet for binding widths, I definitely made it too wide this time. And I need to be pickier in terms of fabric selection. I chose this layer cake because the colours matched with the backing. But the shades weren’t really to my tastes, so I didn’t enjoy making this quilt that much because I wasn’t fond of the colours. So even if I’m making something for someone else, I need to make sure I love the fabrics and design because otherwise I don’t fully enjoy making the project 😅 I guess since it’s my time I’m investing I need to be more selfish so I enjoy the process.
In the end though, I am satisfied with this project. I learnt some things about myself and my preferences and the quilt itself looks nice in it’s completed form. And at the end of the day, it will be useful regardless of the design.
Categories: Quilting
Leave a Reply