Planning and Design
Planning
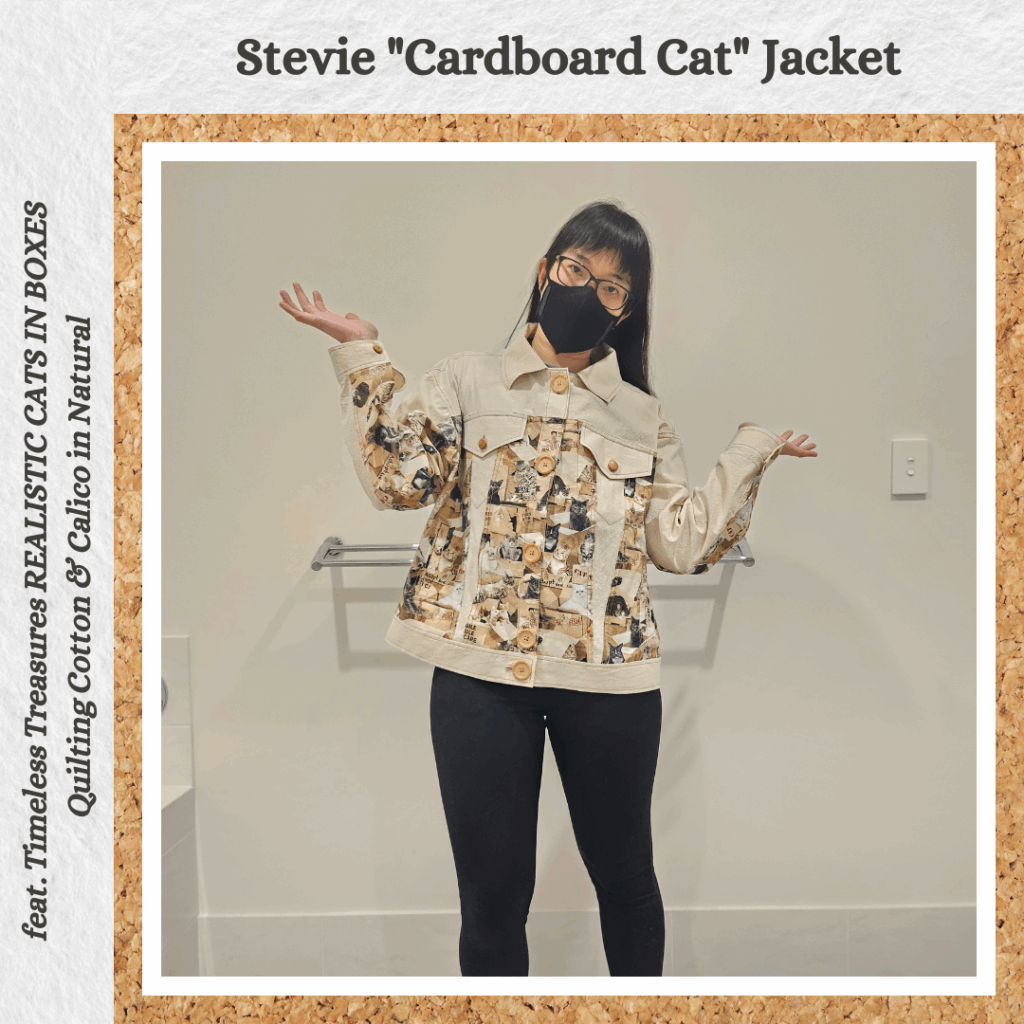
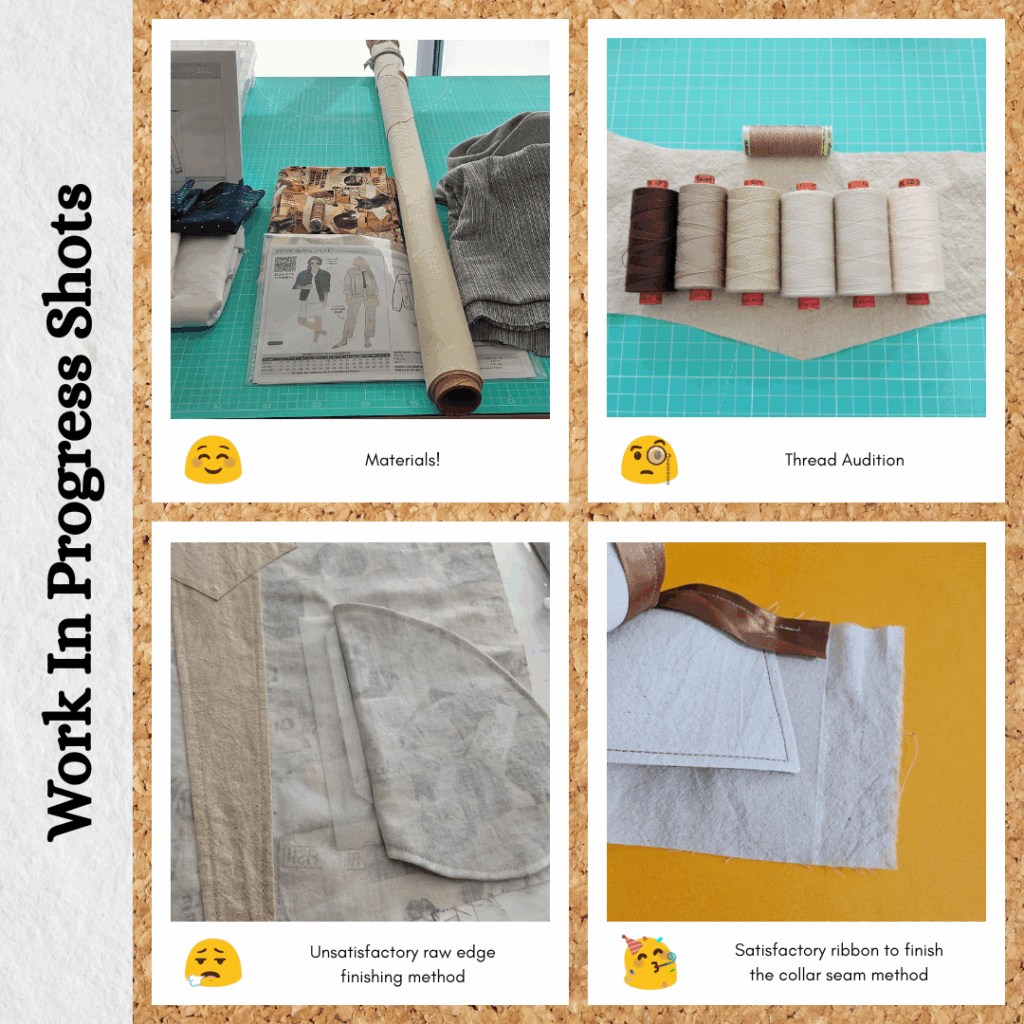
Another wearable toile! I was wondering what fabric I could use for a toile and decided on some quilting cotton my husband brought back from Japan. The pattern is too large to be given justice in the kinda blocks I like to do for quilting so decided I should use it for a craft box or something. But then after browsing Dangerfield with my SIL I realised it would probably work in a garment too 😝 Since I want to do contrast sides for the real deal it also worked well since I only had 1m which isn’t enough for a full garment. To keep with the cardboard theme, I decided to pair it with the calico I have in my stash. Plus calico is quite sturdy, not as much as denim but good enough to be representative imo….or so I thought 🤣 Calico is always a lot thicker in my memory haha.
Pattern Preparation
I had run out of the last sheet of dot-and-cross pattern paper so brought out a new sheet to iron and use. And it occurred to me that the width of the paper was about the same as the A0 pattern sheets. So I decided to try cut a piece equivalent to A0 and just iron that and place directly on top of the pattern sheets and tracing out as per the sheet. Usually I try to maneuver the pieces to save paper, but honestly my innate tetrising ability is pretty low lol. I never feel like I actually save much.
This approach was really good for a couple of reasons:
- In the past I would iron out the creases and store the dot-and-cross paper on a roll. Rolling up that much length of paper is a pain in the ass and it always ends up crooked. Plus afterwards it remembers being rolled and is really hard to get the paper to stay flat 😣
- At least with this pattern (Style Arc in general I think), there is sufficient white space around each piece which gives me room to increase seam allowances etc. Previously when I was trying to save paper I would often forget to give myself this extra space resulting in more waste rather than savings…
- With the exception of one piece, everything else was aligned to the grain which saved a lot of time trying to align pieces to the grain (might as well since the paper is gridded, it makes it easier to align pattern pieces on the fabric later too)
- I don’t have to iron a huge long piece of paper while being paranoid I’m going to rip it 🤣
In the end, I think I saved just as much paper as I would have using my old method (by keeping the decent sized offcuts) but saved much more time and sanity haha. I was planning on buying a roll of the paper once my stash had run out but I think I’ll stick to the folded packages. I just need to buy a large folder to help store the offcuts flat 🙂
As for the pattern pieces themselves, I realised when making the Stacie Jacket that I often forget to transfer markings cos I don’t see them… So I tried highlighting them this time around and see if that helps at all.
I increased most of the seam allowances to 1.5cm for flat-felling but wasn’t sure what to do about the top pocket so left those as 1cm. I figured I can review it once I understand how that pocket is constructed.
Materials
- Pattern
- Stevie Jeans Jacket (Style Arc)
- Fabric
- Timeless Treasures REALISTIC CATS IN BOXES Quilting Cotton (Japan)
- Calico – Natural (Homecraft Textiles)
- Buttons
- 6x Woodgrain look buttons 18mm (Stash)
- 6x Beige buttons 30mm (Stash)
- Wooden Buttons / 2 Hole × 2 17mm (Buttonmania)
- Thread
- Rasant col.
- Gutermann Topstitching Thread col.
- Interfacing
- Non-Woven Interfacing
Fusible/Iron on Fine Light – White (Homecraft Textiles)
- Non-Woven Interfacing
Sustainability Check
👍 Quilting cotton and calico are both 100% cotton so biodegradable
👍 Wooden Buttons are also biodegradable
🤏 The other buttons are likely plastic but are reused from other projects
🤏 Rasant is OEKO-TEX but not biodegradable
👎 Gutermann thread is polyester
👎 Interfacing is polyester
Construction
Fabric Cutting
I really need to get more washers to act as pattern weights. Also, I had a derp moment awhile back and bought an Olfa rotary blade instead of Fiskars 😅 Cue me googling if I can still use it…seemed ok. I do feel like it’s sharper than Fiskars which checks out. When I was researching top end rotary cutters, the consensus seemed to be either Olfa or a very ergonomic brand. I’m very used to the form factor of my Fiskars so will continue with this brand (as well as buy the right blades for it lol) but when it dies I think I’ll replace it with an Olfa.
Interfacing
I had a ‘whole roll’ of calico but when I pulled what was left off it wasn’t that much 😱 So I ended up scrounging for fabric 😅 Other than the side panels and bottom sleeve, anything else in the cat print was out of necessity 🤣
Since I was making the most of what little fabric I had, I couldn’t block interface. So applied it after the fact. I got annoyed at having to scrape glue off my teflon sheets between presses, so decided to try using some of the baking paper my mum gave me ‘for craft purposes’ since she didn’t like it for actual baking. Thanks mum haha, it worked a treat.
I also partially interfacing the cuffs, waistband and front band since the calico wasn’t that thick. When using denim I won’t interface anything.
Getting Started With Topstitching Thread
I decided that I should get into the habit of reducing stitch length for all corners. I forgot to do this for the first pocket flap so started from the second flap. Guess who had to go back and sew over all the corners using 1.5 stitch length after poking holes through the stitching while turning right side out 🙃 I guess it reinforces that it’s a good habit to get into haha!
I had to think carefully about which side to sew my seams from since I needed to ensure the topstitching would be visible when I flat-felled. Luckily this was made easy by the contrast fabrics, sew with the cats on top 😁
I ran into problems with topstitching the pocket flaps. I wanted nice straight topstitching so switched to my quarter inch foot. My machine had a conniption and I couldn’t figure out how to stop the stitches skipping or the thread fraying 😳 I googled why this might be the case but I was already using a topstitching needle and my previous seams were all fine with skipping 😣 I even rethread both top and bobbin threads and switched needle but no luck. It felt so weird since everything was working perfectly before… So I switched back to the default needle position and everything was fine! Good lesson to learn…my machine can’t handle topstitching thread that is heavily offset from centre. Glad I realised this on a toile. Also glad I don’t need to find an alternative to Gutermann topstitching thread (people online were saying it’s no good cos it’s loosely twisted) because it has a good colour range and I can actually get it from my local sewing store.
But…maybe it would be good to get an edgestitch foot. I thought I could get away with my ditch and quarter inch feet but not if I’m restricted with needle placement.
Buttonhole Issues
I did a test buttonhole and it was fine except for the part where I accidentally ripped the buttonhole with my seam ripper because the thread is so thick that the inner area for ripping is smaller.
Then I tried it for real and had skipped stitches and thread shredding. I figured it was because the thread is so thick it doesn’t go well with the skinny and small stitches of the buttonhole stitch. No matter! I can just manually sew the buttonholes using a zigzag and bartacks right? I looked up the tutorial I followed for the Beatrice Peacoat but ended up with more issues 😅 Firstly, the zigzag stitch insists on starting with a locking stitch. Which is guaranteed to cause issues with the topstitching thread. So just do the locking stitch with no top thread and thread it after right? Even though it’s a pain in the ass. Nope, even at a wider and longer zigzag stitch, topstitching thread says NO. So I googled ‘sewing buttonholes with topstitching thread’ and the first result was from Closet Core. I trust Closet Core, oh their article is about handstitching with topstitching thread, ok then let’s abandon machine stitching then 🤣 Sort of. I did a buttonhole using Rasant in the matching colour and then did the decorative blanket stitch by hand. Because I just don’t feel good about handstitched (by me) things.
I also took the chance to try and understand how alignment works with my buttonhole foot. Cos I feel like it’s always offset from my marking. For the tabs, I offset the marking point to the right by 1/8 inch. And it worked out pretty well! Then I tried the same thing on my pocket flaps. That did not go well. I’m so confused… I think maybe the issue is I try to align my marking straight against the markings on my needle plate. But I might need to align it to the edges of my buttonhole foot which often is on an angle due to the little tab thingy you have to pull down for it to work. So for now, I think marking out the centre and side lines for each buttonhole will hopefully help me figure out what the issue is…
Back to the decorative topstitching. The knot I tied for my first attempt came undone 😅 So I tried the embroidery technique where you start the tail further away from when you sew and end your tail in this way too. But it made me paranoid that the decorative stitching could come free… So I decided that maybe I could do the real buttonhole using fusible thread, blanket stitch by hand (with the tail method) and then iron to fuse the topstitching to the buttonhole? Worth a try. Also it seems to be better to not use the Thread Glide when doing buttonholes.
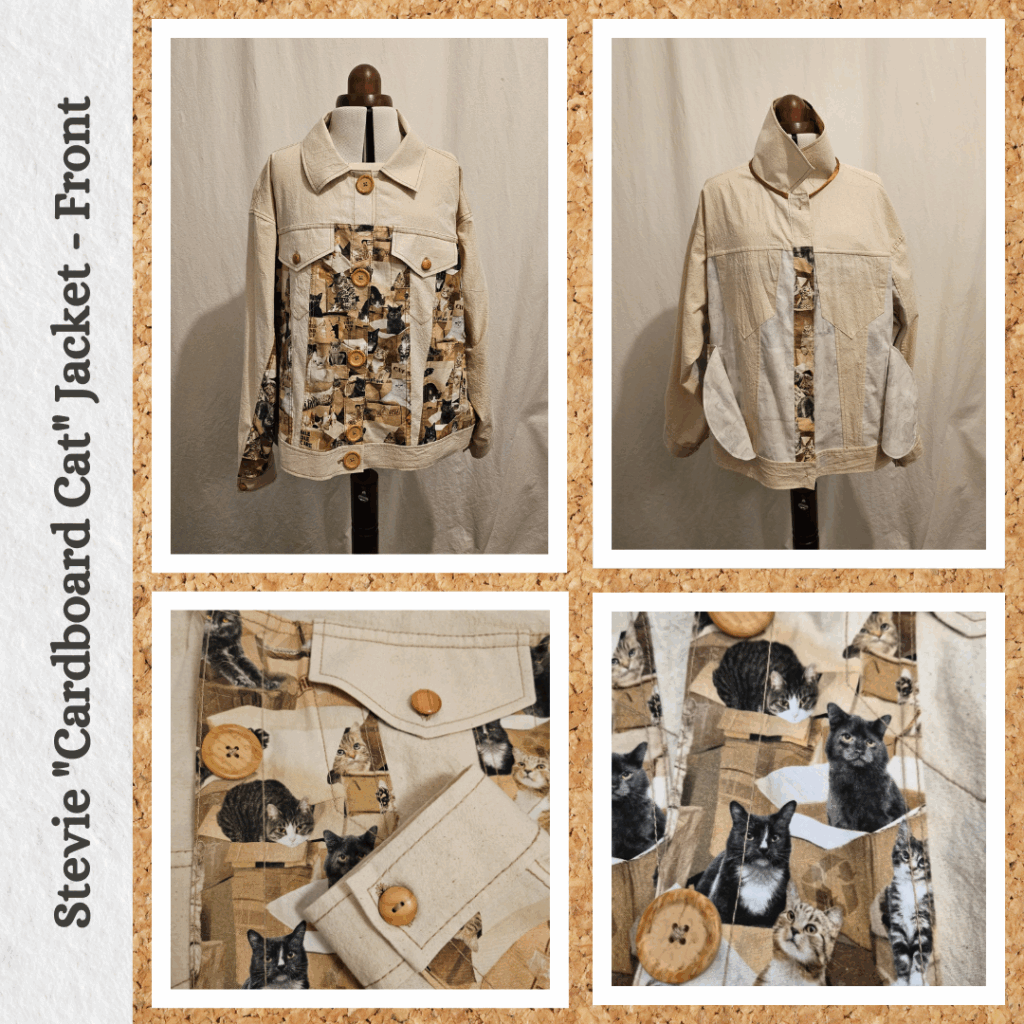
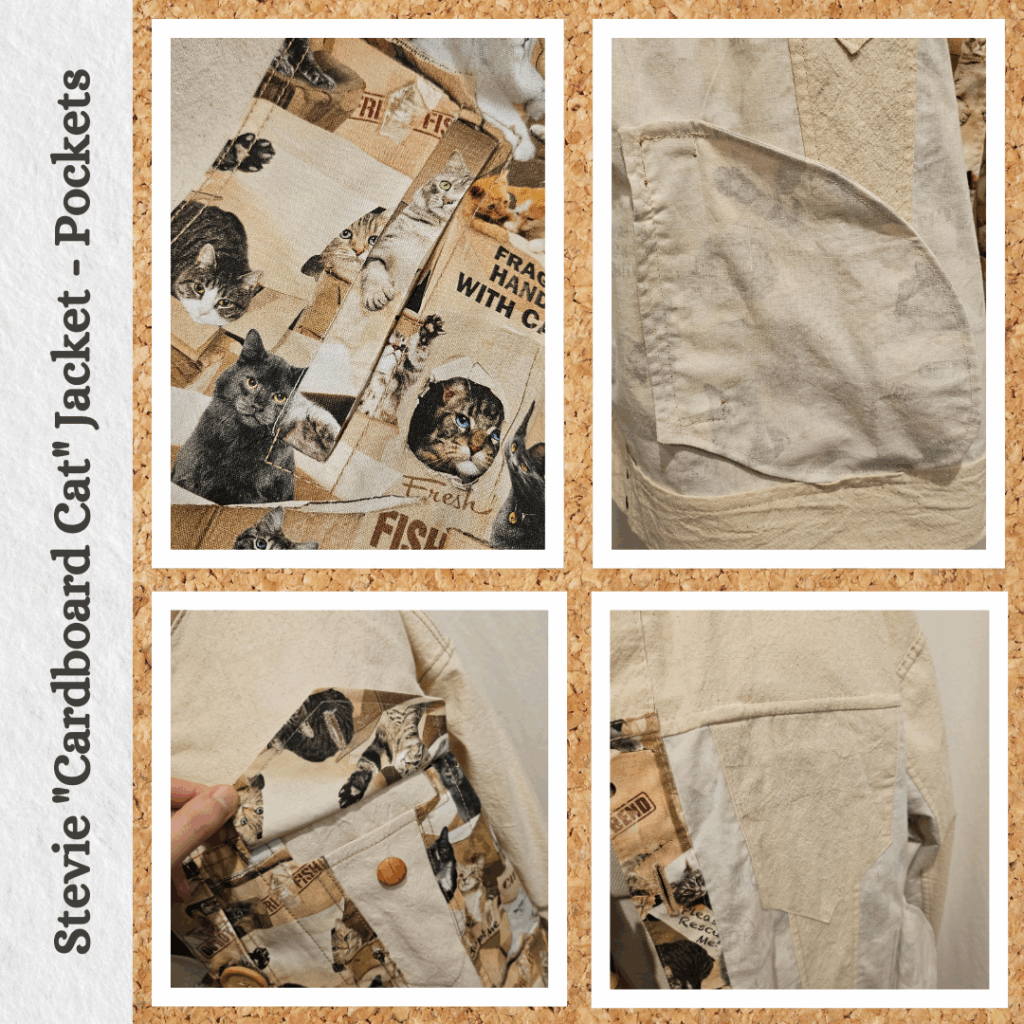
Top Pocket
This was an interesting design. I thought hard about how to avoid raw or overlocked edges. I decided to pre-iron 5mm from each edge of the pocket bag piece in preparation for turning under. I also turned up the facing edge and topstitched it to make it nice and neat even though no one would see it 😊
In order to try make it even on the outside, I measured the middle point of the calico panel and aligned the pocket point to this. I basted it from the wrong side to use as a guide for topstitching on the right side. It made me think of how water soluble thread would be really handy in this scenario.
I’m also going to increase the allowances to 1.5cm so I have more wriggle room with the turnover.
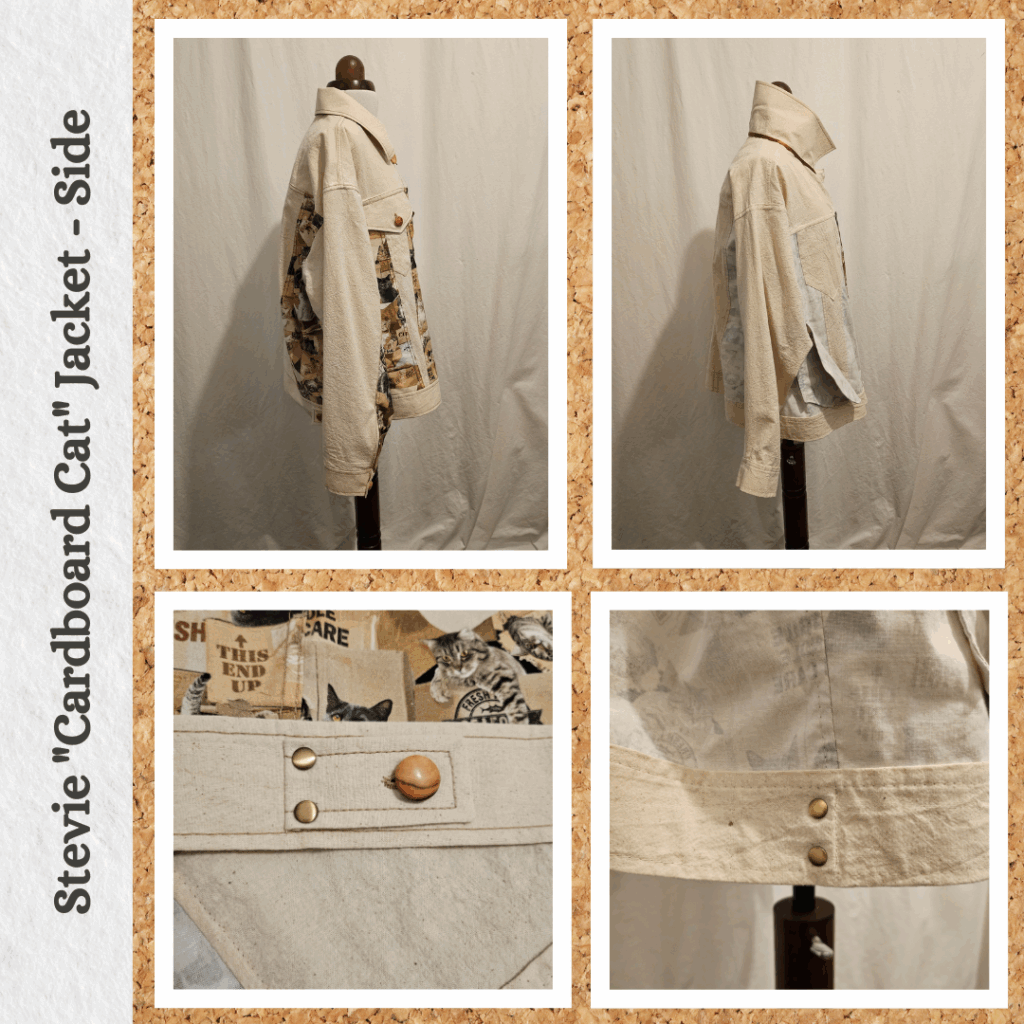
Bottom Welt Pocket
- If in doubt, make pattern piece seam allowances 1.5cm not 1.0cm. That way I can just trim the piece if I’m wrong and not have to redraw the entire piece again 😅
- I used Gutermann Jeans thread in the bobbin for the Stacie Jacket but definitely no point even trying for topstitching thread LOL. Probably would destroy my machine LOL.
In order to achieve my all-concealed-seams goal, I googled if it was possible to make french seamed welt pockets and found this awesome tutorial by Catherine Daze. It assumed you were familiar with welt pockets which I kinda am not, so I also referred to this tutorial by The Shapes of Fabric to sanity check what I was doing. Plus it seems like a handy guide for future projects.
I have no confidence I’ll remember what I did so wrote down each step:
- Mark out welt opening on front with removable marker
- Sew over the welt box and centre line (using water soluble thread?)
- Apply interfacing to back using stitch marks as a guide
- Sew welt to front, matching raw edge with centre stitch guide (not overlapping) and leaving 1cm overhand either side. Turn over to wrong side and stitch a 1cm seam, making sure to match the outer stitch marking and making sure to leave 1cm overhangs free (not stitched down).
- Mark centrepoint of the welt.
- Mark out fold line on the pocket bag piece and centrepoint.
- Line up the fold line to the welt raw edge and match centrepoint to welt centrepoint. Pin from the front to ensure pocket piece is laying flat the turn to wrong side and pin from this side (the side to be sewn from), then remove pins from the front side
- Sew from the wrong side using the stitch marks as a guide. Trace over stitch marks first if they are not prominent enough. Remember to reduce stitch length at the corners
- Mark the Y cut marks within the welt box.
- Cut through the centreline (use a rotary blade) and use scissors to cut to the corners along the Y cut marks. If the welt is lined up correctly it will not get trimmed in this step.
- Turn pocket bag to back and press well
- Turn pocket bag back to the front and attach the pocket bearer piece with a 6mm seam. Ensure the welt piece does not get caught in this seam
- Trim the seam and turn pocket to the back. Press and sew a french seam to finish the pocket bag seam. Ensure the top welt piece is laying flat and capture this in the french seam. However make sure not to catch the bottom of the welt piece (should be too short to be an issue).
- Trim the welt box seam allowance underneath the pocket bag so that when the welt pocket is topstitched from the front this seam will be fully encased.
- From the front baste down the welt and mark 6mm along outer edgefor topstitching
- Leave a long tail (to bring to the back to secure) and topstitch along the marking by turning the handwheel and using the hump jumper when required. It’s super important to use the handwheel and go slow to avoid shredding the topstitch thread or creating a birdsnest with the bobbin thread… Pull tails to the back, tie top and bobbin threads together in 2-3 knots and thread the tails into the pocket seam to conceal the ends.
The first one I sewed you can see the stitch markings on the right side (hence should I use water soluble thread? I don’t want to handbaste because I don’t think it’s a good enough guide for me while I’m at this low skill level). The second one I overlapped the welt over the centreline wondering how bad the gap would be in the resulting finished welt.I suppose it’s not that bad given the pocket fabric is matching but the proper way is better.
Also, it’s technically not fully encased seams. I wonder if I missed a step somewhere… The long edge I could probably bias bind if I cared (more bulk…) but not too sure what to do about the little triangles at the top and bottom of the welt 🤔 I suppose they get secured a little bit by the topstitching? In the end I remembered I had fusible tape from when I was using the Low Fat Quilting Method so used that. I remembered it incorrectly (thought it was double-sided fuse) so was going to fuse the pocket to the front to encase the raw seam but ended up being able to use cover the seam with the tape 🙂 We’ll see if it works out or not. In hindsight I should have at least graded that seam though.
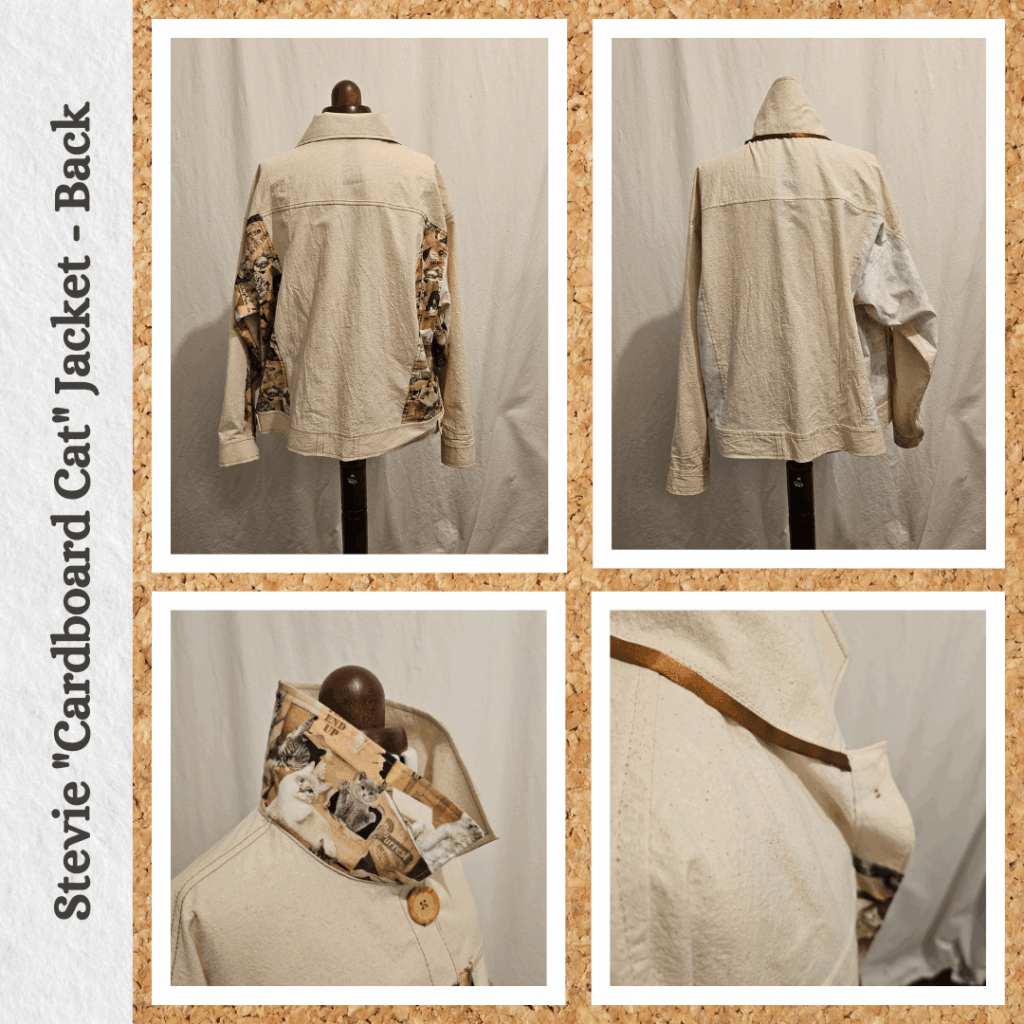
Collar
At this point I had almost run out of topstitching thread haha. 30m doesnt go far, note to self for future projects. So did things a bit out of order so I could do the parts that didn’t require topstitching thread.
Stevie has a very similar collar construction to Stacie which meant I could test out my bias method 😁 I used some random ribbon from my stash (it probably came from a very fancy box of chocolates or something haha). I waffled a bit on where to start and end the ribbon and decided to avoid the fold-over area to reduce bulk. I think I will change the collar seam allowance to 1.5cm too. I should have handbasted the ribbon after folding it over but I figured it’s not a big deal if I didn’t catch parts since I plan to topstitch it from the front at a later stage 👍
Finishing the Front
I thought I needed to trim the pocket area on yoke for nicer flat felling. But instead it just made it harder to fold over ☹️ So I didn’t trim it for the otherside and it turned out much better. Also had to hand stitch it down before topstitching because the thickness made it so unwieldy. I think for the real deal with denim I should probably increase the seam allowance to 2cm so that it makes these parts a bit easier. Given the oversized boyfriend style, wider flat-felled seams won’t look out of place.
For the front placket I used the water soluble thread before topstitching, let’s see if it works out as I am hoping 😝 I used a new finger guard from Studio Mio and is awesome and grippy. The closest I have gotten to being able to sew like when I use no finger guards.
I did the inner straight topstitching first so I could bring the lose ends to the back and hide them in the ribbon bound collar edge. I figured this was they would become super secured by the rest of the topstitching.
Sleeves
I was a bit worried that I wouldn’t be able to flat-fell the sleeve seam due to the way the split is designed. But I think it’s okay to show the back of the fabric on the under split so we good 😊
More instructions for future me:
- Sew the seam and press open
- Fold over top sleeve seam allowance and press. Turn corner of the opening 45° then turn new corner again at a shallower angle before folding the long side of the seam over and pressing
- Fold over bottom seam allowance and press. At the sleeve opening, fold the extra seam allowance back once and around the edge to the otherside. Fold remaining seam allowance in to form a self binding.
- Whipstitch all seams down
- Topstitch under sleeve self-bound edge first.
- Topstitch the upper sleeve from the shoulder downward and over the folded over sleeve opening
I had bought some brass rivets to use instead of a bartack at the top of the sleeve split but it didn’t come with any tools. I had a craft hammer which I was planning to use to install the rivets but wasn’t confident about not hitting my fingers or having a suitable surface to hammer on. So I did some research on universal rivet anvil and setters. I found two stores that did some good looking sets, but that doesn’t help me finish this project right now so I decided to abandon the brass rivets and use either the silver or gunmetal ones that I have and also have the press for. I was started to feel a bit down about what I felt was proprietary tools for rivets/grommets/snap buttons, but when I got my old rivets out and remembered how it all worked, I realised I could just use my existing press for the brass ones because they are the same size 🤣 I did notice they had shorter stems though, so something I need to pay more attention to when I buy rivets. The universal tools still sound useful because my press doesn’t have dies for any other rivet size, but at least now I can put it much further down the priority list.
I wanted to try using the fusible thread on the cuffs but ran into troubles winding a bobbin. Because this is the first time I’ve worked with thread wound this way… I think I need a vertical spool holder. Which I thought I did. But I was probably thinking of my old Memory Craft Janome. I tried a dodgy hack using my overlocker (lol) and the results were dismal. So a standalone thread spool is going on the shopping list 😣
I figured I could still test my theory by handsewing the fusible thread on. I didn’t realise how fragile it was. It shredded really easily. I switched to using a cross-stitch needle since it has a much larger eye and it was better but hard to force through the calico weave (especially when it was interfaced).
I sewed fold lines using 1cm seam but with the needle at position 5.0. This was I could fold the edges in a way that would hide the guide stitches. I tried a couple of approaches but the best one was to:
- Iron down edges along three outer sides
- Attach cuff to sleeve
- Press seam towards cuff
- Handsew fusible thread to just inside the fold guide stitches. Don’t try to fold any corners and secure with the fusible tape
- Fold cuff over and turn in corners, secure with glass-head pins by pinning it to the ironing board
- Iron down cuff and remove pins
- Iron down one more time. Cuff should be ready to topstitch with no pinning or additional basting required
I like this method because it results in very sharp corners (no bulging…) and allows for easy topstitching.
The original pattern called for attaching the sleeve first then doing the side seam. But I didn’t think I would be able to flat-fell the seam if it was done this way so I did the side seam first. When I attached the sleeve to the body I accidentally matched edges when I was meant to offset it 1cm for flat-felling. But I think by doing this unnecessary step, I managed to stretch the pieces enough that it made it much easier to ease in. Because the second sleeve I did was a lot harder to ease in 😳 I did end up trimming some of the narrow seam allowance, perhaps because I pressed the fold-over so that the guide stitching was hidden so it was probably a bit more than 1cm. But this meant that it ended up having a 6mm topstitch which matched the rest of the garment 😊 Speaking of pressing, I used my new sleeve board and damn it made things SO much easier.
Waistband
I had to add 5cm (9cm piece including seam allowances) because the band was significantly short… Significant enough I don’t think it was an issue with the seams I did. Maybe I copied the wrong lines from the multi-size pattern? I need to investigate.
I used the same method as the cuff with the fusible thread. I also tried to catch the base of the lower pocket in the waistband but only one side was long enough so I’ll probably still need to secure with hand-stitching.
Buttons
I decided I wanted the sleeve buttonholes to go vertically instead of horizontal. I kinda stuffed up the placement, was aiming for in the middle of the cuff but offset in the wrong direction after messing up once and it ended up near the far edge. So I just went with it 😝 For the front buttons, I did a test and the button hole length was the same as within the top-stitching of the waistband so made this one horizontal. Then because I only had 4 more buttons, I marked out the top button and tried to use my buttonhole expandable gauge to mark out the rest. I feel like it’s pretty useless, it doesn’t stretch far enough to help me mark out my buttons 😠 I kinda didn’t care so made the top buttons evenly spaced with the last one 1/2 the distance from the bottom button.
I sewed on the large buttons giving it a thread shank. The small buttons had a shank so that step wasn’t necessary. But I misaligned one on a sleeve cuff so twisted it to get to the topstitching thread and the shank broke 😳 Plastic vs topstitching thread, topstitching thread wins 😅 So…I was almost done but now I needed to find a way to fix the button because I have no spares 😣
Fixing the Button
So I was wondering how to fix the button and found out about the existence of Plastic Cement. Turns out my brother had some spare so I grabbed it off him. My idea was to put water soluble thread in the hole portion, masking tape over the broken part of the shank and then applying the cement on top. Then once the cement had hardened, dunk the whole thing in water so the thread would dissolve. This was me assuming Plastic Cement worked like actual cement. I did not look up how it worked before trying this (with soluble interfacing rather than thread because I couldn’t get the thread to stay). Needless to say, it did not work at all. And after I had applied the Plastic Cement, I immediately look up how to use it because it didn’t seem right at all haha. Back to the drawing board. I think I might still be able to use it though because I believe the button is plastic (although it looks like wood).
BTW all of the above was done at the end of April 2025. Fast forward to July 2025 and I finally gave up on the idea of fixing the button. And just bought two buttons off a similar size to use on the sleeves. The remaining woodgrain button will just go back into the stash.

Reflections
The jacket itself is quite light, calico us lighter than how I remember it, I think I assume it’s canvass-y haha. A light jacket could be useful? But I think it doesn’t hold the structure of the jacket as intended. I’m pretty happy with the way it looks though, the printed cotton and the calico go well together and I find the mishmash of buttons very fun. The only thing I’m worried about is the durability LOL
Things I learnt:
- That I don’t have a vertical spool holder but I do have a special spool holder end piece for ‘longer reels’ or in other words, literally Rasant as that’s what is shown in Janome’s video 🤣
- I learnt about the existence of the Janome Lap-seam Foot (and was reminded that this is the same thing as a Flat-felled seam). I think I will try to see if I can do without with just an Edge Foot.
Things to consider:
- Buy a vertical thread holder, it will come in useful for when I use embroidery thread too (note: this has since been purchased).
- I need to look up a sharp needle with a large eye that isn’t too fat to use for hand-sewing the fusible thread. I think what I’m after might be a Chenille needle (note: this has since been purchased and yes it is a Chenille needle).
- Look into whether my buttonhole gauge is just bad or if it’s me doing something wrong…..???? I feel like it’s very self-explanatory so I feel like it can’t be me…
Things I need to do for next time:
- Increase all seam allowances to 2cm
- Check waistband pattern piece length
It took me so long to complete this project that I have since made the Stacie Gabardine Jacket using a lot of the learnings from this one 😅 I need to be more decisive and not let projects drag on this long…
Categories: Sewing
1 reply ›