Planning and Design
So I originally bought the fabric (plus matching ribbing) to make a Heidi Cardigan. But I think I wasn’t fully sold on the Heidi…when I bought the pattern I thought I would really like it, but the more I think about it, the long length and single button closure as well as the hoodie on a cardigan just didn’t mesh with me. While the fabric was in transit, I somehow ended up on Etsy (as you do) and saw the Alina Sweatshirt pattern (conveniently on sale). And I thought it would be nice to eventually make it in a printed fleece. Then when I actually received the fabric, it was a little more blue than I thought, and my vision of it as a Heidi cardigan completely evaporated. But since it is kinda pastel-y, it felt like it would fit the Alina. So, change of plans 😛 I also kinda justified it by this shade of sage and the Alina being more work appropriate than the hooded Heidi.
Materials
- Pattern
- Alina Peter Pan Collar Sweatshirt (Tiana’s Closet)
- Fabric
- European Jogging Sweater Knit – Sage (Wattle Hill Fabrics)
- European Ribbing – Sage (Wattle Hill Fabrics)
- Bliss by Riley Blake Fat Quarter
- Buttons
- Daiso Self Cover Button 15mm
- Thread
- Rasant col. X1410
Sustainability Check
👍 The quilting cotton is 100% cotton, so biodegradable
👍 Both the fleece and ribbing are 95% cotton and 5% elastane, so technically biodegradable
👍 The self cover button is covered in 100% cotton and 100% metal so recyclable
🤏 Rasant is OEKO-TEX but not biodegradable
Construction
Preparation
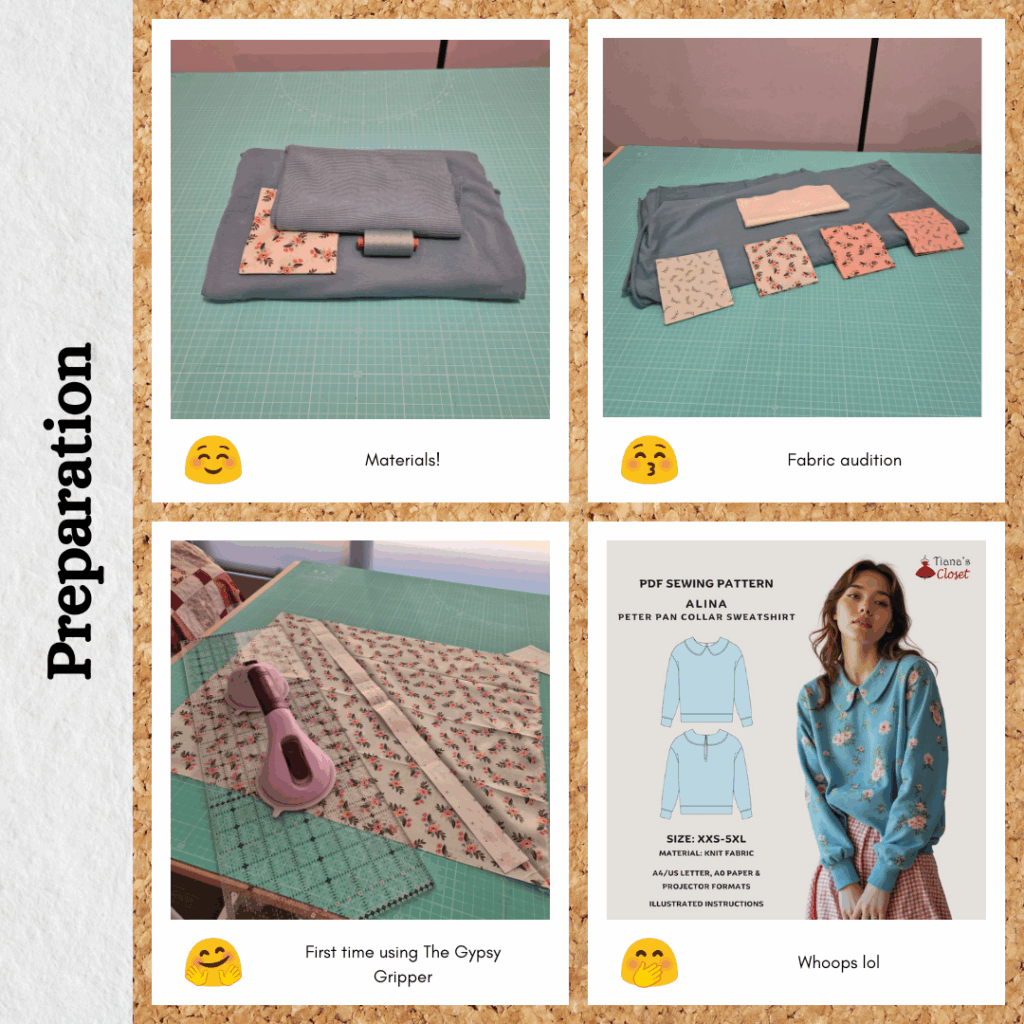
This pattern doesn’t have finished garment measurements, so I had to choose a size based on the size chart alone. Although they did recommend going up a size if between sizes. I kinda ignored bust since I know mine won’t match the corresponding waist/hip. The closest match was the M with the hip matching exactly and the waist being 1cm smaller. I think since the hip is the biggest part of the body I’ll just stick to M and not size up. If it fits at the hips, it will fit me at the waist, since this is not a fitted garment.
I originally planned to use some cotton fabric for binding/under collar etc. I knew I didn’t have anything that would colour match so I auditioned a bunch of patterned fabrics and chose one that had a flower on it that was a very similar shade to my main fabric. But then I second-thought myself and figured since I had bought extra ribbing, thinking that I was doing the Heidi cardigan, I should use up as much ribbing as possible since it isn’t much use without the main fabric. But then I third-guessed myself when I laid my pattern pieces out on the main fabric and thought that I could probably use the remaining fabric for a wearable toile of a vest pattern I would like to make in future. Which means I actually need to conserve the ribbing, not use it up 🤣 But this kinda worked out, because I wasn’t really looking forward to using the fleece or ribbing as the facings/under collar/neck binding. Using a woven feels a lot more palatable. So I did cut out the above mentioned pieces in the quilting fabric, with the neck binding on the bias, to account for not having any stretch since it’s not a knit.
Also, while I was cutting the fabric, I realised that the quilting fabric I chose is very similar to the sample garment shown in the Etsy listing LOL. I seriously don’t have any personal design or creative skills haha. Unconsciously making clothing as per the examples given…
Also also, another case of where my overlocker thread doesn’t match my fabric, but like with the Maple Balloon Cardigan, I am prioritising less waste over what the inside of my garments looks like haha.
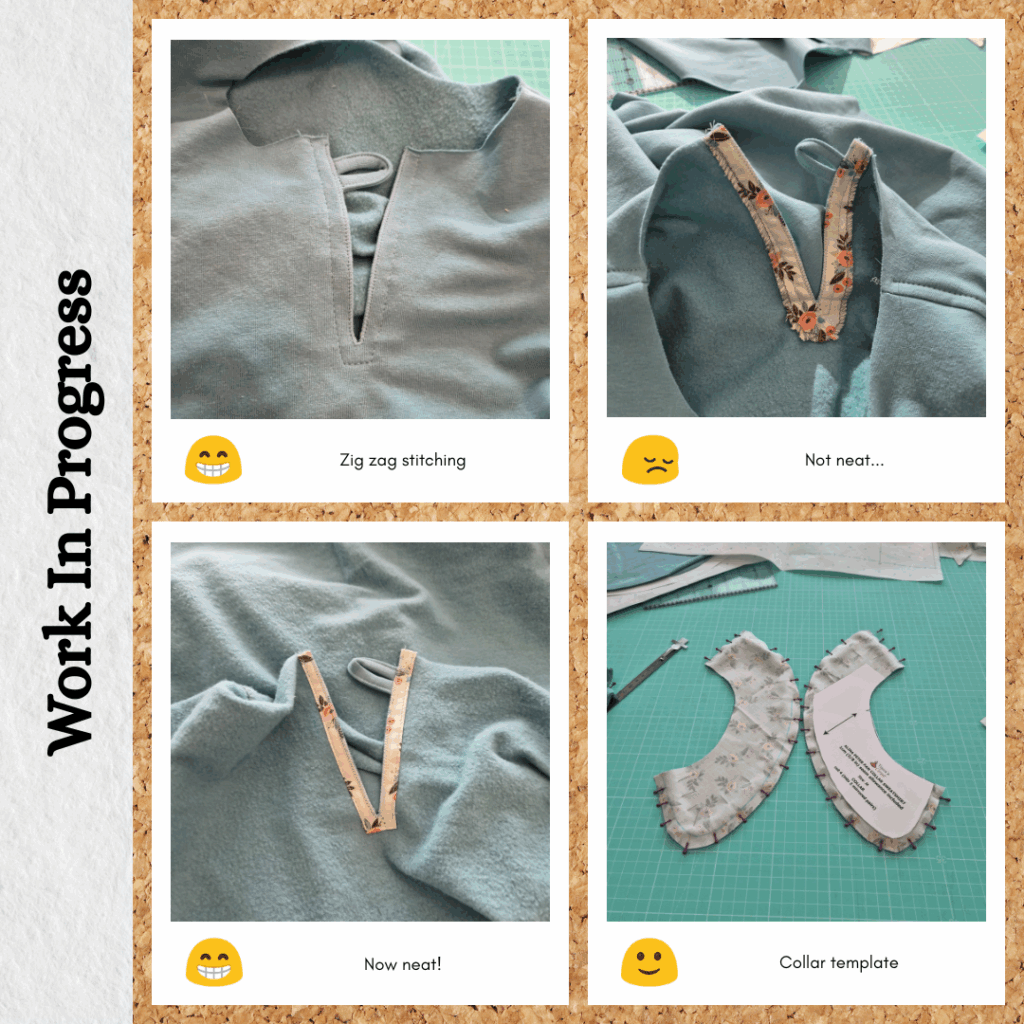
Back Facing and Button Loop
So I originally was going to do the loop using the ribbing but my walking foot had a conniption and I accidentally ripped through the fabric trying to unpick the thread LOL. So into the (fabric recycling) bin that went and I cut a new piece from scrap of the main fleece instead. Since this fleece is quite light, it wasn’t hard to sew through 4 layers of it (easier than the ribbing actually).
I wasn’t so sure on the facing method but followed the instructions anyway. I attempted to overlock the facing edge to pretty fail results, but I left it as is since it’s on the inside. After marking out and sewing the facing to the back, I realised that I need to make my V point less acute. I couldn’t cut all the way to the point, even using my mini Clover rotary cutter, without cutting through the seam itself. I wasn’t too fussed, I think subconsciously I was expecting this to happen haha, and just did a narrow zig zag stitch over the opening. Sure it would be neater without, but it’s not terrible with it either (looks quite neat tbh). Then I topstitched the facing down about 1cm from the back slit edge. Later on (after I had attached one sleeve), I decided that I REALLY didn’t like how messy the facing was, so unpicked the topstitching, marked out 1cm from the edge and trimmed back (including removing the overlocking stitches). Then I iron the facing flap under 5mm all the way around and topstitched this down so the raw edge was hidden. Much better!
Body
I had changed back to my normal presser foot after the ribbing back loop disaster and was wondering if I could get away with using this instead of the walking foot. When it came to topstitching down the shoulder seam though, it did end up a bit wavy, so switched back to the walking foot. Serves me right for being lazy 😝 Other than that it was standard construction.
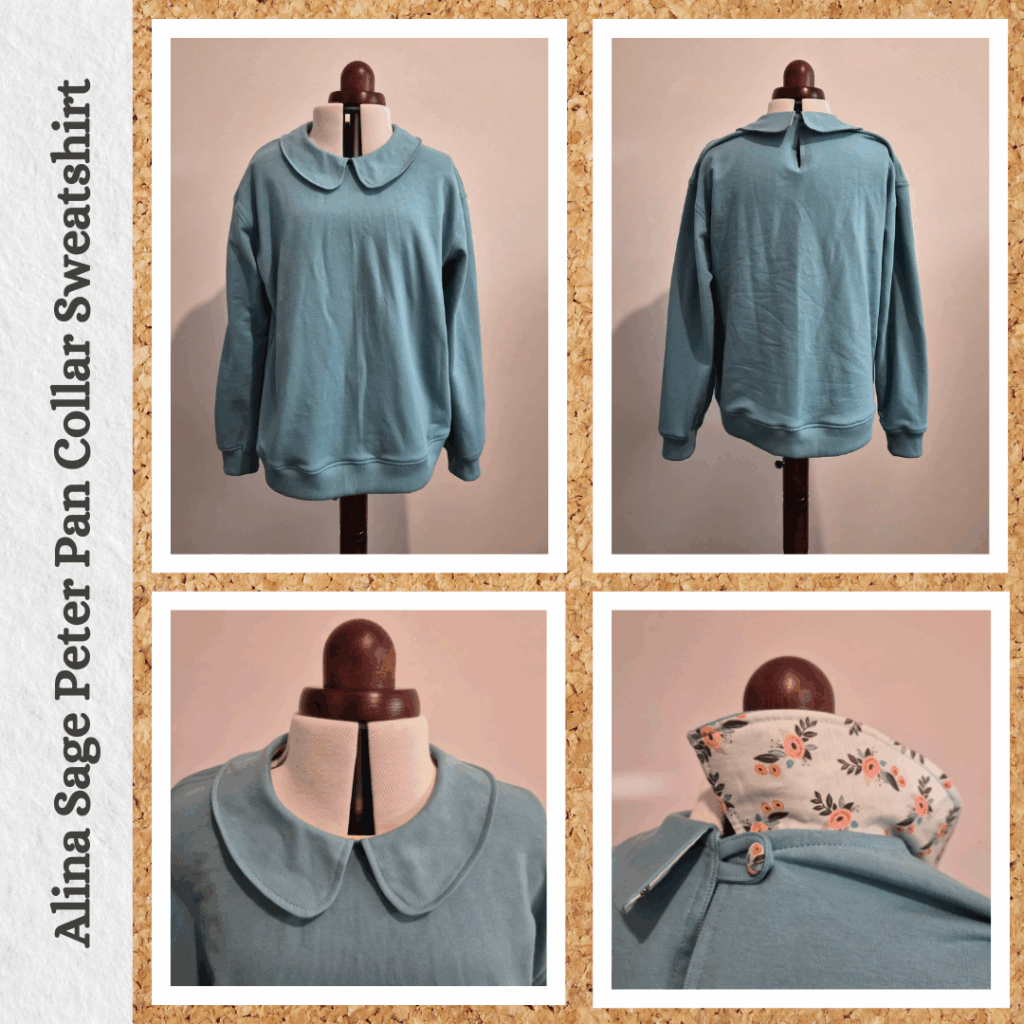
Collar
I decided to make a cardstock template to mark out the seam allowance along the curve because trying to align it while sewing is a pain in the ass. The template ended up being handy as a pressing tool too woohoo. I topstitched the collar edges, but I wonder if I should have understitched the under collar first, or if that was even possible on the curve. I pinned the collar to the neckline and only realised after referring back to the instructions that it’s actually meant to finish at the back slit, so undid the pinning to ease it in. The instructions says to pin the collar and the binding and sew through all three layers in one go, but I know my track record and that doing that would be a disaster, so attached the collar first. In hindsight, I should have attached the two collar pieces at the centre front with water soluble thread (like I did with the Lemon Hoodless) in order to make sure they wouldn’t separate and leave a gap. Oh well.
Then it came time to attach the binding and I didn’t like their way of encasing the binding edges so did it my way and I think it worked out nicely. However, I think I need to make the binding a little thinner (maybe because it’s on the bias) because it was extending past the seam line when I pressed it over and around. So I very dodgy-ly trimmed it myself and secured it with a row of stitching before folding it to the body and topstitching it down. Another hindsight thought, would I have been able to attach the bias like I did for the Kalle Shirt hem? Something to try next time.
Ribbing and Button
Attaching the ribbing was business as usual. I decided to use a self cover button to tie the button into the binding/facing/under collar theme, centring the button on the little bud that was the same colour as the main fabric. I do like how the design has the button under the collar so it’s quite well hidden.
Reflections
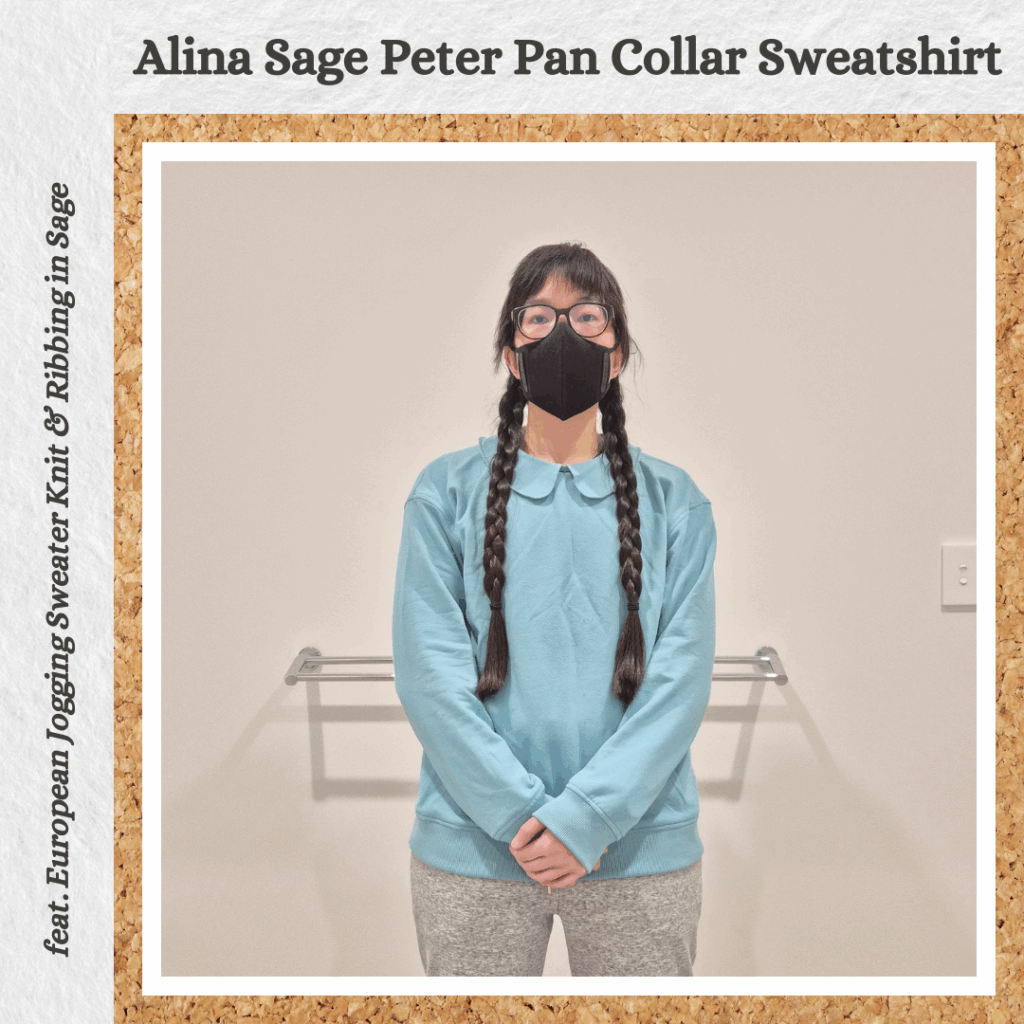
I am a bit weirded out by how this sits on me. On my dress form it looks fine. When I wear it there are very obvious wrinkles around where the sleeves attach to the main body. Is this because I need to do a small bust adjustment? My dress form should mostly be similar to my bust though… Is it because the neckline is slightly gathered due to stretching to fit the peter pan collar? I’m quite confident it’s NOT because I put the sleeves the wrong way though. I definitely marked out the front and back and matched accordingly.
After a test wear in Albany, turns out the top kinda settles as I move around and the fit issues disappear. Also, while I wasn’t a huge fan of the length, the entire garment was actually very comfy. Lastly, my husband complimented the colour, so I guess I gotta hang onto this for a bit LOL.
I probably won’t bother trying to troubleshoot the fit though, because the sweater design itself is kinda boring. There are a lot more interesting sweater designs out there I would prefer to make. I guess this pattern will help me decide if I like Peter Pan Collars on sweaters though, and if so, I would try to apply it to a sweater pattern with a nicer fit.
Also, I think this is too casual for workwear, unfortunately.
Things I learnt:
- Avoid sewing finnicky things out of ribbing fabric
- When trimming a seam that has fleece on one side and a woven on the other, cut from the woven side. I trimmed from the fleece side and it looked like I had stayed well away from the seam but on the other side I had actually cut through
There are quite a few things I would do differently next time I make something similar:
- I like the idea of the feature under collar, but I think it would actually be better to make the entire collar out of fleece. And maybe interface one side?
- Secure the collars at the centre front
- Try the Kalle Shirt binding method on the collar seam
- Add in-seam pockets
- Use a printed fabric
Categories: Sewing
Leave a Reply