Planning and Design
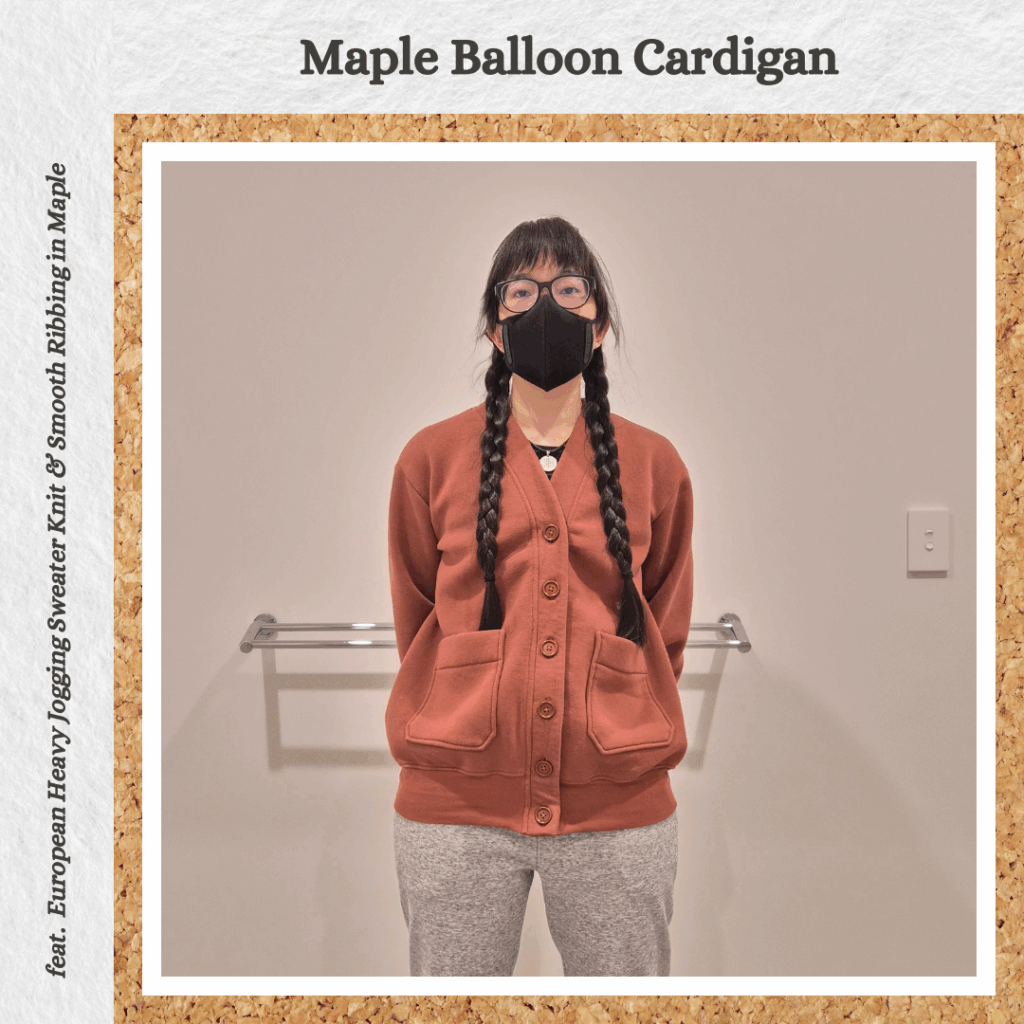
It got cold really suddenly which made me very aware that my work wardrobe isn’t really equipped to deal with these kinds of temperatures. At the same time, I was reflecting on my recent sewing projects. I’ve been learning a lot and taking my time and ending up with garments that I honestly am rather proud of, but at the same time it had me craving some quick wins/makes. So in keeping with my colour coordinated work wardrobe project, I got a nice thick fleecy in ‘Maple’ from Wattlehill Fabrics. I decided to make the Wardrobe By Me Balloon Cardigan in the V-neck and Long options, as sort of practice for an upcoming pointelle cardigan I plan to make (which is a lot lighter and therefore bumped quite far down the priority list haha). Luckily Wardrobe By Me’s sale coincided with the temperature drops, so I managed to pick up a bunch of patterns including this one for buy 2 get 1 free.
Materials
- Pattern
- Balloon Cardigan (Wardrobe By Me).
- Fabric
- European Heavy Jogging Sweater Knit – Maple (Wattle Hill Fabrics)
- European Smooth Ribbing – Maple (Wattle Hill Fabrics)
- Buttons
- 4-Hole Classic Rimmed Wooden Button – Mahogany (Homecraft Textiles)
- Thread
- Rasant col. 1346
- Maxi-lock 3000yd Polyester Server Overlocker Thread – Poppy Red
- Interfacing
- Non-Woven Interfacing Fusible/Iron on Fine Light – White (Homecraft Textiles)
Sustainability Check
👍 The ribbing is 95% cotton and 5% elastane, so technically biodegradable
👍 The buttons are 100% wood so biodegradable
🤏 Rasant is OEKO-TEX but not biodegradable
👎 The fabric is 80% cotton and 20% polyester. I generally try to avoid polyester blends… I think what happened was I had a bunch of fabrics open in tabs on my phone to buy and I was systematically going through and closing the tabs that weren’t at least 95% cotton. Which meant I closed the tab for this but not the ribbing. And then placed and order for the ribbing, thinking that I had included this fabric too, mistakenly remembering it as being 95% cotton like most of the other sweater knits on Wattle Hill fabrics. And then realised after the package shipped that I had ribbing but no main fabric. So made a panic buy of this fabric. Then realised it was actually a polyester blend. I really liked the colour so I think I tunnel visioned through that whole process LOL. Now I know to be extra careful when browsing at Wattle Hill Fabrics
👎 Maxi-lock overlocking thread is 100% polyester. But I am determined not to waste thread so I will use it all before looking into alternatives.
👎 Interfacing is 100% polyester. The end of my stash is in sight 😋
Construction
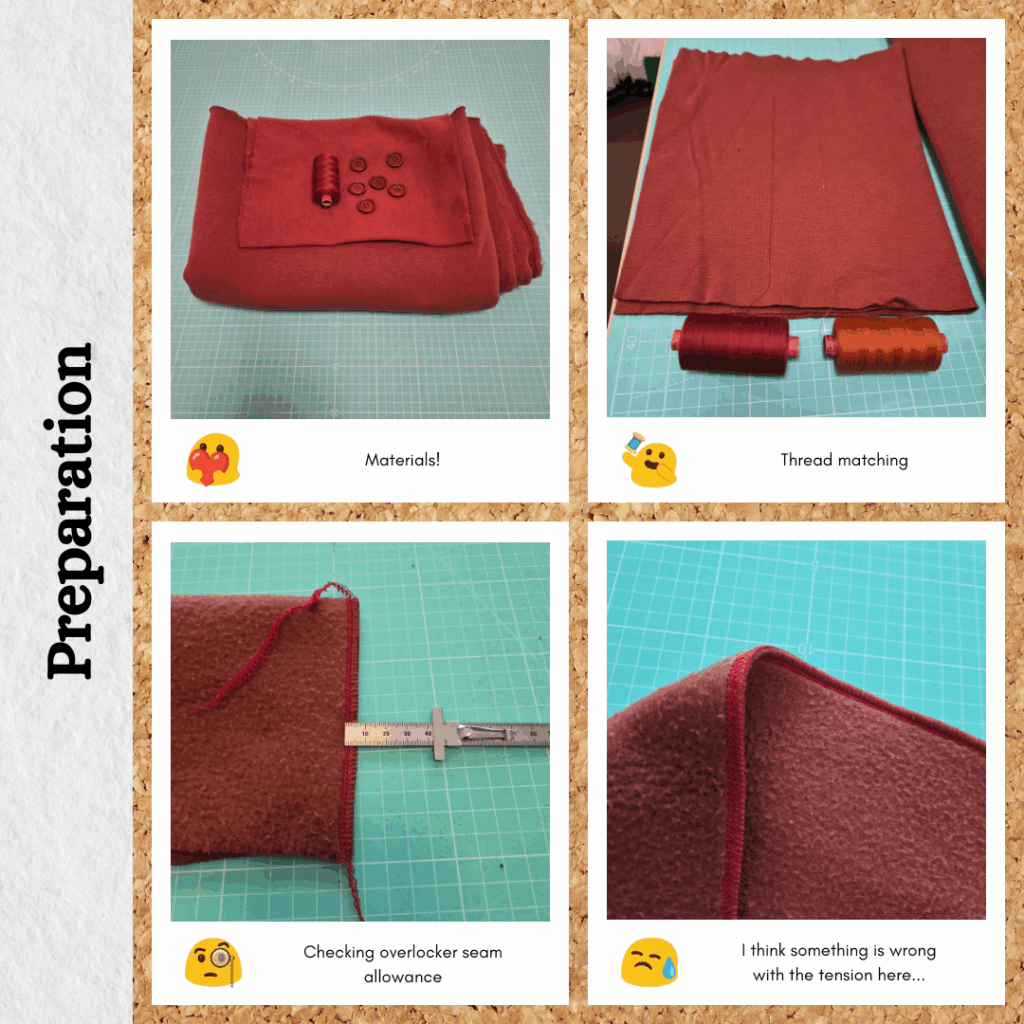
Preparation
I appreciate the size guidance (choose based on chest measurement). Thanks to my small bust, my waist/hip combo never matches up with the bust measurement. I like how they provide finished measurements. Yeah, that is a lot of ease 🤣
I had to do more fudging with the ribbing for this one, even though I’m pretty sure I bought what was recommended. I guess in future I should get 1.5x ribbing or something 😕
I used my heat press to apply the interfacing and it applied rather wrinkly. I wonder if that’s because I didn’t pre-press to remove moisture, or because it’s interfaced to a fluffy fleece backing. But in the end I don’t think it will matter.
I’ve also gotten over my aversion to my overlocker threads not matching the fabric by thinking about how if I don’t use my overlocker thread, the thread will end up ‘past its use by date’ and need to be binned. And that’s bad for the environment and worse than having mismatching thread on the inside of my garments LOL.
Body
I did actually review the instructions before sewing so was aware that the seams were only 7mm. Sounds like a good reason to use the overlocker to sew the seams and not just finish them. So I added the second needle. But I’m guessing my tension is way off because the loops were so loose you could see it from the other side. I wasn’t really in the mood to troubleshoot so just used my sewing machine to redo the seam line LOL.
Based on the line drawing I thought the hem was going to be gathered but the ribbing was just mega stretched to fit. I decided to follow their instructions. I think it looks a bit weird, but that’s probably just because I’m looking at it lying flat and not being worn as a garment. But it’s a good test to see if I like the way this looks or if I should do a gather stitch instead in future (although after trying on the body I’m not sure if this approach would give a wide enough ‘opening’ at the hem).
Neckband
Another case of not referring to the fabric suggestions ahahaha…”just about any jersey you can dream of as long as it isn’t heavy”. Welp this isn’t necessarily a ‘heavy’ knit but it is a ‘thick’ one. I shouldn’t have interfacing the neckband (I should have learnt this lesson from the Miela Bomber Jacket).
I didn’t like their instructions for doing the hem of the neckband, and it probably wouldn’t work given how thick my fabric is anyway, so I did a stay stitch for about 5cm from the hem and folded up the seam allowance and then sewed all the way through all the layers as part of the seam to attach the neckband to the body.
Cuffs
The cuffs were where I fudged the fabric allowance and had split it in half. So I started by joining the two pieces and then realised I wasn’t using Maraflex and therefore should I have used a stretch/lightning stitch? But I tested it out and it still had a bit of stretch, definitely enough to easily get my hand in/out so I left it as is.
I was originally going to gather the sleeves using the overlocker but given how the width of the overlocking stitch is the seam allowance, I used my sewing machine instead since I would be able to remove the gathering stitches afterwards. Except that I ran into troubles when trying to sew the 7mm seam on my sewing machine with my walking foot because the gathers didn’t always lay flat. So I ended up doing a 1cm seam anyway. And then overlocking it and cutting it back to around 7mm width. Small sacrifice of length in order to make things a bit easier to assemble.
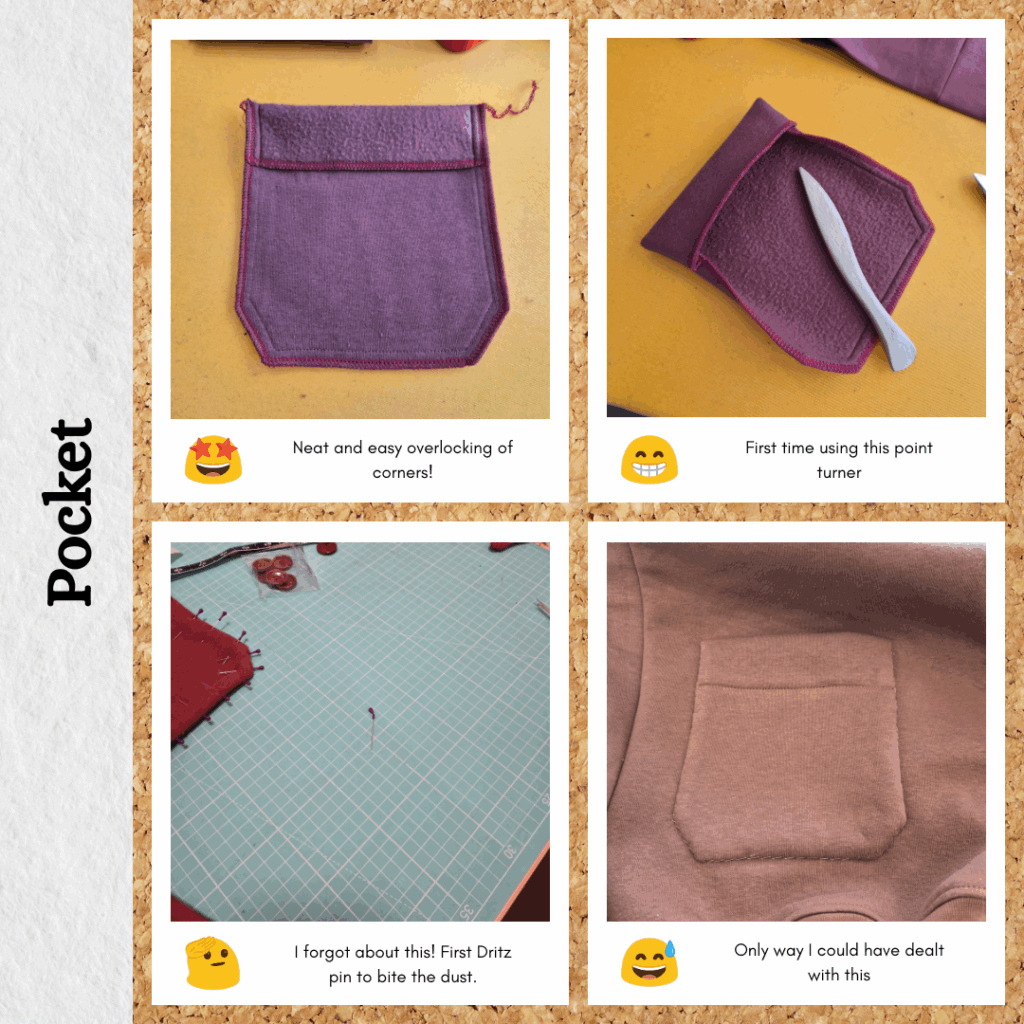
One happy learning from this project is this style of pocket is really easy to overlock. I put the pockets aside to attach later on after I could put on the body of the garment and figure out ideal placement. Which is what I do for shirts. But doesn’t actually work for this particular cardigan because the hem gets gathered. So I used the suggested placement but attached them later on in the process. Since I had made it harder for myself I handbasted the pockets to the front with water soluble thread to help anchor it.
Buttonholes
The neckband wouldn’t fit under my automatic buttonhole foot, so manual it was. I tested and unlike with the Beatric Peacoat, I will now actually record the settings lol.
- Mark out the button length + 3mm using a thick Clover marking pen (the width of the pen will be the opening of the buttonhole).
- Align the edge of the presser foot to the far right of the marked line and sew a zigzag stitch (2.5W, 0.5L)
- Turn the fabric 180degrees and do the same for the other side. This will create two zig zag stitches along the edge of the pen marking.
- Change the zigzag settings to 5.0W and 0.2L and align the presser foot to the middle of the marked line and beginning of the two zigzag lines and sew a bar tack.
- Do the same on the other side.
The opening looks rather large, but given the size of the buttons it actually works pretty well. And I guess a positive to interfacing both neckband pieces means that it gives the stability for the buttonholes without having to add anything extra.
Sleeves
Very straightforward, although as I was finishing the edges, I was thinking about how nerve-wracking it would be if I was doing the actual seam itself using the overlocker.
Since I had washable marking for the buttonholes and the water soluble thread holding down the pockets (and one end of the neckband at the hem), the 98% complete garment went into the washing machine for a rinse. Which meant I couldn’t finish this project on my big knit weekend.
Buttons and Buttonholes Take II
I put the anti-fray glue and waited til the next day to chisel the buttonhole open. I was super careful and the spacing between the zig zag stitches was quite wide, but I think thanks to the plushness of the fabric, what you see on the top side isn’t necessarily the same as the bottom. So yes, I cut through my zig zag stitches on some of the holes 😩 So I decided to try and redo the zig zag. The first attempt went very poorly because the second lot of zig zag stitches managed to catch the first so I essentially sewed the buttonhole shut instead LOL. So I got out my ditch foot and used that to help separate the buttonhole and assist me in sorta pulling the buttonhole open. It worked pretty well, just looks a bit dodgy where I veered off the centre line because I couldn’t see because of the ditch foot piece haha. But it’s functional and the buttonholes actually look better now than before so it’s a win.
I attached the buttons and gave them a thread shank since the neckband is so pudgy. Gotta hand sew if I want a thread shank, sewing machine unfortunately won’t do it for me… It’s not as bad hand sewing bigger buttons though.
Reflections
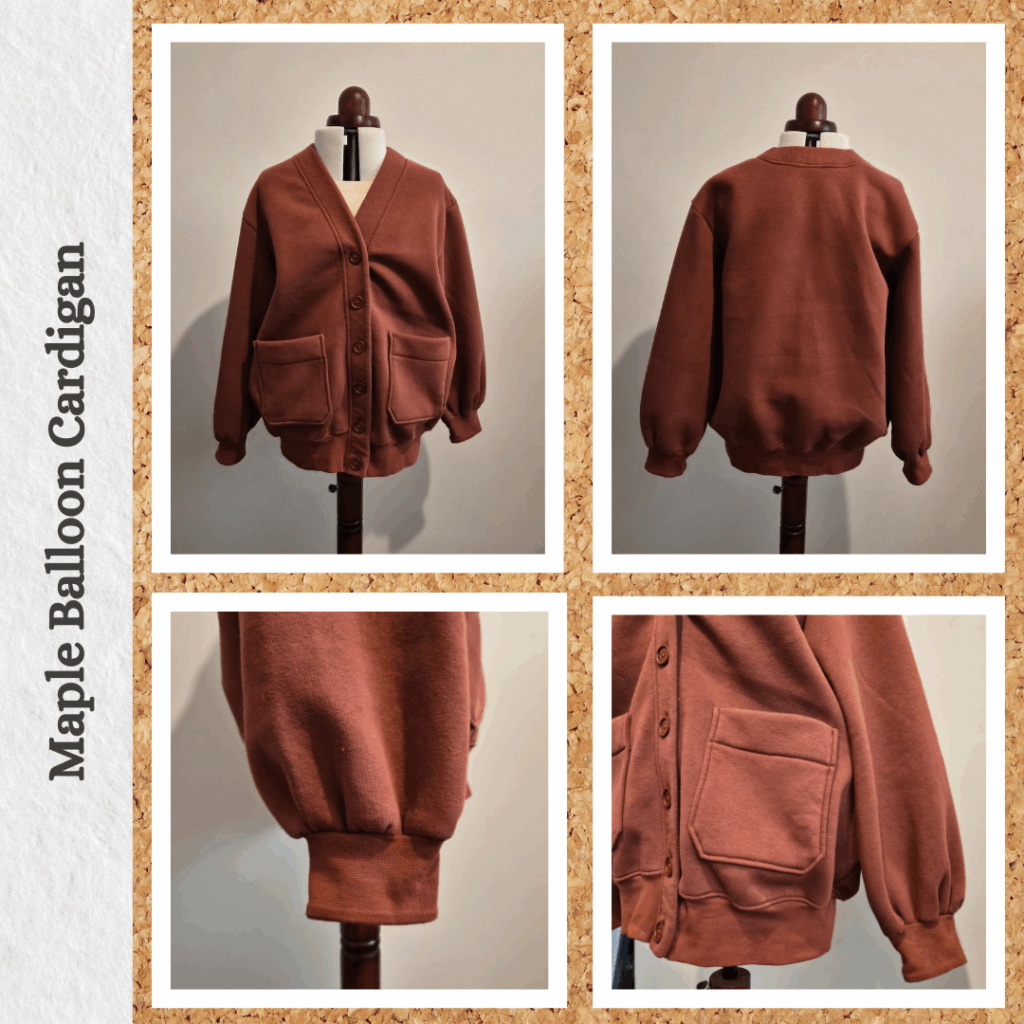
Despite using a non-recommended fabric, I think the garment looks pretty nice. The double interfaced neckband doesn’t seem too big an issue either. It’s definitely nice and cosy. I think this would have been a very quick make if I had used the correct fabric type and had my overlocker set up properly. Most of the time taken with this project was ‘battling the bulk’ and doing little extra things to make sure things wouldn’t shift out of alignment.
I wonder how much of a difference doing 1cm seams for the cuffs and sleeves would make. Like if I kept the pattern the same but used a wider seam allowance for the ‘hard’ parts of construction. I figure since it’s a knit fabric it would be forgiving and the oversized look means it wouldn’t make any obvious difference. Maybe I’ll try it for the next run.
I would make this pattern again in a heavy sweater knit, but I would change the neckband to ribbing instead of the main fabric. That way I could give it a cleaner finish on the inside too since it would be less bulky. I wonder if I could get away with no interfacing. I would probably also maybe bias bind the insides if it was a heavy sweater knit. In which case I would need to increase the seam allowances anyway.
Things I learnt:
- I don’t think I like 7mm seams 🙁
- Trim any ‘non-standard’ overhangs before overlocking, the overlocker doesn’t always deal with the little bits very well
- How to manually sew a buttonhole on the sewing machine
- Refer to fabric recommendations before buying fabric
- Sew pockets on before doing any kinds of gathers
After taking it on a test run during my trip to Albany, I like the fit but my hacks on the cuffs and the interfaced neckband are jarring when I move in a way that makes me notice it. I’ve ordered more ribbing in Maple for a different project so maybe I can scrounge some to replace the cuffs on this one. Although not too sure what to do about the neckband…I’ll see what scraps I end up with once the other project is complete.
Categories: Sewing
1 reply ›