Planning and Design
So I disregarded (not really on purpose) a couple of specifications in the materials list for the TDCO Phillipa Pant, including using a totally inappropriate fabric weight (5oz instead of 10oz) and super stiff Ban Rol (instead of light to medium interfacing), resulting in a not very flattering (fabric too thin, shows too many body lines) and uncomfortable (no give in the waistband) pant. I’ve been thinking ever since that I want to try to do things a bit more to spec 😅
Unfortunately, it’s a bit hard to find 10oz fabric, but very easy to find 8oz fabric. So I thought I would try if I can get away with 8oz. Then I also decided to test the zip fly expansion. An easy change is to not use Ban Rol, but I thought I’d go a little further and make the waistband expandable using the technique from the Waistband Masterclass.
Materials
- Pattern
- Philippa Pant (Anna Allen)
- Fabric
- Cotton Drill – Beige (Homecraft Textiles)
- Devonstone Solid – Partly Cloudy (Cozy Corner Quilts)
- Thread
- Rasant col. 1572
- Notions
- Gold Snap Buttons (Studio Mio)
- 6″ Zip (from Stash)
- Non-Woven Interfacing Fusible/Iron on Fine Light – White (Homecraft Textiles)
Sustainability Check
👍 Cotton Drill and Devonstone quilting cotton are biodegradable
🤏 Rasant is OEKO-TEX but not biodegradable
🤏 Zip is metal but the zipper tape is likely polyester
👎 The gold snap button is metal but has plastic backing. Given a lower rating than the zip even though they are both half/half because the zip at least can be repurposed if unpicked and removed
👎 Interfacing is 100% polyester
Construction
Pattern Modifications
The first change I wanted to make was removing the extension from the top of the pant. During TDCO I thought I needed to use the size 16 line, but wearing the toile made me think it actually needed to be lowered.
The second change was I reviewed my bias application notes and saw I said to increase the front crotch seam to 1.5cm so I could do a flat-fell. Which is a pretty easy change, I’ll just continue the front edge curve.
The third change was to expand the waistband. I looked at the Masterclass handouts and it said to add ease to all the side seams. HMMMM. Problem – this pattern has straight side seams. I can’t add extra ease without making the entire pant wider. Soooo…do I have to give up on the expandable waistband??? Well, maybe not. After googling and not finding any answers (although I did find out the existence of elastic Ban Rol, gonna file that info away for later), I recalled one of the waistband adjustments from the Closet Core pants making course. So I reviewed the video on that technique and I think it will work! Plus no need for elastic woooo.
The last change, which isn’t really a pattern change, was I had a rethink about how I was going to deal with the seams and decided on the following:
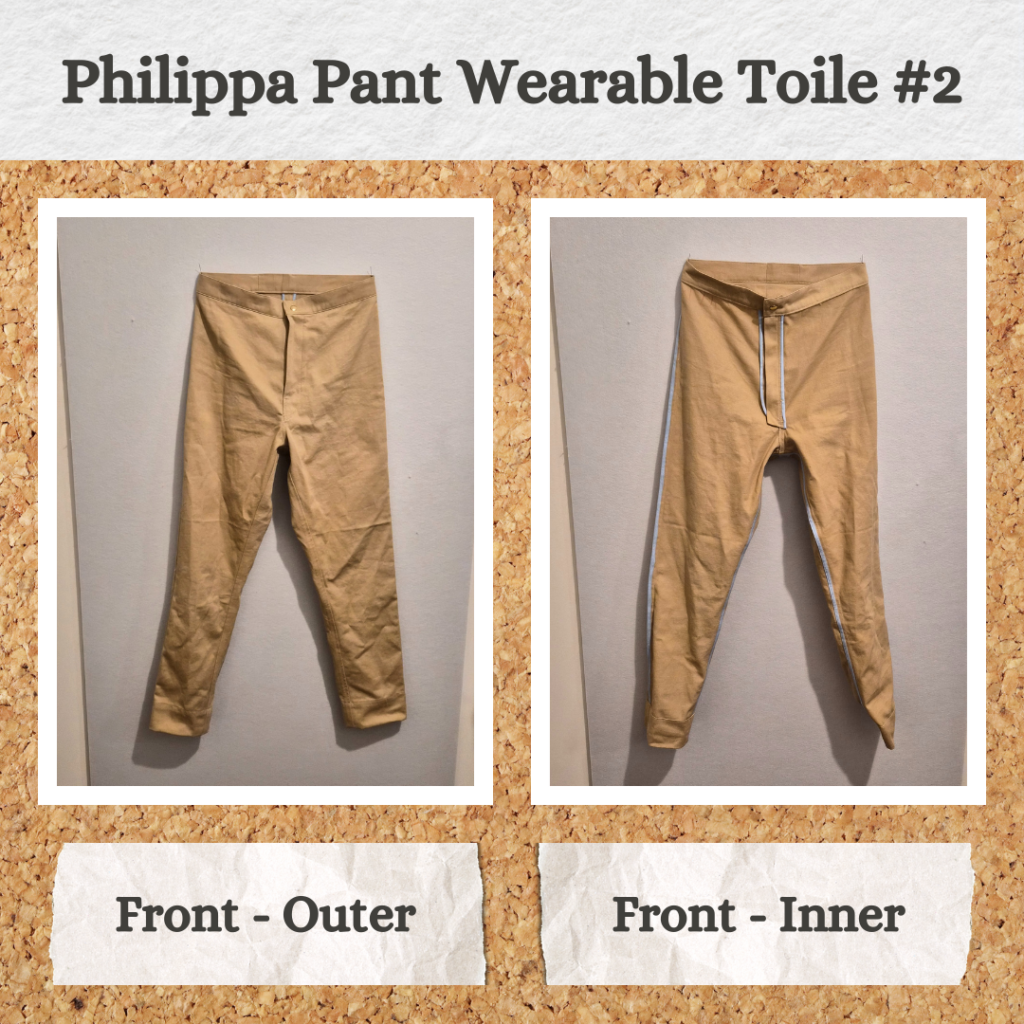
- Flat-fell the front crotch seam
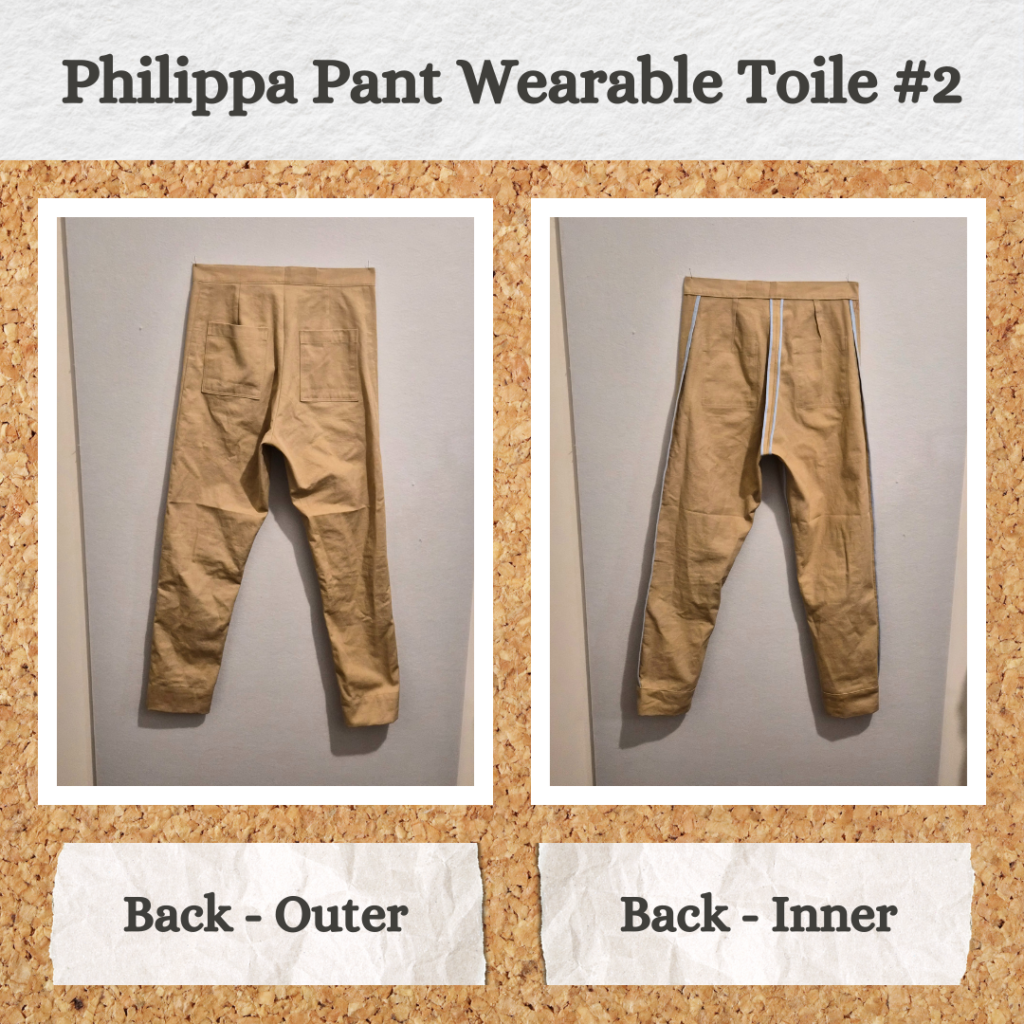
- Bias bind the back crotch seam separately and press open
- Bind the inseam together with bias
- Bind the side seams together with bias (let’s see if the bulk is acceptable)
- Bind the waistband facing (after sewing the split) and stitch in the ditch
Phew…this project is gonna take some concentration lol.
But on the bright side the only pattern pieces that need adjusting are the waistband and waistband interfacing (add seam allowance at centre back)
Inserting the Zip
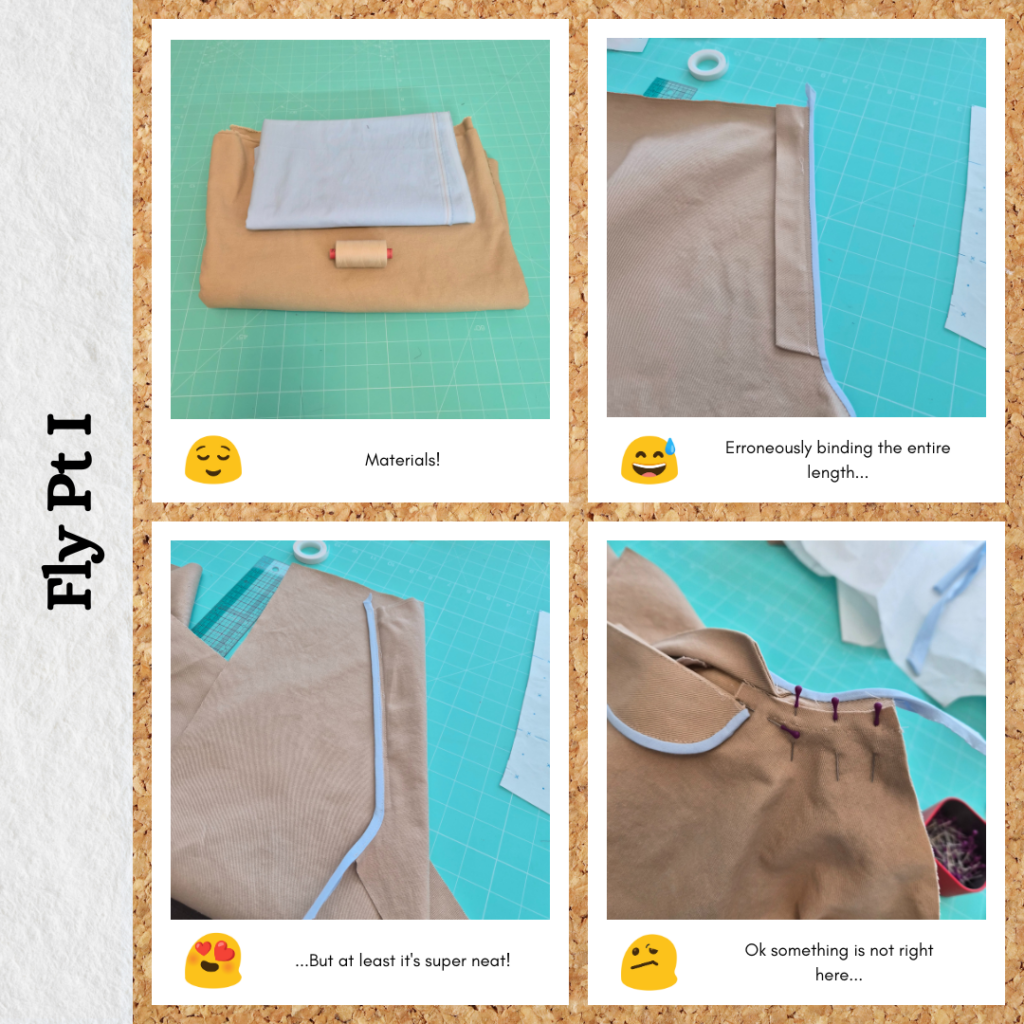
This was a little confusing to do because I had notes on when to finish edges for the buttonhole fly version and so had to have both instructions side by side to see where I had made changes and try to figure out if it applied to the zip version too. And of course made sure to make notes on the zipper instructions too.
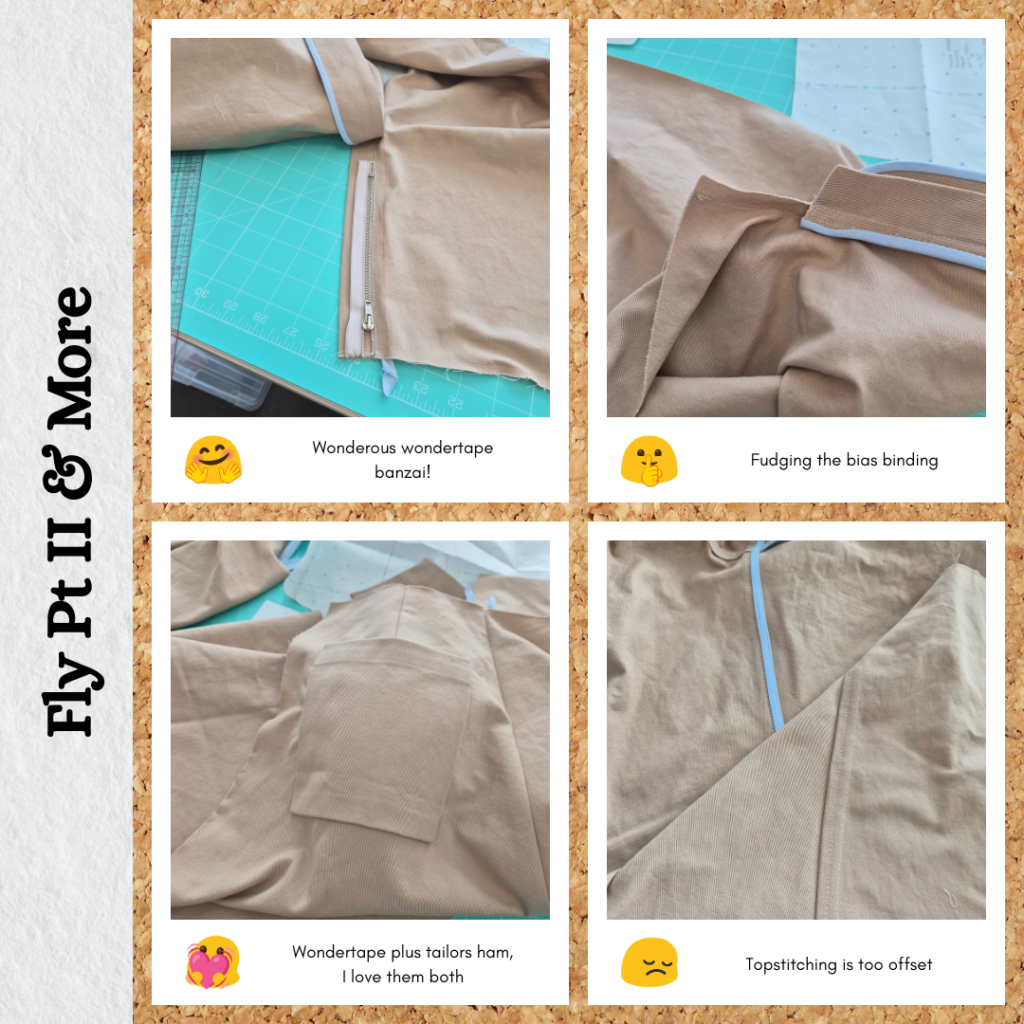
I accidentally made things even more confusing extending the crotch seam for the right front (where it usually cuts in). I thought by doing this I would give myself my seam allowance to do the flat fell. But what I actually needed to do was extend all the seam allowances to 1.5cm (or greater), not just this section… So I bias bound the whole edge and had to fudge things when I reclipped that part out. But it makes sense now and I understand how to get a nice finished fly guard seam.
But in terms of inserting the zipper, it was actually really easy thanks to wonder tape. Like, really surprisingly easy. Maybe also helps that I’ve given up trying to sew a zipper down in one continuous stitch run. I do like 3/4 of the length and backstitch, then lift the presser foot and take the piece out and move the zip and then sew the rest. I figure it’s on the inside, no one will really notice. And it’s much easier this way.
The wonder tape also helped with the bias binding of the seam edges. Since I went with 1/4inch bias, it was quite thin and some of the fly seams were very thick so it would have been really hard to pin it down and keep it in place. Speaking of thickness, I started this project using an Universal 80 needle and that was a mistake haha. It didn’t break but it did jam when I tried to do the fly topstitching from the front. It worked better if I went slow but I figured I should just change to a jeans needle. Still went slow over the thick parts though, the best way to do this is to change the stitch speed on the machine itself haha.
A win I had was with the bias binding. I tend to have issues where I either can’t catch the overhang when stitching from the front or I have way too much overhand. But thanks to the Booklet Pouch, I know the trick now – stitching in the fold but just offset. And it works beautifully and consistently. I also figured out the best way to pin it down – inserting the needle in the seam line perpendicular to the bias long edge. I think I never did it this way before because I always worked with fatter bias so would stick the pin in the bias itself. Interesting how changing one little thing leads to a better understanding of other things.
Overall while it took me a long time to construct the fly I think I understand how it’s all put together a bit better now. And another learning was that the length of the zip is measured along the teeth. Which makes sense. But I misplaced the 7″ zip I had bought for this project and when I opened my zip drawer I found one that measured 7″ along the tape and thought that was fine. Even though the instructions actually tell you how to measure a zip haha I read it later and that’s half how I know now. The other half was things didn’t quite match up well (the fly guard seemed too long and the topstitching ended a lot further down than the zip end) which was what led me to look into a bit more. But all good, I can save my YKK zip for a non-toile version haha.
Pant Legs
I had forgotten that I didn’t trace the pocket pattern last time so had to get the A0 out again. Since this is a TDCO pant, it’s a mishmash of sizes, so I decided to go with size 8 because I don’t like super big pockets. The difference is pretty small anyway. Attaching the pockets was also really easy thanks to wonder tape and the tailors ham. The tailors ham helped to press the dart but also for draping the pocket over the resulting curve. And the wonder tape meant not having to bother with pins. If I’m going to make lots of pants I think I better stock up on wonder tape LOL.
Because I messed up the front crotch seam allowance, I just zig zag stitched over that and topstitched it to one side. For the back crotch seam I bias bound each raw edge separately, sewed together then pressed open. For the inseam I confused myself and ended up pushing the bias bound (together) seam to the back instead of the front. I don’t think this will be a big deal? But it goes against the ‘push to the back’ general rule of sewing which is why I overthought it and did it wrong even though I was trying to follow the instructions and diagram. I noticed that when I topstitch this down, the stitching lines are very far from the seam itself. So I think the inseam can probably be trimmed to 1cm (3/8″).
The previous toile I individually bound all the side edges and pressed those seams open. But I couldn’t really figure out why it was done this way. Especially when you push both seam allowances to the back for the top 17cm or so and topstitch it down… So I figured I would try binding them together and see if that’s an issue bulk wise (it isn’t).
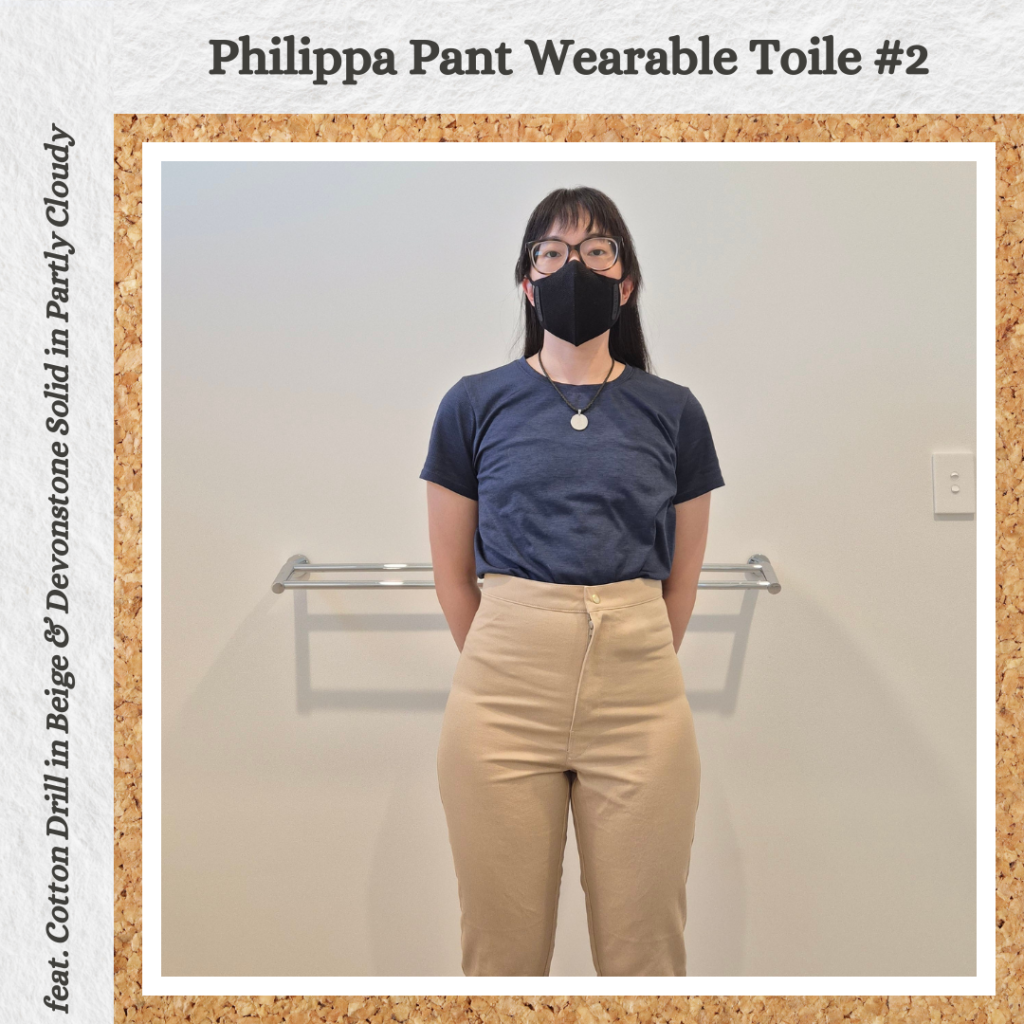
At this point I decided to try on the toile and it definitely fits like a glove. But I think this is maybe not an ideal thing. Because it still shows the curves of my body a bit too much. And it probably fits more closely than the previous toile since the fabric is thicker. But 8oz is definitely suitable for this pant, at least I got an answer for that test.
I decided to try find out the intended ease in this pattern to extend the side seams by that amount in future. But when reading the alterations guide, it says to make the pants snug because the fabric will grow. So now I’m a bit torn…but still leaning to a little looser might be better. In terms of ease the waist is 1¼ inch and the hips are 1¾ inch. I’m thinking I will do another toile in the same fabric anyway, so maybe I’ll add the smaller amount of ease (so divide by 4 and apply to the side seams). Although when looking up how to calculate ease (lol yes I forgot it’s just a comparison of body measurements to final garment measurements) I saw a photo of someone else’s Philippa and it has a fold very similar to the one I’m so hung up on. So I went and looked at the original pattern listing photos and there is quite a pronounced crease. So it might be by design? Might as well explore and experiment though (keeping in mind that I need to wear this toile too to see if it relaxes out and makes all of this unnecessary).
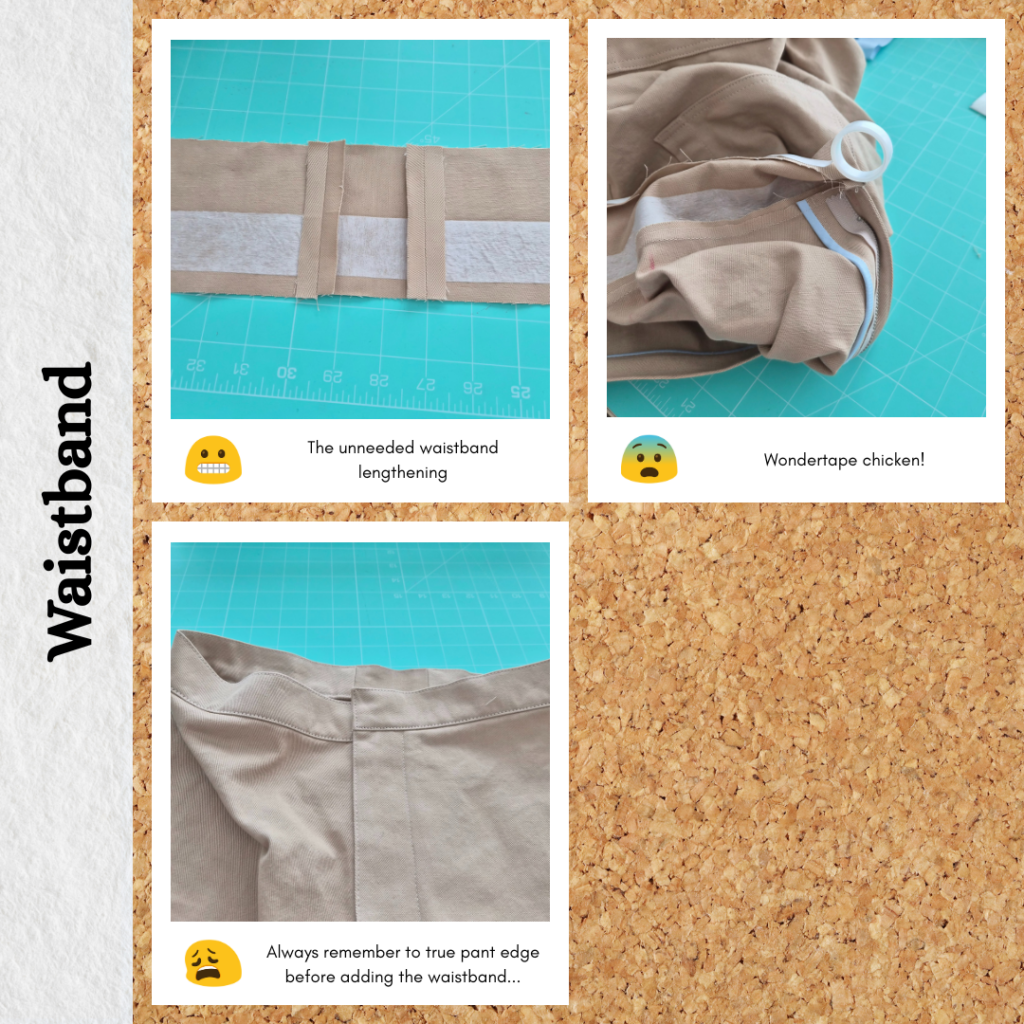
Waistband
So I somehow managed to measure the right waistband incorrectly and it was too short. At least I have heaps of this toile fabric. But after sleeping on this project, I thought I should probably just make the waistband normally due to the whole ‘fabric growing’ thing. So I hacked together a full waistband. But then when I pinned the hacked waistband to the pants it turns out I measured wrong and I only needed about ½ inch extra lol. So just trimmed off the excess from the right pant opening end. And turns out I was playing wonder tape chicken and had just enough. When it was all complete I remembered that my pant tops were slightly offset after inserting the zip. So of course my waistband ended up offset too. But I decided to just fudge it since it wasn’t a big difference and this is just a toile. And got lazy and decided to use a snap button. I got out my snap press but when I went to get a button I realised I had leftover from the Corduroy Bomber Jacket project (no tool required) so even easier! Just used those.
After this I tried it on again and….the waistband sure gapes at the back 🤔 Pinching away the excess with my fingers and the excess is about ½ inch LOL. So I didn’t screw up the waistband measurement, I just needed to ease the waistband into the pant top length. For once it wasn’t me, but I assumed it was and now it looks odd haha.
Reflections
So now that I have a second toile, I’m thinking it isn’t work appropriate given how fitted it is. But also, while you can sit down in it, I wouldn’t say it’s super comfortable. And thinking about it, I don’t like high-waisted pants. I put up with it with my Levi jeans because I don’t have a choice (they don’t do low/medium rise versions of the skinny jeans I like). But also those are made of a stretch denim.
So while I really like the way this pattern looks, it might not be for me given my Style Personality putting comfort over looks. If I were to make it again I’d try in a 10oz fabric, but at this point I think I should probably try a different pattern. I’m still really set on a chino style pant so will probably try the Chi-Town Chino’s from Alina Design Co (once I figure out how to add the pattern to cart and not have the website tell me that my cart is empty LOL. I’ve tried Vivaldi, Chrome and Edge at this point). But for work pants and the mid-weight meetMilk fabric I bought specifically for work pants, I might try the Classic Trouser by The Markers Atelier. I did also think if I really wanted to I could try the chino’s pattern for stretch fabrics from Wardrobe By Me, but as of writing this blog post, it seems to have mysteriously disappeared from their site… Ah well, there are quite a few stretch denim jeans patterns out there, although I like my Levi’s and imagine they should last me a long time so no rush there.
So while I haven’t really gained another garment that I can wear I feel like this was a worthwhile experience. I’m still kinda in shock how easy wonder tape makes inserting zips and I’ve got a better idea of how and when to bias bind seams.
Things I learnt:
- Installing a zip with wonder tape
- How to measure zip length
- Make sure to true up fly and fly guard fronts before attaching the waistband
- I don’t like high waisted pants much
- Fabric ‘growing’
- I actually don’t look terrible with top-tucked-into-pants

Categories: Sewing
Leave a Reply