Planning and Design
I’ve been on the hunt for shirts that have no/very small bust darts, that would be suitable as work wear, and this pattern was one that I short-listed. I’ve been on a bit of a fabric shopping spree recently, buying nice (and sustainable) fabrics and really don’t want to waste any of them by trying to sew a pattern without testing it first, so decided to use some cheaper cotton linen from Spotlight. The thinking being, if it turns out well, great! I will wear it. But if it doesn’t then I’m not too sad.
I was actually planning on using some green cotton linen in my stash but 2m of 112cm wasn’t enough 😅 So used my 145cm cotton linen instead.
Then…I didn’t plan for buttons so turned to my stash once again. Obviously didn’t have matching colours so decided to go contrasting buttons and thread (because I hadn’t planned for that either haha). Luckily I had two sizes of Daiso wooden buttons I could use…this pattern called for quite a few buttons.
Overall an extremely disorganised and slap-dash start to the project 😅
Materials
- Pattern
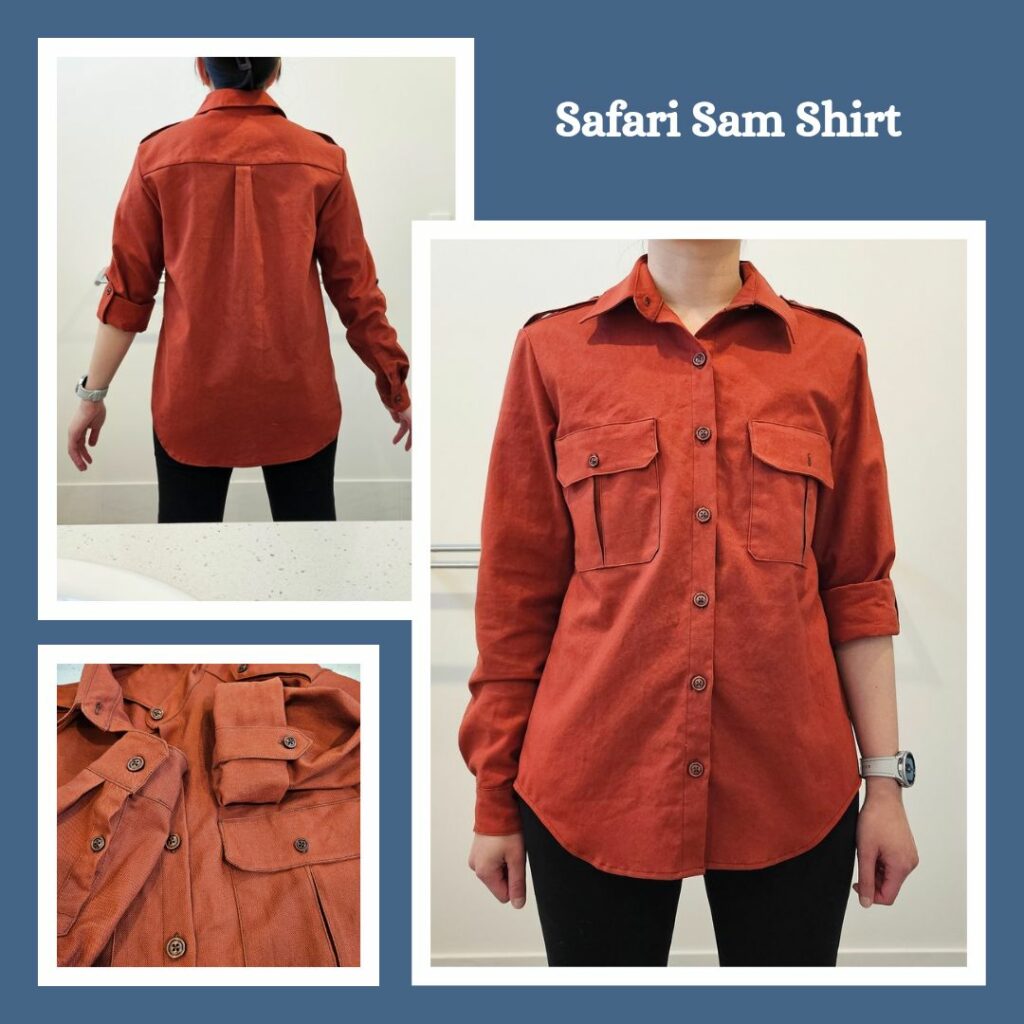
- Safari Sam Shirt (Style Arc)
- Fabric
- Cotton Linen Rust (Spotlight)
- Buttons
- 12mm and 15mm Wooden Buttons (Daiso)
Construction
Ooh boy was this not fun. Partially my fault and partially the instructions fault.
Things that were my fault:
- My choice of fabric wasn’t great. It was slightly on the thick side and frayed waaay too easily.
- I had decided I wanted to try flat-fell seams but the seam allowance is only 1cm so gave up on that and decided to do french seams instead, which I also didn’t have enough seam allowance for but made do anyway.
- Half of my french seams I didn’t trim the fraying edges so ended up having to snip them away after the fact…
The stuff that was either the pattern or instructions fault:
- Pattern says 13 buttons. If you count the ones on the images it’s actually 17 buttons…
- Pattern image shows pocket button but pattern piece has no marking for the button hole so had to guess the placement (not a big deal)
- Collar pattern piece doesn’t show the marking for the collar buttonhole which I also guessed. This one was a big deal cos I guessed wrong so now the top button is purely decorative…
- I re-read the instructions multiple times and didn’t see any mention of when to sew the side seams lol. Which would have been helpful because it dictates how I attach the sleeves. I inferred backwards from the sleeve instructions to figure out that it was side seam first and sleeve set in after. But why do I need to do the mental gymnastics for this 🙄
- The sleeve tab isn’t very generous. I had to move the button so I could actually secure it after rolling the sleeves. I think even if I used thinner fabric it might only juuust be enough if you rolled the cuff up exactly to the width of the cuff and very tightly at that.
- The sleeve placket was in two pieces and in typical Style Arc fashion, there is no explanation on how to attach them. No matter! I was at least prepared for this aspect of the lack of instructions and found an AWESOME tutorial on sewing sleeve plackets. In fact, I’m only going to sew sleeve plackets this was from now on ❤️
Reflections
Yeah, probably won’t be wearing this one. The fabric isn’t very nice on the skin, regardless of how the rest of it turned out. But it’s fine cos I learnt a lot and I think I can use it for planning in another project. Plus I can salvage the Daiso buttons for a different project!
One thing I noticed while taking the photo for this blog is the pockets seem too low. In future I think I would reduce the pocket size and move it higher by at least 2cm.
Things I learnt:
- Spotlight 145cm cotton linen is a different weight to the 112cm cotton linen. It also doesn’t feel as good quality (not that the 112cm version is particularly high quality anyway…) Basically, don’t buy either anymore 🙃
- Best sleeve placket method ever 😁
- When attaching the sleeve tab, sew a rectangle with an X through the middle because it will look much better
- Same goes for the top part of the sleeve placket, put an X connecting the corners of the topstitching
- Always trim seams before doing the second seam line for french seams even if it doesn’t look like it needs it
- Adjust all shirt patterns to allow for flat-felled sleeves and/or french seams. Not sure if they need to be different though (I think 1.5cm vs 1.2cm?), I need to do some research.
- Look up a tutorial on collar buttonhole and button placement. I ALWAYS fail at this and I think it’s because I’m not understanding the basic principle behind it.
- Only do contrasting topstitching if I’m confident I’ll get the spacing right, otherwise it just looks bad lol. Also, use top stitching thread so it stands out nicely
- Always stitch the seam allowances for pocket folds etc, makes it much easier to fold properly
- Remember to finish/conceal raw edges for pocket pieces 😅
- Sew the buttons onto the sleeve for the sleeve placket before sewing the sleeve side seam otherwise it’s just kinda painful. Doable but painful lol
Categories: Sewing
2 replies ›