Planning and Design
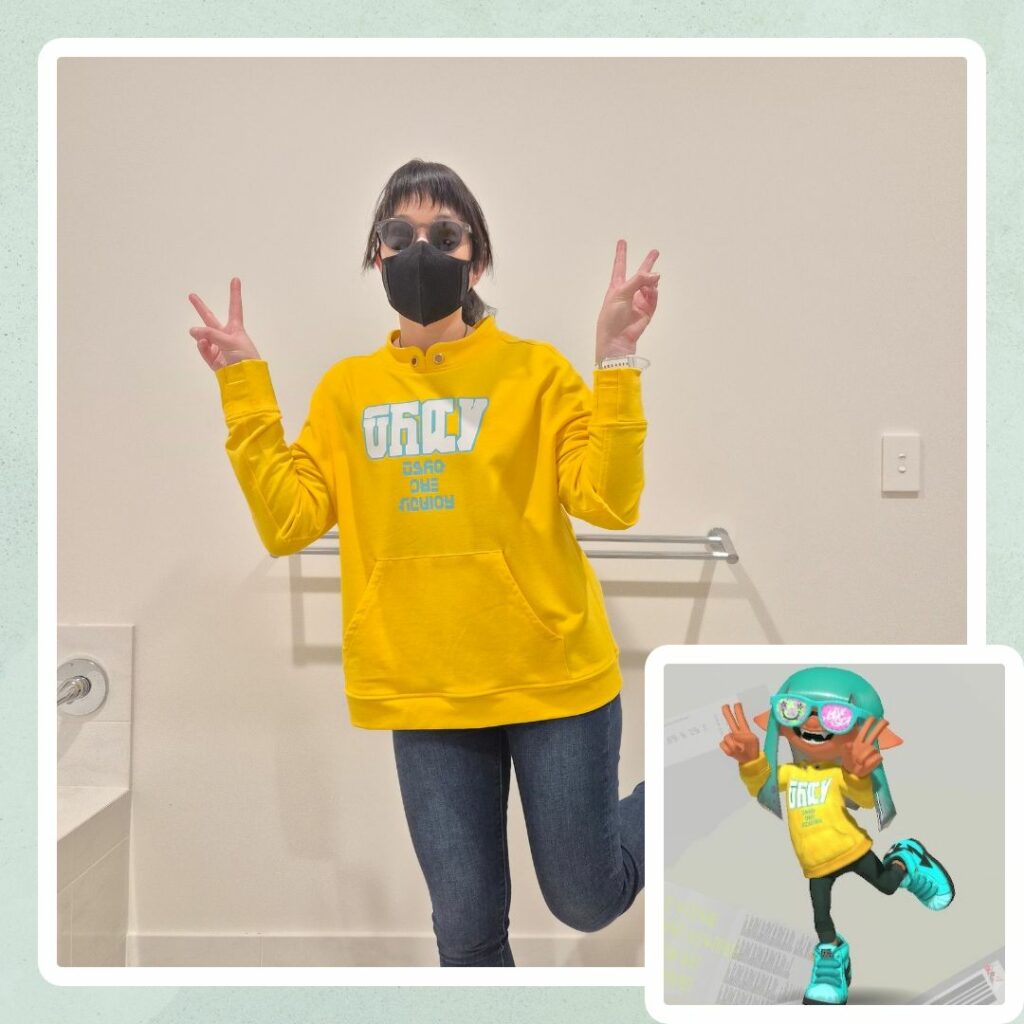
I was on the fence about making this one because I don’t think ‘hoodless’ hoodies with a collar are a real-life fashion thing (from my very limited exposure to fashion haha). And since it’s so bright, those two aspects combined made me feel like I wouldn’t really ever want to wear it out. But I guess a couple of things made me change my mind. Firstly, I ended up using the Dreadwringer (the weapon that I wear this gear with in Splatoon 3) a lot when I was trying to figure out what weapon I needed to use to not feel helpless in Anarchy battles, and it grew on me a lot. Secondly, I’ve decided (realised?) that I can wear nice clothes at home too, and since the Homecraft fleecy is quite comfortable, I would very happily wear this as loungewear. Thirdly, I made a Fitzroy hoodie in bright red, a Fitzroy/Simpson hoodie in bright blue, so making (another modified Fitzroy haha) top in bright yellow would complete my primary colours casual wear (can I call it a hoodie collection if one is ‘hoodless’?).
Changes I made to the Fitzroy Hoodie pattern:
- Replaced hood with a stand collar
- Replaced side pockets with a front kangaroo pouch one
- Added a thumbhole in the cuff. Browsing retail stores with my in-laws is worth it haha (inspired by Lululemon)
- Longer cuff (to accommodate having a thumbhole)
Things I changed from the Lemon Hoodless game design:
- Used main fabric and not ribbing for the cuffs and waistband because that’s my preference
I was procrastinating a bit on starting this project and I think it was because I was mentally overwhelmed. This project had a lot of new things to learn/figure out…:
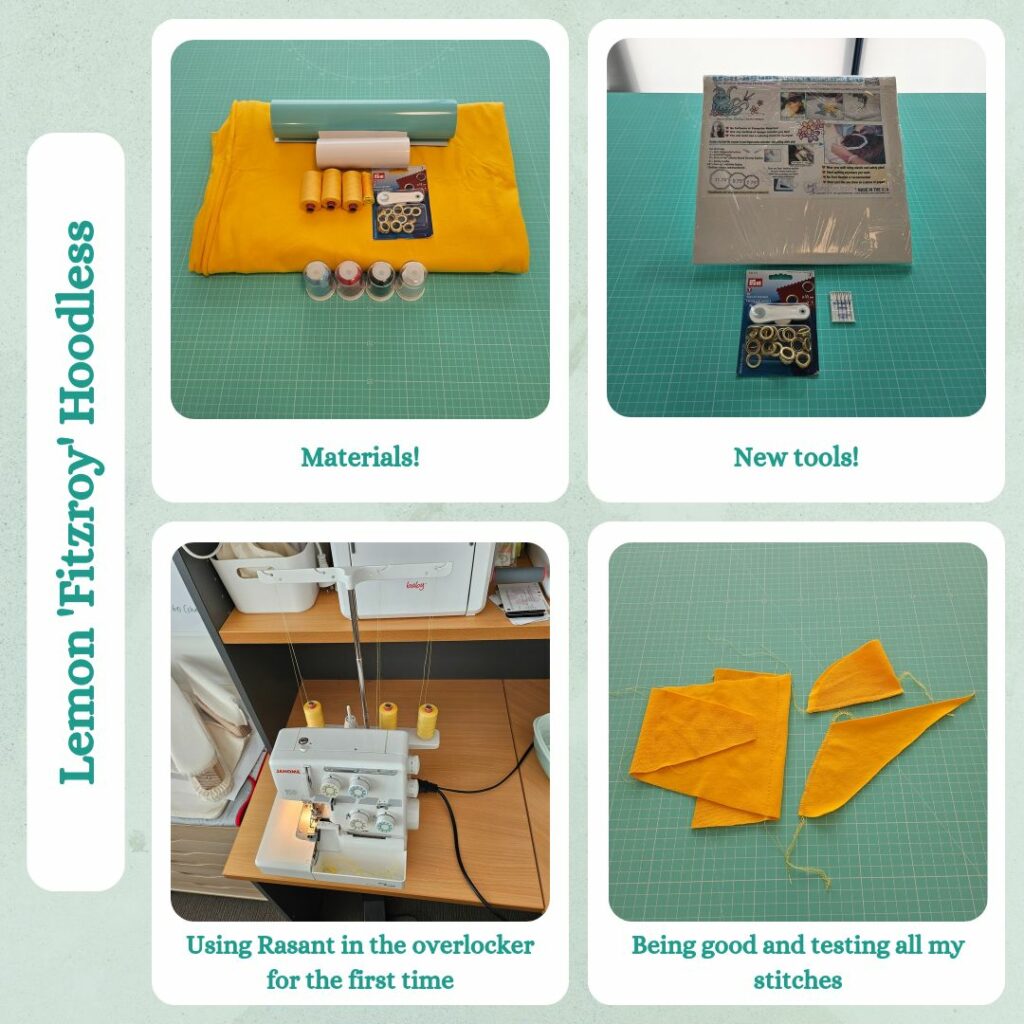
- Using Rasant thread for my overlocker instead of specialised overlocking thread
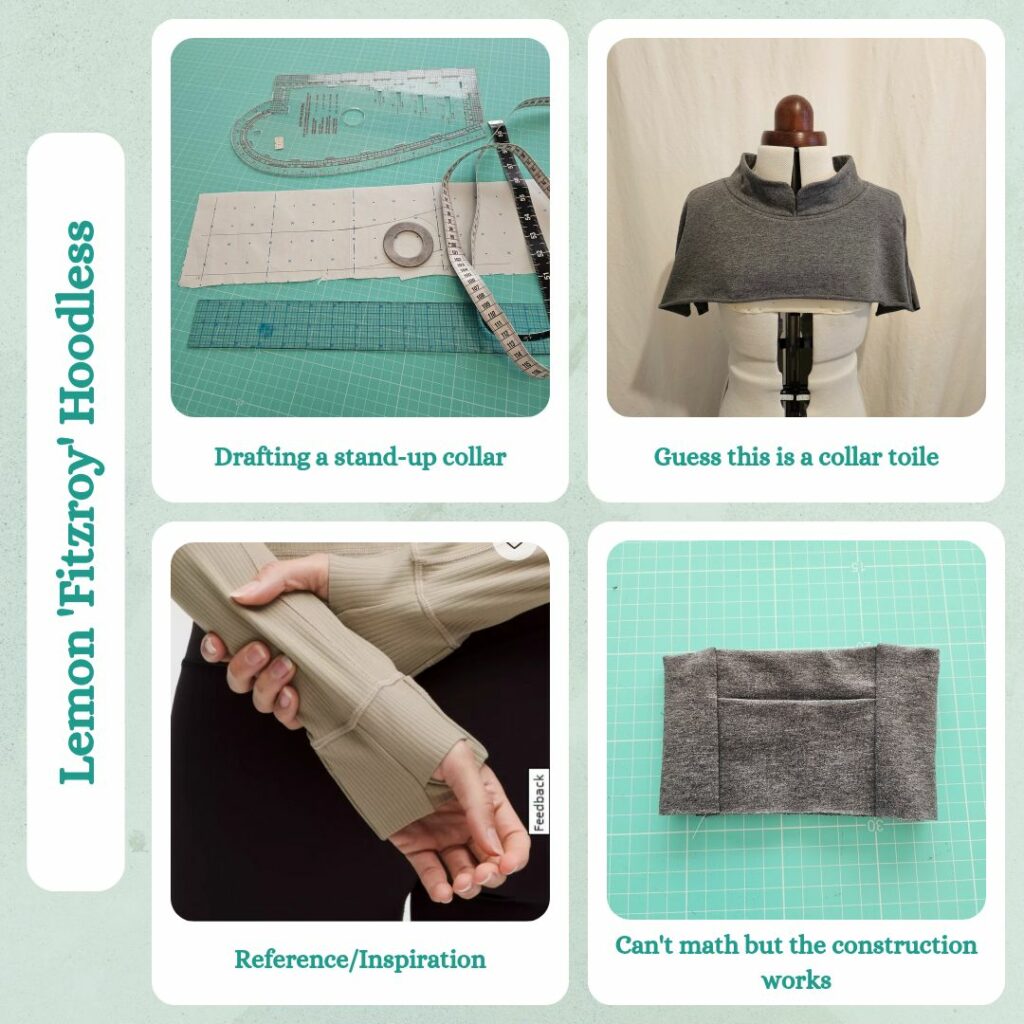
- Draft a collar
- Applying Prym eyelets
- Thumbhole in cuffs
- Replicating the HTV designs
- Free-motion embroidery
- Making an embroidery patch
I thought winding my own thread onto an empty spool (to use on the overlocker) was another list item, but luckily past me had already bought 3 spools of colour matching Rasant. I’m not sure if this is before I had looked into potential methods of transferring the thread or if I had decided ‘no, we’ll deal with that next time’, but I was honestly a bit relieved LOL.
Materials
- Pattern
- Modified Fitzroy Hoodie (Style Arc)
- Fabric
- Cotton French Terry Knit – Yellow (Homecraft Textiles)
- Thread
- Maraflex col. 417
- Rasant col. X0120
- HTV
- SISER EasyWeed® STRETCH – Heat Transfer Vinyl – White
- SISER EasyWeed® STRETCH – Heat Transfer Vinyl – Sea Glass
- Embroidery
- Hemingworth Polyselect™ Thread – Iceberg
- Hemingworth Polyselect™ Thread – Classic Black
- Hemingworth Polyselect™ Thread – Pure White
- Hemingworth Bobbin Thread – White
- Sulky® Fabri-Solvy™
Sustainability Check
👍 Fabric is 95% cotton and 5% spandex so technically considered biodegradable
👍 Maraflex is biodegradable
👍 Fabri-solvy is PVA (poly-vinyl alcohol) is biodegradable and of course, water soluble
🤏 Rasant is OEKO-TEX but not biodegradable
👎 HTV is not biodegradable. But I found out recently that Siser have a product called PureHT which is 100% compostable! And the film & carrier sheet are at least recyclable. The colour range is limited but it will be good for the simple white/black only designs. Plus it’s matte finish which I prefer. Also I learnt the difference between compostable and biodegradable (composting is the ‘higher’ category)
👎 Embroidery thread is 100% tri-lobal polyester. I haven’t sunken that much money into embroidery threads so looked into if I should bail now and invest in something more sustainable. It seems there are some recycled polyester embroidery thread ranges (Polyneon Green and Coloreel) but I feel like I’d rather go straight to Lyocel (Sensa Green). Unfortunately it looks like not only will it be impossible to get a thread colour card (only available via the Madeira website and probably only to wholesalers) but even within Australia, the one place I found that stocks it has a 5 spool minimum order per colour LOL. As for the recycled polyester threads, it doesn’t look like it’s easy to obtain a thread shade card. I think this is not an option for me right now. I’ll check again in like 10 years or so… 😅
Construction
Testing Modifications
I wasn’t sure if I should hack a collar from the hoodie pattern piece but decided to draft one from scratch using a tutorial from Cloning Couture. It was much simpler than I thought it’d be. I made the collar 2″/5cm tall even though I thought it would be too tall, because I kinda wanted to confirm I guess? And yeah, ended up making it 1.5″ tall. It’s kinda annoying when I flip/flop between metric and imperial, but I tend to go with whatever is easiest to measure at that point in time…
For the cuffs, I totally did my math wrong but at least the way I envisioned it coming all together worked. The Lululemon promo image I used as reference had the thumbhole further to the edge of the cuff and I think I understand why now that I’ve put mine together, but I think I’m fine with the placement of mine too. It depends on how much back of the hand you want covered by the cuff when the thumbhole is used.
Sleeves
Due to being disorganised with preparing the HTV, I ended up doing the sleeves first. Even though I did a test of the thumbholes, I ended up making a couple more adjustments as I put together the real deal. I also made sure to capture the overlocker thread ends under the seam allowance when I topstitched it down and I trimmed the cuff seams too before topstitching and encasing that raw edge.
Designing the HTV
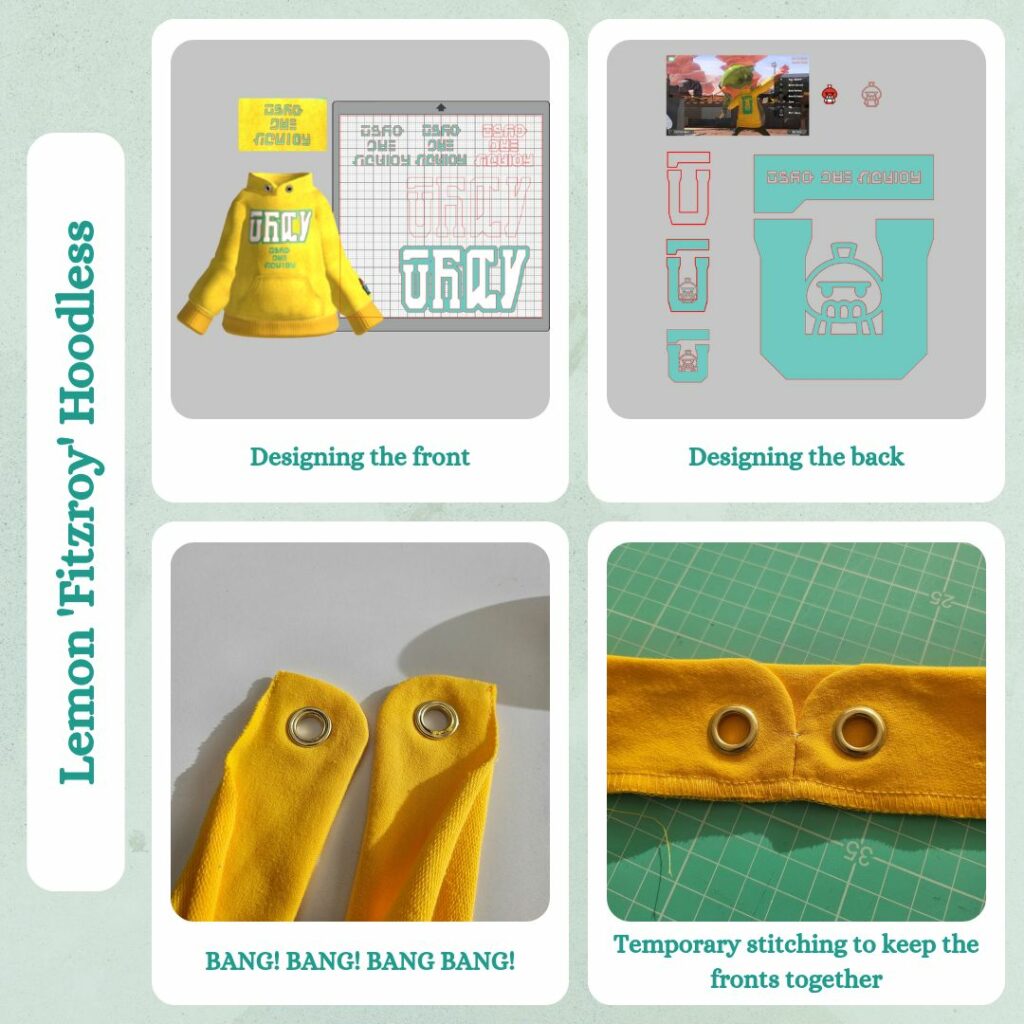
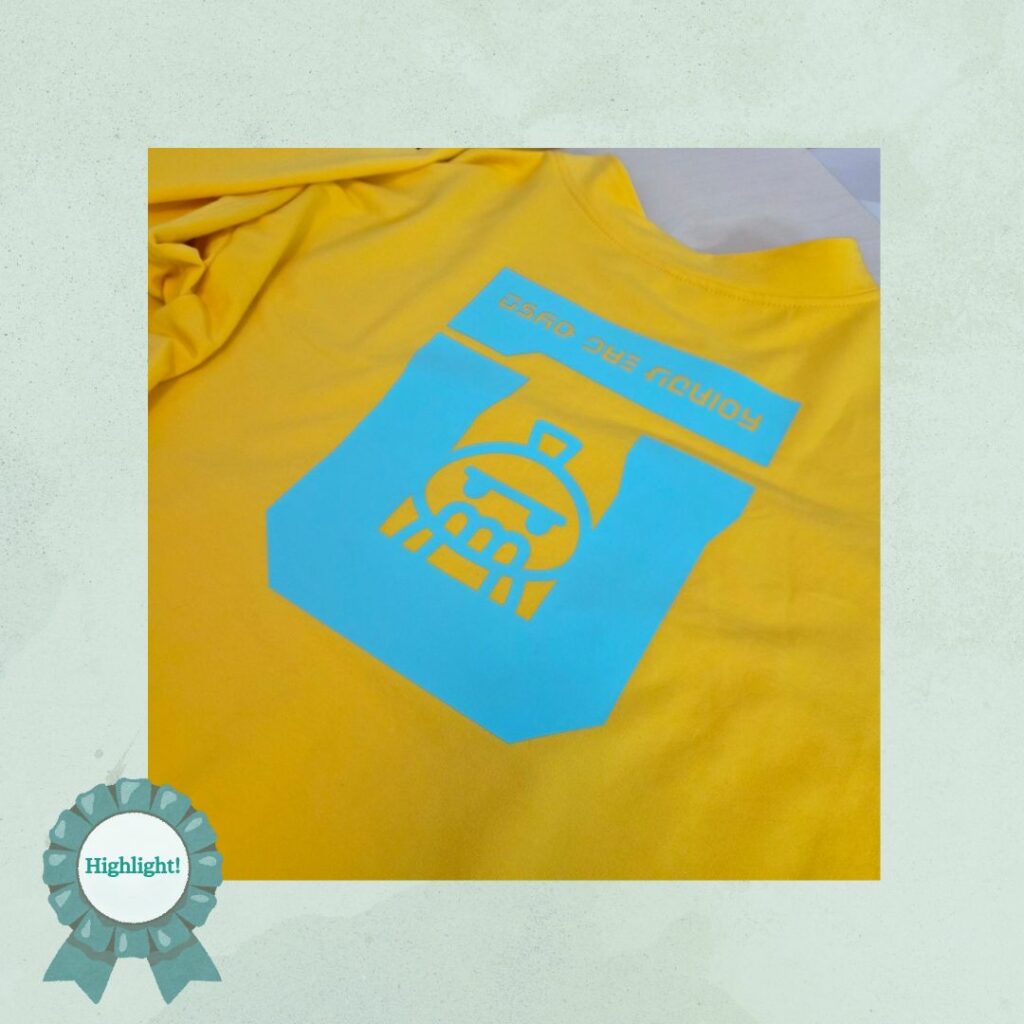
So I was expecting that since so much work has been done on the Splatoon writing system/script/fonts, I would be able to use them as reference for the front and back designs. Unfortunately, whatever they used for this outfit barely matches any of the scripts that have been collated so far 😫 In addition, the logo doesn’t even match the official Z+F logo and is a special custom one for this top??? At least the Switch 2 makes it easier to export screenshots from the game haha. So into photo mode I went and took some snaps, although all the poses ended up distorting the designs quite a bit.
I then brought these into Silhouette Studio and first tried tracing the design, with the intent to try edit the bezier curves to match the very fuzzy reference images I had. This…did not look like fun or like it would get anything near the original design. Then I decided to just digitise it myself. I started with rough polygons based on my screenshots (with the understanding that these were skewed at the sides of the in-game garment), then copied these into a new project and turned on grid snapping. I then adjusted all the corners and made sure the thickness/height/width of each ‘letter’ was similar. This gave me a pretty good ‘sharp corner’ representation of the front logo and random assortment of text underneath (which I’m pretty sure says ‘Zekko And Firefin’…I suppose I could look up the Japanese names and see if it matches any of the scripts that have been deciphered so far, but at this point I’m making it all up anyway so whatever). To get it more rounded, I applied a rounded offset and also adjusted the width to make it more proportionate to the hoodie I’m making.
For the back, I copied the U shape from the front logo and manually adjusted the corners to be more similar to the back design. Luckily, ZF lil dude (the very toothy mascot thing) is a sticker that you can collect, so I was able to easily obtain this particular design and trace it. Then it was just a matter of welding it to my U shape. From there, I adjusted the proportions of the U to align better with lil dude. Then I copied my ‘sharp edge’ writing from the front and arranged them in a single line. After adjusting the size a little bit I placed this is the – above the U and made it all one compound path.
Given I pretty much did all of the designing from scratch, it didn’t take me that long 😮
Applying the HTV
Nothing unusual here. Just…I measured out my designs so I would make maximum usage of my Sea Glass HTV….and then when I was looking at trying to cut 10″ out for the back, for whatever reason, I lined it up with the edge of my cutting mat and cut out 12″ instead 😫 So I had to reduce my front design. Not a big deal, but now I have more scrap HTV than if I had done it as intended.
Also afterwards I realised that my front design was slightly angled. I’m not mad though, because it’s not because I was lazy and winged it. I actually measured it a lot before pressing. but what I should have done, was align it to the grain, rather than measure from the shoulder corners etc. Lesson learnt.
Pocket & Body
Pretty standard construction, but I did notice that when topstitching the pocket down, it was a bit tricky keeping it straight and equal distance from the edge. Maybe I should have used my edgestitch foot?
Collar and Eyelets
I had to look up a video on how to insert the eyelets. I love how the video I used turned the packaging to the back as if to say ‘c’mon, we have instructions on the back, you dummy’, but my instructions don’t look anything like what they show, hence me looking up a damn video! I think I need to hit harder with the hammer. The instructions say 3-4 times but I had to do it more than that. And I need to figure out which part to hit because I feel like the left side of the eyelet was pressed down more than the right. Something I’m sure I’ll get used to eventually.
I also had issues using the tool to cut the hole out. I wonder if it’s because I’m using a knit? I used the impressions from the tool to manually cut out the hole. One side you can see the rough edges a bit, but I didn’t want to trim the hole in case I made it too big. It’s on the inside so I’m sure no one will notice 😋
I also basted the fronts together with water soluble thread so I could do a nice continuous overlocking stitch like it was usual ribbing for a collar. I wanted to try and avoid having a gap between the two collar parts.
Free-motion Embroidery
Part 1
The patch was made up of two distinct stickers from the game, so in order to create the design, it was just a matter of downloading the two individually and tracing. The only adjustments I really had to make was make the star outer corners sharper. I did this by releasing the compound path, deleting the curved outer line and scaling up the inner star. I also moved the inner flower bit down slightly to give a bit of space between it and the overlapping lil dude.
I did a test embroidery (with a freehand drawn very wonky heart) to see if my intended method would work and which feet to use. I wanted to do the colours completely free-motion but use a free-motion zigzag for the black borders. This was also my first time using my new free-motion quilting feet. I bought these because I think I ruined my darning foot with the chalk powder I use to mark out my designs and now it squeaks something crazy 😣 Looks like the open toe is a good fit for the fill and the clear view sole is the only option for the zig zag. Ignoring my terrible freehand heart shape, I think this was actually a pretty good result, especially considering it was my first time trying this. It feels almost equivalent quality to some of the embroidered designs I’ve seen in EB Games lol (which is more a comment on the quality of EB Games merch than my skills 😗).
I did some practice with my scarf mending project before tackling my own patch. And in doing so, realised that my plan of using water soluble stabiliser wouldn’t work because my stitches aren’t dense enough. And I don’t really feel like it making it dense enough for this to work. Since I used white thread on the navy blue scarf, you could really see the underlying fabric beneath very easily too. So I decided to go with another method and ordered some printable fabric.
I procrastinated on printing out my design. I wanted to make sure I didn’t waste the fabric sheet. So was thinking about the different things I could print out and embroider. But I wasn’t really that keen on doing any additional designs. In the end, I kinda realised that I probably needed to make the white space around my design decently sized enough to help with the stabilisation and embroidery part, so printed 4 of the same design, so I had spares for practising.
And it’s good I did this, because the very first attempt helped me realise a couple of things:
- I bought white/black bobbin threads for embroidery, but now thinking about it, I’m not using a dedicated embroidery machine so I probably didn’t need to do this? You can definitely see the bobbin thread on the front and at first I thought this was a tension issue, but I adjusted it while embroidering the red portion and it made no difference. Then I finally realised that since I’m doing free-motion on a normal sewing machine, the stitches are probably different. So looked it up and indeed, the satin stitch of a dedicated embroidery machine is designed to ensure the bobbin thread doesn’t show on the top. I couldn’t find anything on the internet about whether I should be using matching thread for the bobbin if doing free-motion embroidery, but after referring to Meredith Woolnough’s Organic Embroidery book (that I received from my Secret Santa last year), I found her section about how to design colour gradients and interestingly, the top thread and bobbin thread changes are different, in order to introduce colour mixing not just via the top thread, but through the combination of top/bobbin threads.
- I should avoid sewing along borders for the colour fills because it looks a bit weird. So next time will lock stitch and move to the new area. Or be smarter about where I start and finish my fills.
- I don’t need to use water soluble stabiliser at all anymore. Since I’m making a patch I actually want it to be quite stiff, so should just use normal embroidery stabiliser
- Just like free-motion quilting (cos it’s basically the same thing), I really struggling going horizontally. It just gets stuck somehow and end up with a ‘jump’ due to the pressure build up trying to push it in that direction. Which is especially bad for smaller more detailed work in free-motion embroidery. But I don’t actually really need to go sideways, since my work area is so small (compared to quilting), I can just rotate the design so I’m mostly going ‘up’ or ‘down’ or even ‘diagonal’ and not ‘right’ or ‘left’.
Now that I’ve made the realisation about bobbin thread, time for another break while I wait for my pink bobbins to arrive. Because I realised that I need to really differentiate between the bobbins for my different threads or I get super confused and ain’t got time to waste trying to match bobbin threads to main spools LOL. Hence pink will be for embroidery threads.
Part 2
So about 5 weeks later I’ve got my pink bobbins and motivation to tackle this again LOL. I realised this time that the spool covers have a rubber stopper at the top so I figured that maybe the thread is meant to go through this to provide some extra tension control? And yeah, it really helped stop the thread bounce around so much. When I wound a bobbin without using the cover the thread bounced out of the thread holder 😅 I’m still running into issues a bit winding bobbins, sometimes it just gets caught at that one turn (that the fusible and water soluble threads also have issues with), so this is really making a case for getting a dedicated bobbin winder where I can control things a lot better.
I forgot about not needing to use water soluble interfacing, but not a big deal, I guess this means that my tests are more comparable this way. The second attempt I ‘coloured’ in the design with stitches orientated vertically. I had quite a few issues at certain points getting the Octi-hoop to move smoothly. I thought it turned out ok, but the best looking part was the black border of the star, which was orientated parallel to the design rather than vertically, so thought I would try another time, this time filling the areas like I would if I were hand embroidering it instead. However, one other concern was, the embroidery looked a bit dirty… I wondered if it was fluff or something? Or maybe the clear foot was rubbing against it. I didn’t realise that I could raise the foot a bit by winding a screw on the foot. But figured I should try an open toe foot anyway. The instructions for these free-motion feet are kind of confusing. But I gathered I was meant to use a straight stitch plate instead. So dug out my sewing machine manual to figure out how to do this. And… 🤣🤣🤣 I had no idea this would allow me access to the inside of my machine. Yes, it says so in the maintenance section of manual which of course I had either never read, or read and then promptly forgot about. I do make sure to clean my overlocker between jobs. But I think I’m not used to having a machine where you can change the needle plate. So I didn’t think of this when I cleaned my sewing machine. I would brush away fluff from all the places I could see. So, you can imagine, the amount of fluff compacted in my sewing machine 😳 I ended up spending a good while removing it all. I think this explains why sometimes my automatic thread cutter would fail. I’m really glad I accidentally discovered this haha. Not just so I could properly maintain the machine, but because I kinda cringe at how judged I would have been if I had brought this in for a service hahahahaha. One other thing that’s different is how much I’m sewing now. So I imagine the build up from my previous usage wouldn’t have been that bad given I usually service it once a year. But it’s been about 1.5 years since I’ve serviced it, so it really all has added up. For good measure I also cleaned the top looper area as per the manual, but this was no where near as bad. And then I had to figure out how to put the bobbin holder back in as well at attach the different needle plate, which wasn’t hard but was a bit nerve wracking because you do have to push down quite hard on it and putting that much pressure was scary (I was worried I hadn’t aligned the bobbin part properly).
With this done, I could finally try Take 3. And this is definitely the best one. I also read on the instructions for the feet that you shouldn’t pull the ‘quilt’ towards you, so I tried to angle things so I was always moving the Octi-hoop in a diagonal direction.
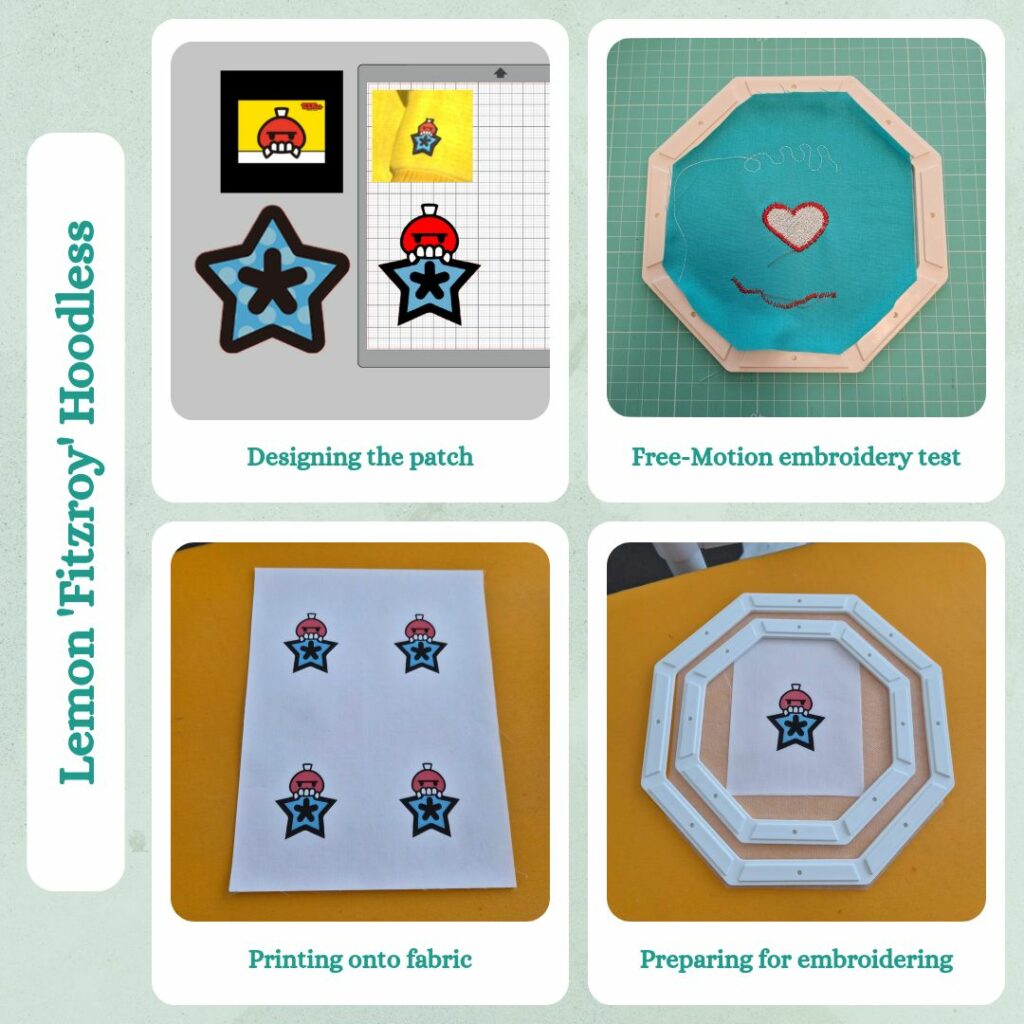
Creating the Patch
So I forgot I used water soluble interfacing and thought it was normal interfacing and tried to iron the Fuse and Stick and just ended up burning it haha. Whoops, time to soak all my embroidery and let it dry. I also need to place some baking paper between the embroidery top and my ironing board, because some of the colour from the black thread transferred to my ironing board cover…time to give it as a wash I guess.
ONE YEAR LATER…
Damn has it been this long? I wasn’t planning on procrastinating on this for so long, my original plan was to bundle the finishing of the patch with my next lot of HTV work. But I just legitimately didn’t have any for an entire year 😶 It was only when I decided to give my brother’s Granblue Sweater prints a bit of a refresh that I managed to get together a bunch of items for heat pressing (redoing the collar on my Maple Balloon Cardigan and block fusing the interfacing for my Ginger Jean toile).
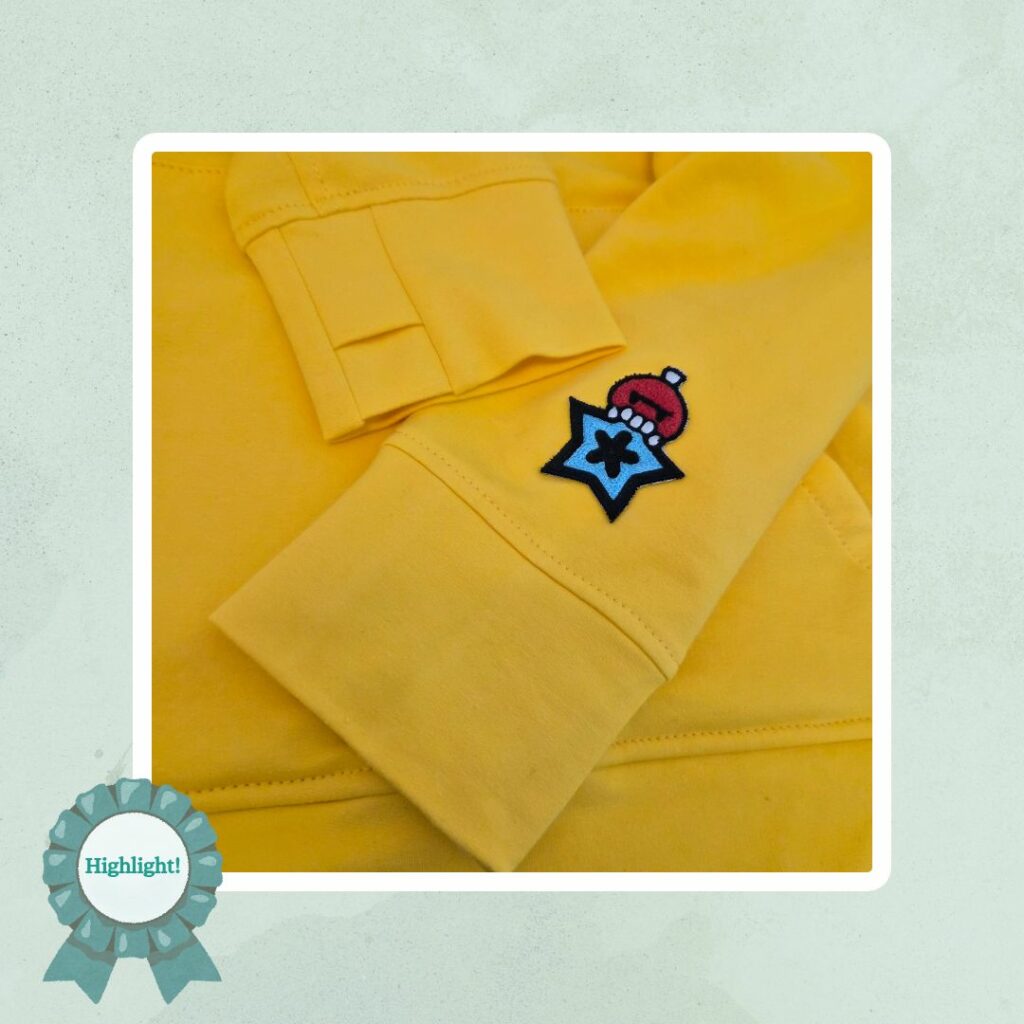
But on the bright side, I discovered via the Punch and Judy newsletter, that I can use fray stop on patch edges. Wonder why I didn’t consider that before lol. I tested this on my practice piece and it seemed to work pretty well. But after trimming the edges, I realised a couple of things. Firstly, you can still see the white at the edges from the printable fabric. Secondly, this is just embroidery, it doesn’t have the thickness of a patch. I realised this because I bought a sample pack of labels and patches from The Dutch Label Shop. I had a look at how their patches were constructed and next time I make a patch, I should embroider onto a pretty thick underlay of interfacing. I think I used washaway interfacing. Not sure why now (oh yeah, because I forgot it wasn’t required anymore).
To salvage this patch, I got my brother to donate me some black felt. My plan was to use the felt as backing to make it thicker and then do applique zig zag stitch along the entire border to try and hide the white of printable fabric. For my test I cut the felt to size and appliqued it without fusing it in anyway. A bit of a mistake, the felt didn’t stay in place perfectly so I had to trim some of it off. So for the real thing I used the fray stop, put a square of black felt underneath and appliqued that, then trimmed it. The issue with this was it was hard to trim the felt to the applique stitches without cutting through the stitches themselves lol.
The next step was trying to adhere the Fuse And Stick with the heat press. The non-paper backed side fused like any normal interfacing (so fine). But removing the paper backing and attaching the patch to the sweater and heat pressing that did NOTHING. So I just gave up and hand stitched it down 🙃
So! My notes for patch making:
- Print the design onto printable fabric
- Stabilise with a decently thick interfacing. Or rather, look up options (I did a quick google and there is a lot of good advice out there, now why didn’t I do that to start with haha)
- Free-motion embroidery over the printed design. Don’t worry about getting super accurate outer borders, as long as it stays within the print and doesn’t fall short by over 2mm.
- Use fray stop on the back of the embroidery along the borders
- Trim to the embroidery
- Apply the Fuse And Stick to help hold in place while doing applique zig zag stitch along the border. Or if doing a stand-alone patch, look into options for adhesive backings (probably need to do the applique zig zag stitch before applying any backings)
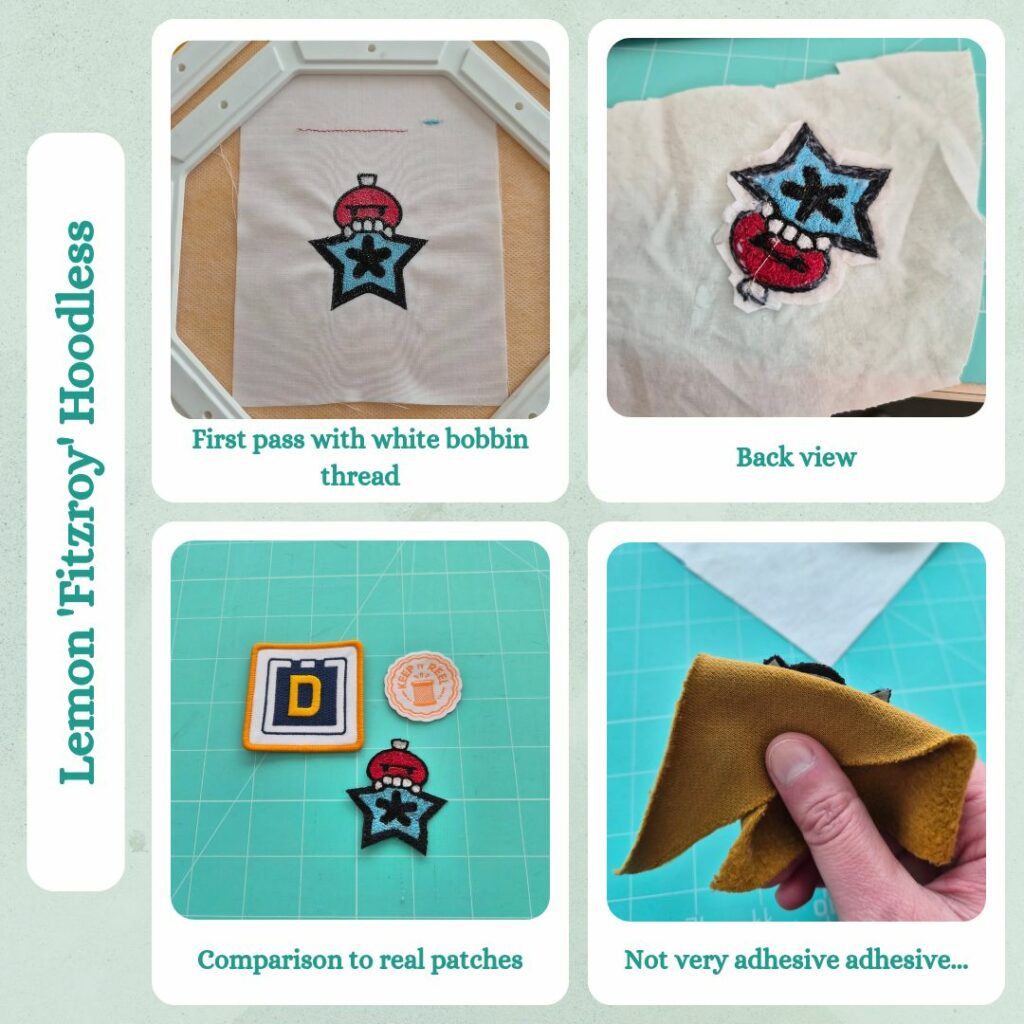
Reflections
Funnily enough, I ended up turning all my hoodies into sweaters, so now this fits into the Primary Colour Sweaters collection. The collar is ok, 95% of the time I don’t notice it. I have very little faith in the patch standing up to wear and tear but if it breaks down I’ll just remove it.
It’s pretty interesting how much can change in a year. I’ve since found patterns to do the cuff thumb slots and AI could probably replicate the designs way faster and more accurately than my attempt in Silhouette Studio… I’m also no longer buying fabric from Homecraft Textiles and I’m pretty much done with Splatoon 3.
Things I learnt:
- How to draft a stand-up collar
- Creating thumbholes in the cuff
- Turning on grid marks and snapping in Silhouette Studio to help with digitising designs
- Make sure to align HTV designs to the fabric grain
- Use the edge-stitching foot for all topstitching, just in case
- How to insert Prym eyelets
- Installing and using the free-motion quilting foot set
- Free-motion embroidery and best way to fill a design
- Cleaning the insides of my sewing machine
- How (not to) make a patch
- You can sew through Fray Stop (for some reason I thought you couldn’t)
- Fuse & Stick only is good for temporary holds
Categories: Sewing

Leave a Reply