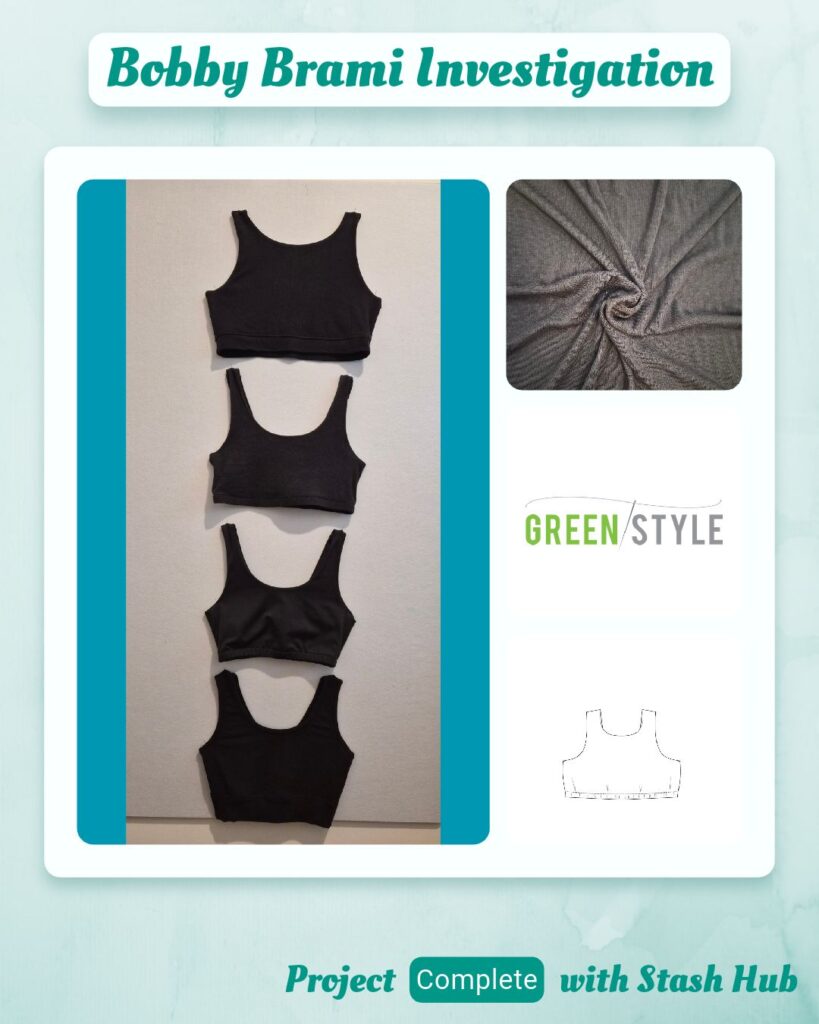
Planning and Design
I was going to call this the Big Boody Bra replacement project but realised I have an even bigger Boody replacement project in the works, so this is downgraded to an investigation of one particular garment.
There were a couple of things I wanted to test with this:
- If it would be suitable for a sleep garment
- If I can line it sufficiently to wear as a day garment
- What fabrics to use to get a quick dry sports version
To match the Boody version I went with the U-front and U-back design.
Materials
- Pattern
- Bobby Brami (Greenstyle)
- Fabric
- 2×2 Bamboo Rib Jersey – Black Bear (Remnant Warehouse)
- Minerva Core Range Stretch Power Net Mesh – Black (Minerva)
- Midweight Compression Knit Wicking Athletic Knit – Black (Riverside Fabrics)
- Thread
- Maraflex col. 000
- Madeira Aerolock Overlocker Thread – Black
- SoftLoc™ Tex 35 Wooly Poly Thread – Black
- Notions
- Knitted Elastic – Black – 20mm (Textile Traders….yes it’s that old)
Sustainability Check
👍 Bamboo ribbing is bamboo and likely <5% elastane so technically biodegradable
👍 Maraflex is 100% polybutylene terephthalate and compostable (as long as it’s not in marine or fresh water)
🤏 The compression athletic knit is 87% recycled polyester (13% spandex/elastane) and is deadstock
👎 Powernet is 92% polyester and 8% nylon
👎 Overlocker threads are 100% polyester
👎 Elastic is likely polyester
Construction
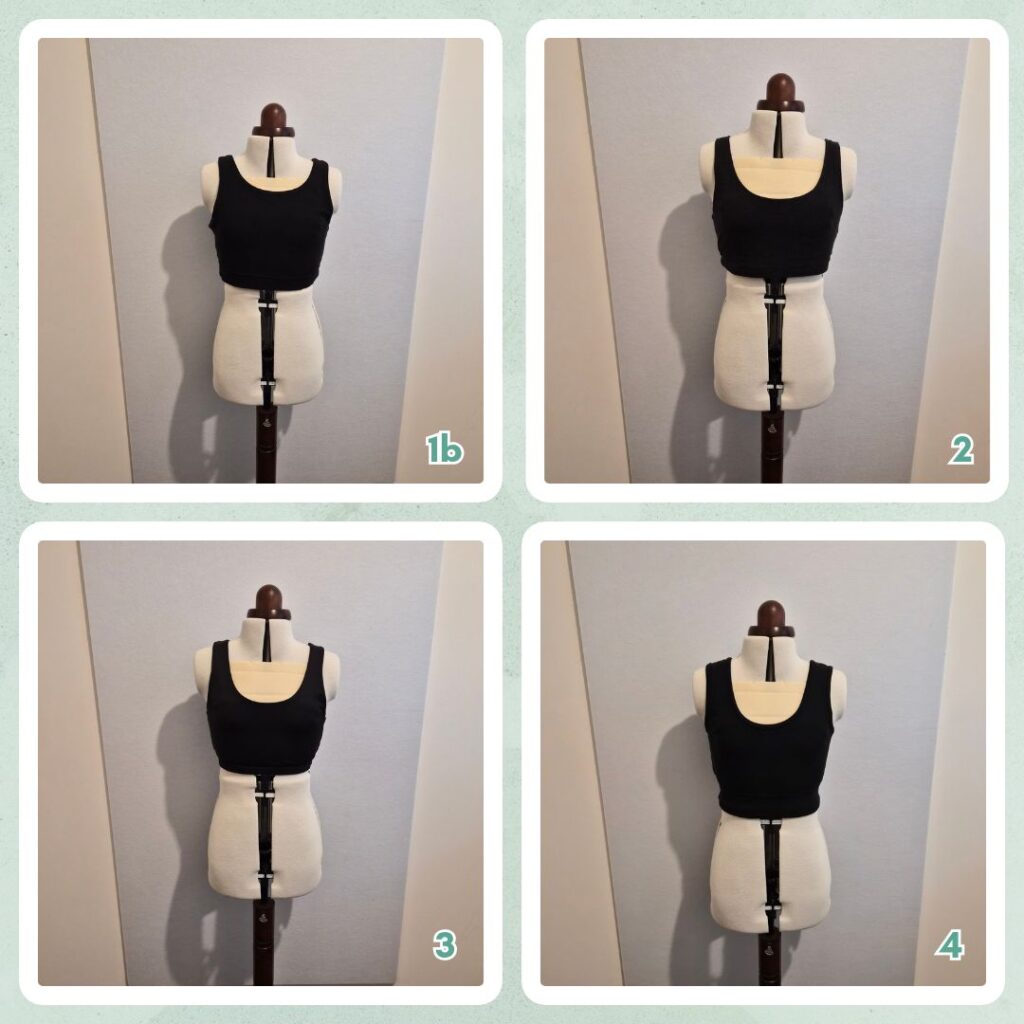
Version 1 – Bamboo Ribbing outer & inner
I have two lots of bamboo ribbing so used the smaller remnant first and just managed to eke out all the pieces. I had reviewed the instructions beforehand and understood that it was using the burrito method but couldn’t wrap my head around how to apply it since I’ve only ever used the method for shirt yokes. Thankfully Greenstyle have a tutorial video which was very helpful.
I started off sewing the seams with Maraflex but it honestly probably would be easier to use the Gloria 4-thread overlock. So I switched halfway (at the burrito method) since I could see that’s what Greenstyle were doing.
Since this one is the sleepwear test I measured my underbust (82cm) and first cut 80cm elastic but decided that was too long and reduced it to 75cm. This length required very little stretching but still feels secure from a test wear.
I think I failed at my seam allowance nesting (I pinned it but I think it shifted while I was sewing) so I may topstitch it down with the Skyline (at least at within the seam allowance) to help myself later on. And I for some reason feel very strongly about attaching the elastic with the 4-thread overlock and then sewing over this again with coverstitch, so I used the Maraflex to just do a single line of topstitching, which works fine since there is very little stretch required with such a loose elastic length.
Verdict – it’s very comfortable! But I feel like it could be lengthened ever so slightly, and it actually reminded that I used to have this same problem with Boody’s Seam-free Crop Bra, I guess my upper torso is a bit longer than the ‘norm’.
Lengthening the pattern by 1cm seems doable, but I thought I could maybe try to length this one with a wide main fabric band and forgo the elastic. This would make it even better for sleep. So I removed the elastic (to reuse in Version 2) and made do with what I had remaining of the bamboo ribbing remnant. I ended up cutting two pieces 14 inches long and 3.5 inches wide, which is just slightly less than the circumference of the brami itself, once the two pieces were joined.
The new length brings the brami in line with my current Boody Ribbed Seamfree Crop and it didn’t ride up during sleep so that’s a success! I think I will adjust the pattern slightly though so the band itself is wider and the seam is higher (matching the elasticised version). I guess this adjusted make is Version 1b.
Version 2 – Bamboo Ribbing outer/Power Mesh inner
Turns out I had traced the high neck for the front and actually had been wearing Version 1 the wrong way around LOL. It was still super comfy though 🤣 So I adjusted the pattern to follow the scoop neckline and added 1cm to the length.
I had to refer to the tutorial video again because I still couldn’t wrap my head around the burrito method haha. Maybe third time lucky? This time I only used the Skyline to understitch and hem the elastic.
So this one had the correct length but the elastic was too loose for daywear. I also don’t love the Power Mesh inner, it’s not as soft as I thought it would be. So Version 3 won’t be Technical Knit out/Power mesh inner but Technical Knit outer & inner.
Version 3 – Technical Knit outer & inner
I have a range of deadstock technical knits (black and white from Riverside Fabrics and white from Closet Core) but started thinking that if I want a staple supply maybe I should find a non-deadstock stockist, preferably Australian, which basically just means Voodoo Rabbit. But waiting for an order to arrive would kill momentum so I took out the black Riverside Fabrics deadstock since I only have 1m of that. It’s so lovely though. I compared it to the Voodoo Rabbit samples I have and it is definitely softer and silkier (the Voodoo Rabbit fabric isn’t bad, but isn’t as good). So I did end up going to check Riverside Fabrics and they might still have some (black in stock). But I’m getting side-tracked.
For this version I used the same pattern pieces as Version 2 but I cut the elastic to 56cm, which I based on the 80% version of the wide band piece for Version 4. I had issues with my Skyline skipping stitches so switched to a Stretch needle (from jersey) and it completely fixed the problem.
This one is perfect. So comfy!
Version 4 – Bamboo Ribbing single layer with wide band
One of the things I didn’t really realise was even though it’s a bralette, it uses a decent amount of fabric, especially when using the same fabric for the shelf bra. I didn’t have enough to of my Bamboo Ribbing to cut all four pieces. So I checked the ribbing I had for the pajama set I’m working on and that also can only fit three pieces. Which got me thinking, if it’s for sleepwear it doesn’t really need the double layer. But if I don’t use double layer I’ll need to bind the armholes and neckline. I thought about finally testing out the binding attachment I bought, but I really would prefer to bind a in-the-round piece and not deal with the extra bulk. So this ended up being the perfect test for my alternate coverstitch binding method theory.
I had already prepared wide band version pieces of the bra and shelf bra pattern pieces (removed 2cm from the bottom of the original, based on the width of elastic I was using). So I just took the shelf bra pieces and cut those. Then I measured the bottom of the front and back together and created a 12cm wide band piece at 90% of the length. I cut this and attached it and it seemed like a good length (I had 80% marked on the piece as well just in case, which I used for the elastic for Version 3). So I used my Stitch Buzz curve rulers to measure the length of the armholes and neckline and cut 4cm wide binding pieces for these at 90% of the length as well. I attached these using the Gloria 4-thread overlock stitch and then folded it over the main bra piece and hand-basted the excess. I used the coverstitch machine to secure the binding so it had a fairly nice flat finish (as opposed to the usual way I would have done it where it would end up with 5 layers of fabric).
I tried this one on and was pretty pleased with the fit. The only issue is the armhole felt a bit tight because I didn’t remove the seam allowance, I wanted to see if the wide strap would be fine, which it is on the shoulder but not in the underarm. This is an easy fix, just remove the seam allowance on the armhole side and probably re-measure the length to redo the armhole binding piece too (it’ll probably end up 1cm or so longer).
Reflections
I’m really happy with the results of this investigation! I’ve figured out what fabrics I like and how much I should buy (I think 1.5m so I can fit all 4 pieces, and then depending on the width of the fabric I’ll either be able to get 2 or 3 pairs). I didn’t expect to end up with essentially 3 different variants though (which isn’t a bad thing):
- Double layer elastic band
- Double layer wide fabric band
- Single layer wide fabric band with binding
I could also unpick Versions 2 and 4 to make them all to my preferences but will probably only bother to do this for Version 4 (remove the binding, trim away the armhole seam allowance, reapply the binding). But I will do this another time 😅 What I will do is prepare separate pattern pieces for each variant I’ve come up with.
Things I learnt:
- How to burrito sew shoulder straps
- Use a stretch needle on technical fabric knits
- Clipping and nesting seam allowances on knits is really beneficial
- Hump jumper for getting over seam allowance bulk on the Gloria doesn’t work that well, pulling the back of the garment ever so slightly is maybe a better way to get over these parts?
Categories: Sewing

Leave a Reply