


Planning and Design
The purpose of this toile was to test the pattern and try a small bust adjustment. I had multiple fabrics I could have used but went with one with a similar weight fabric to the future intended project.
I remembered seeing photos of the Kalle shirt with a contrast lining (?) and liking it a lot so decided to do same here. Meaning a facing instead of bias binding which is the defauly finishing option for the tunic style. This also makes it different to the future intended project which is good. I was indecisive about how much contrast I should use. Doing the under collar and inner cuff bands felt a bit much. So ended up choosing just inner most aspects, in other words, details only I will appreciate 😝 Except I accidentally cut out the inner collar stand in white so just left it haha.
Materials
- Pattern
- Kalle Shirt & Shirt Dress (Closet Core)
- Fabric
- Plain Cotton Linen Fabric – White 140 cm (Spotlight)
- Komu La Farfalla Silhouette Butterfly – Blue Grey (Japan fabric haul)
- Buttons
- Plastic White Pearl Look (Stash)
- Interfacing
- Fine Light Non-Woven Interfacing – White (Homecraft Textiles)
- Thread
- Rasant col. X2000
Sustainability Check
👍 Fabrics are cotton and cotton linen blend so biodegradable
🤏 Buttons are reused from stash but are plastic
🤏 Rasant is OEKO-TEX but not biodegradable
👎 Interfacing is polyester
Construction
SBA
I used the Closet Core guide and I think it went ok? My final adjusted pattern piece looked similar to their example diagram. My issue was not really knowing where to draw the line from on the hem.
Preparation
On a whim I tested my three Frixion pens. Because I’ve been using blue a lot so figured I should use the other ones too. Unfortunately the results of the test were not equal with blue the clear winner. The black didn’t even disappear fully and the red left a very faint yellow mark, which could appear like staining if someone looked closely 😣 So definitely need to form a habit for testing Frixion pens for every project.
I identified an additional benefit to having a grid mat as my table top, it makes cutting interfacing much easier. I usually eyeball how much to cut for each piece of fabric I plan to heat press interfacing too and that is usually very inaccurate. I generally try not to cut the interfacing bigger than the fabric because it makes cleaning the heat press a pain, so having the grid marks means I can make a snip at the relevant width/length and follow the gridline to ensure a straight-ish cut.
I’m also glad I reviewed the instructions the night before starting the sewing. I guess it’s easy to get into the mentality of ‘I know what I’m doing’ but especially with this project, where the instructions are across two pdfs, I’m glad I realised that I couldn’t follow the instructions in order. So also need to form habit of reviewing instructions all the way through before starting – especially for expansion packs. It wouldn’t have been unsalvageable, I just would have done side seams too early, but it would have still been demoralising.

Body and Sleeves
Things went smoothly since this pattern is one that Closet Core uses in their shirtmaking course. The main things are my topstitching felt a bit too narrow (my usual offsets don’t work well with the ditch foot) but since I’ve ordered an edgestitching foot it doesn’t feel worth troubleshooting settings for the ditch foot. So I just made do with double topstitching. I tried to apply this across the ‘feature’ parts of the shirt (front band, collar, cuffs, pocket).
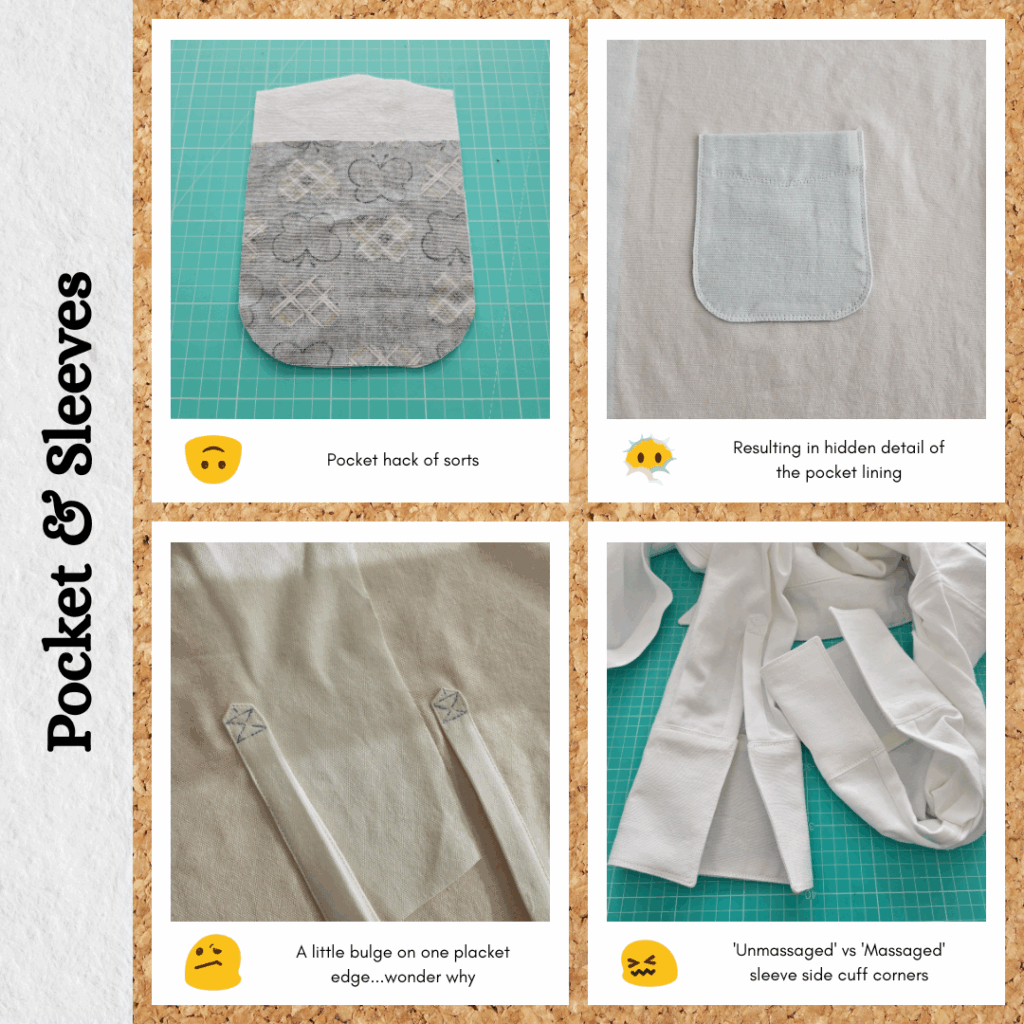
I was dreading having to press the pocket curve so decided to line it instead 😋 It didn’t end up too much bulkier and I’m happy with how the pocket made up now.
I need to sew yoke and collar band seams narrower than the seam allowance so that the second seam will conceal this first row of stitching. Something to remember for next time.
The collar points weren’t as sharp as I was hoping but I think I was being unreasonable given the thickness of this fabric.
I flat-felled the shoulder seams, almost on auto-pilot, and then realised the sleeves being attached to the body meant flat-felling the side seams would be tricky…french seams it was then! But if I had thought ahead I would have done the shoulder seams french too.
For the cuffs I was planning to practice the burrito method but went on autopilot with my original method 😂 But I think it worked out because the fabric is quite thick. And I realised I can ‘massage’ the bulk to the wrong side so it looks nice and flush with the plackets. I might need to look into interfacing the cuff only up to the seam allowance to reduce bulk though 🤔
Hem Facings
I eyeballed the front and back pattern pieces and decided on a 10cm wide facing. But luckily I checked against the contrast fabric I had and I definitely did not have enough. So 5cm facing it had to be.
The front was a little tricky to draft because the curve just never looked right. I ended up going between a straight 8cm offset from the hem edge and an offset tracing of the original hemline starting 8cm higher. For the back, I wanted to make sure the part of the back that was longer than the front had a facing. I think I probably could have made the facing a bit wider because when looking from the side, you can see where the back facing ends…if you happen to be looking there LOL.
I did wonder if it would be worth buying pinking shears to clip the curves because my hand always gets so sore doing all the little snips. But I think I can’t justify it just yet since it doesn’t take that long and I don’t do curves that often either.
Buttonholes
I had issues with the automatic buttonhole foot and the collar band. I remember reading about using a mallet to assist with sewing jeans waistband buttonholes so decided to give it a shot. I couldn’t tell the difference by feel, but my machine did 😅 Good to know it works. I also think I understand how I need to approach the positioning of the collar band button. I need to sew the front placket buttonholes first, then mark out the far edge of the placket buttonholes and then add on a little bit extra for the bar tack of the collar band buttonhole. Then I think all the buttons will line up nicely.
When I tried to place the placket buttonholes, I found myself in a bit of a dilemma. I had 11 buttons from my stash and was using 4 for the sleeve cuffs, which were longer than I expected. Which left 7 for the front. One of these was for the collar band and one was directly beneath the collar band to prevent gaping when buttoned all the way up. Then one was placed at max bust. Given how long the shirt (tunic I guess) is, I did not have enough buttons to equally space all the way down. Then I thought, who cares, it’s not like it’s a rule to have evenly spaced buttons. So the top 3 buttons are ‘randomly’ (actually very thought out) placed and then from there onwards they were spaced equally based on where I wanted the last button to be. I don’t think this will be a problem often since I don’t think I’ll be making many shirts of this length.

Reflections
So when I was transferring my WIP SBA front piece to a clean piece of pattern paper, I overlaid it against the placket front piece and the original shirt front piece and the only difference looked to be a reduction in total length by about 2cm 😳 It made me wonder if I screwed up when aligning the side seams, like did I just add back everything I removed? But then I thought about it a bit more, and with a non-shaped top like this, maybe the length is the difference between an A and a B cup? That little bit less fabric required to ‘go over’ the bust. Just comparing the SBA front and the back pieces along the side, you can see that the length looks different, but when I sewed it, I suppose it got eased around the curve of the armhole thus making the hemlines match? The top itself fits pretty well tbh, which made me think I was successful. But feels like a lot of work to go through when I could just chop 2cm off the hem or shorten it along the shorten/lengthen line by 2cm??? 😅 I never did any SBA for the Safari Sam Shirts which are also drafted for B cups, so maybe I just shouldn’t bother with loose fit shirts with no dart? I don’t bother with jacket patterns so feels like the same approach might apply here…
So that’s it on the bust fit, one thing I was a little surprised at was the length. I guess it didn’t really click to me how long the back was compared to the front. I went and looked up what height Closet Core patterns are drafted for and it’s 5ft 6″, and I’m 5ft 4.5″, so I guess that 1.5″ difference plus my own personal preferences mean I should probably shorten the whole lot for the future project.
Things I learnt:
- How to do an SBA (maybe???)
- To test Frixion pens at the start of each project
- Review instructions all the way through as a refresher before sewing to prevent missed/out of order steps etc
- I might be able to do cuffs ‘my way’ instead of the Closet Core way. But I will try the burrito method a couple more times before committing either way.
- Maybe should not interface cuff seam allowance
- How to position collar band button
- Need to consider number of buttons to buy per shirt project based on the ‘necessary’ buttonholes I like to do
- I don’t like heavyweight fabrics for long-sleeve button up shirts
Things I will do for the future intended project:
- Shorten the length. I think if the back is the length of the default front that would be ideal (remove 12 cm)
- French seams for the shoulder as well as sides
Categories: Sewing
Leave a Reply