
Planning and Design
This fabric was sort of an impulse buy. I already had a sage version of a similar pointelle pattern in my stash waiting to be turned into a cardigan, with the plan to use the round collar version of the Wardrobe By Me Balloon Cardigan (because the pointelle seems like a good fit for all the gathers in this design). So when I saw this fabric my brain immediately thought of how I could make a V-Neck version in this colour. Because I do quite like matching sets.
I ended up making this one before the sage version because I have more maple knit fabric to turn into a different cardigan and thought it would be more efficient this way as I wouldn’t need to change overlocker threads.
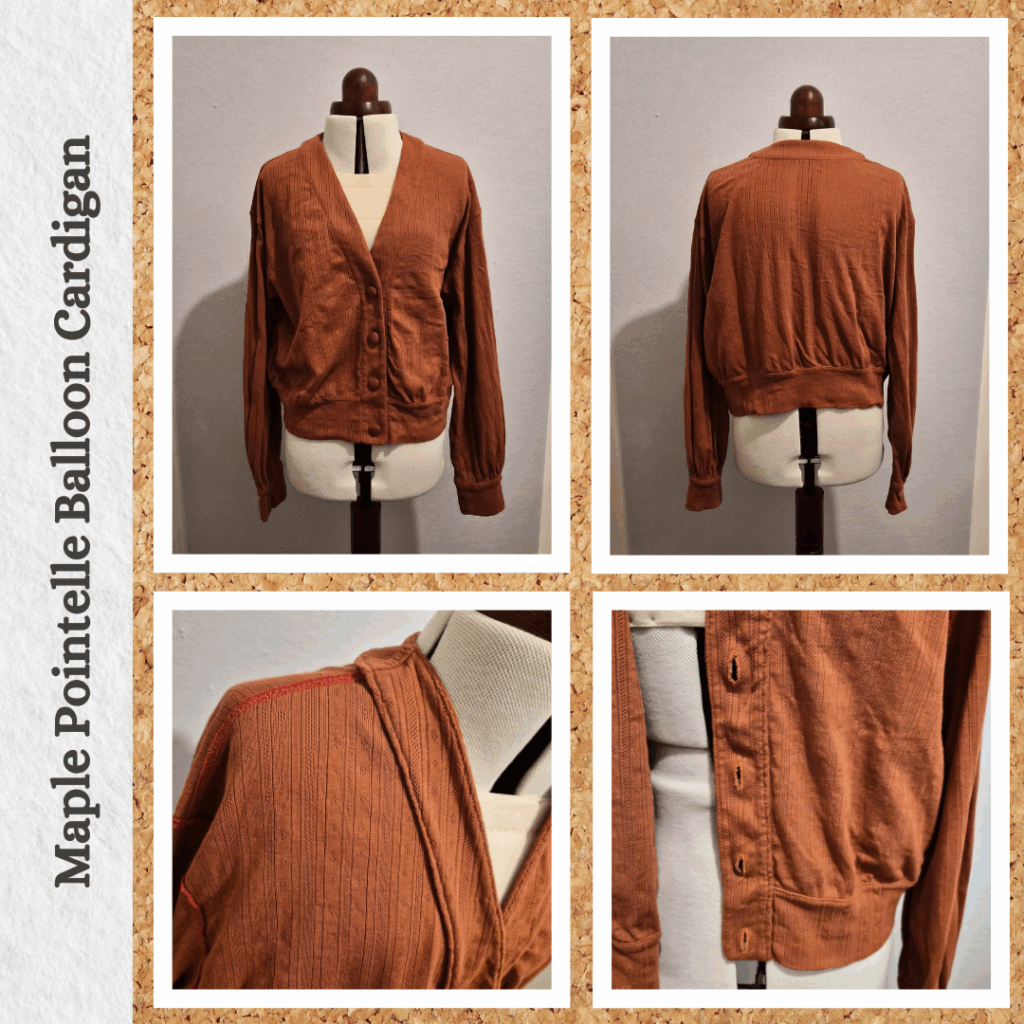
I ended up going with the cropped version, because as much as I like long cardigans, wearing my Sable cardigans to work is kinda annoying because I don’t like to sit on the cardigan so everytime I go to sit down I need to adjust it 😑 So since this cardigan is for work I will make the short version.
Materials
- Pattern
- Balloon Cardigan (Wardrobe By Me)
- Fabric
- European Cotton Pointelle Jersey Knit – Maple (Wattle Hill Fabrics)
- Buttons
- Daiso 18mm Self-cover Buttons
- European Smooth Ribbing – Maple (Wattle Hill Fabrics)
- Thread
- Seraflex col. 1054
- Maxi-lock polyester serger/overlocker thread – Poppy Red
- Interfacing
- H609 Vilene Knit Fusible Interfacing – White
Sustainability Check
👍 Pointelle Jersey Knit is 100% cotton
👍 Daiso self cover button is metal
👍 European Smooth Ribbing is 95% cotton and 5% elastane so technically biodegradable
👎 Seraflex and Maxi-lock are both 100% polyester
👎 Vilene Knit Interfacing is 100% polyamide
Construction
Pattern
So a lot of sewing patterns have variations, which is great! But I’ve always found it difficult to deal with the pattern pieces for these. Do I have separate pieces for each length? What if hem line is different for each length so I can’t just fold the longer version to make the shorter version? And I’m always so paranoid I’ll miss a pattern piece for a particular view when I’m cutting the fabric and end up not having enough because of the way I positioned my pieces 😣 Plus when I make one variation, should I be cutting out the pieces for the other variations? And if I make changes, I should apply them to all the other variations too right? It makes the preparation stage a little bit stressful. I’d much prefer to just have all the pattern pieces I need in one envelope so I can just pull it out and start my project.
Well that is in my control! This is the first pattern where I’m splitting each variation into its own pattern envelope.
Cutting the Fabric
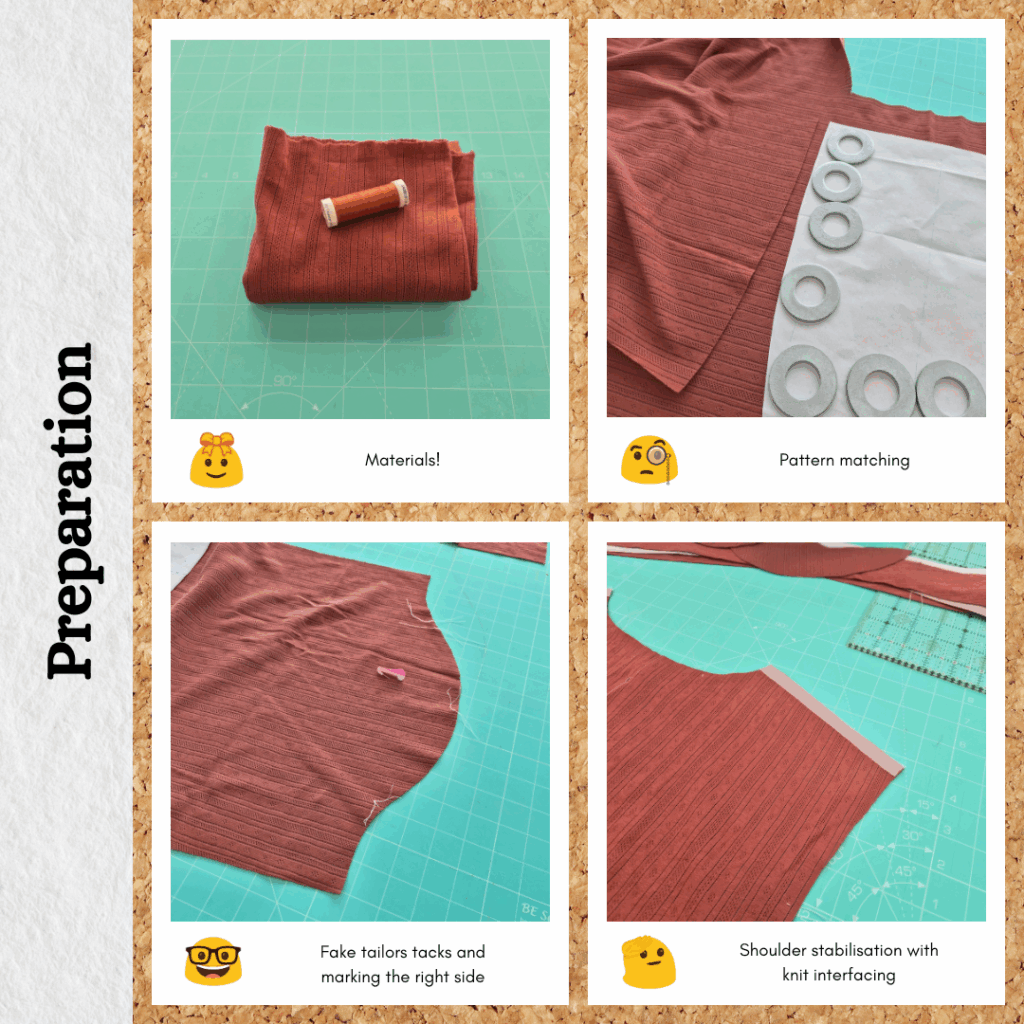
This pointelle is nice because it’s super easy to find the grain, but no so nice because it’s hard to fold. So I decided to cut the mirror image pieces separately on a single layer. I did check for nap (I think there is one) and I also did my best to pattern match/make the back pieces symmetrical. Even for the sleeves. And made a separate pattern piece for the back hemband that didn’t require being on the fold. And marked the right side of each piece with a Clover wonder pin.
I also tried a fake version of tailors tacks. Because marking knit fabrics is painful but I don’t have the thicker type of thread that seems to be used for this purpose (turns out you don’t need special thread, just double it over and loop it multiple times to make it thicker so it doesn’t just slide straight through the fabric).
I block-fused the elastic interfacing, making sure to align the grain and stretch direction. I also decided to only interface the outer band pieces to reduce bulk.
And then I also applied a strip of the elastic interfacing to the back shoulder seam allowance, for stability.
Buttons
So my original plan was to use wooden buttons from Homecraft Textiles. I wanted this to be an almost matching pair with a View B version in a sage pointelle, so bought buttons in two different colours for each version. But the factory messed up the dimensions so the buttons were actually different sizes and this seriously annoyed me more than it should have. I did try looking for replacement wooden buttons, but it’s hard to find these with colour variations. So I decided I would try self-cover buttons with matching ribbing. The fabric itself is quite busy so I wanted the buttons to be on the plain side. But turns out I’ve been slowly chipping away at my Daiso self-cover button stash so I didn’t have enough buttons in the 18mm size for both cardigans (need 10 all up). So I tried covering a 12mm button but the ribbing was way too thick. So back to the 18mm it was. I had enough for this cardigan, and Daiso isn’t some mythical store anymore (we have multiple in Perth I think?) so I can just go buy some more for the other cardigan. It was still pretty hard to assemble though…because the ribbing is so thick. My hands were sore afterwards haha. I’m glad I did this before starting sewing the actual project. If I got to the button stage then tackled this, I think I would feel quite demoralised lol.
Body and Sleeves
Since I had threaded my overlocker with 4 threads, I could actually use it to sew the seams haha. Some extra things I did this time:
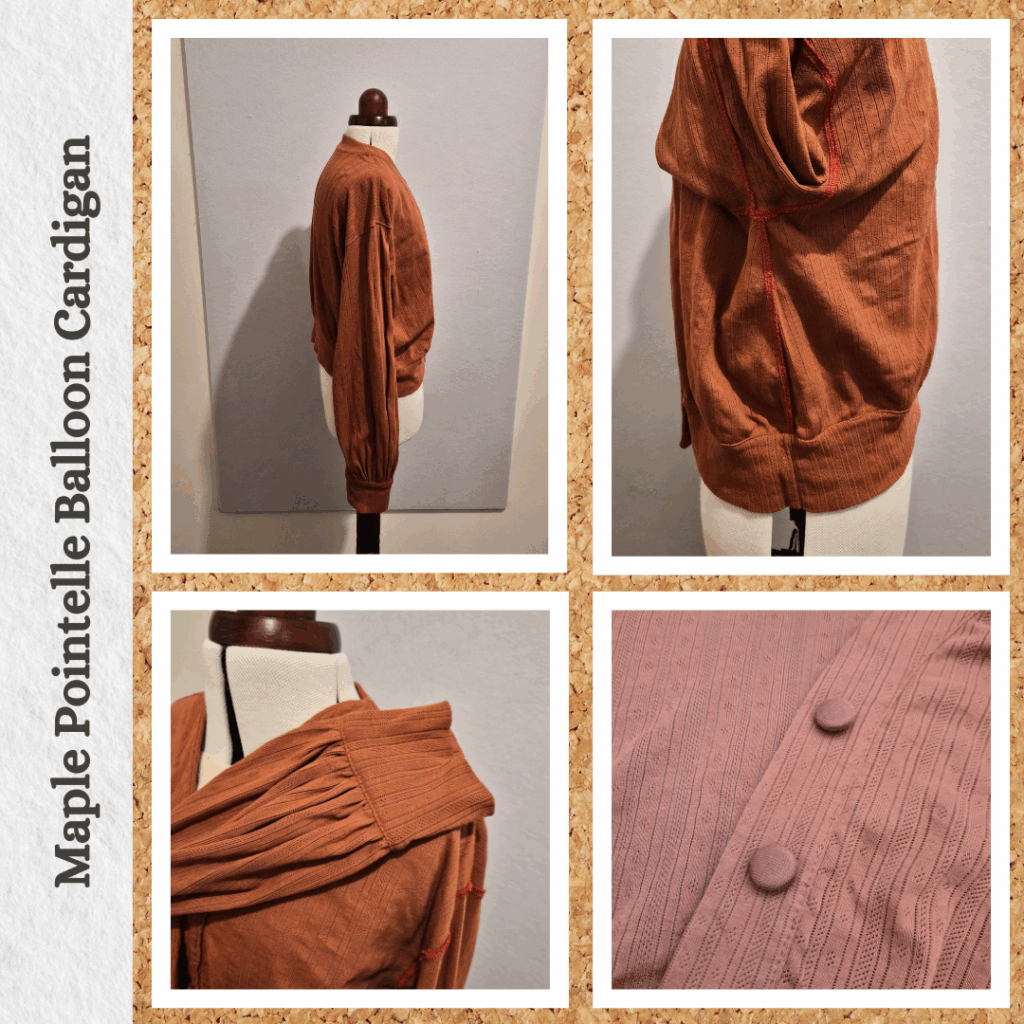
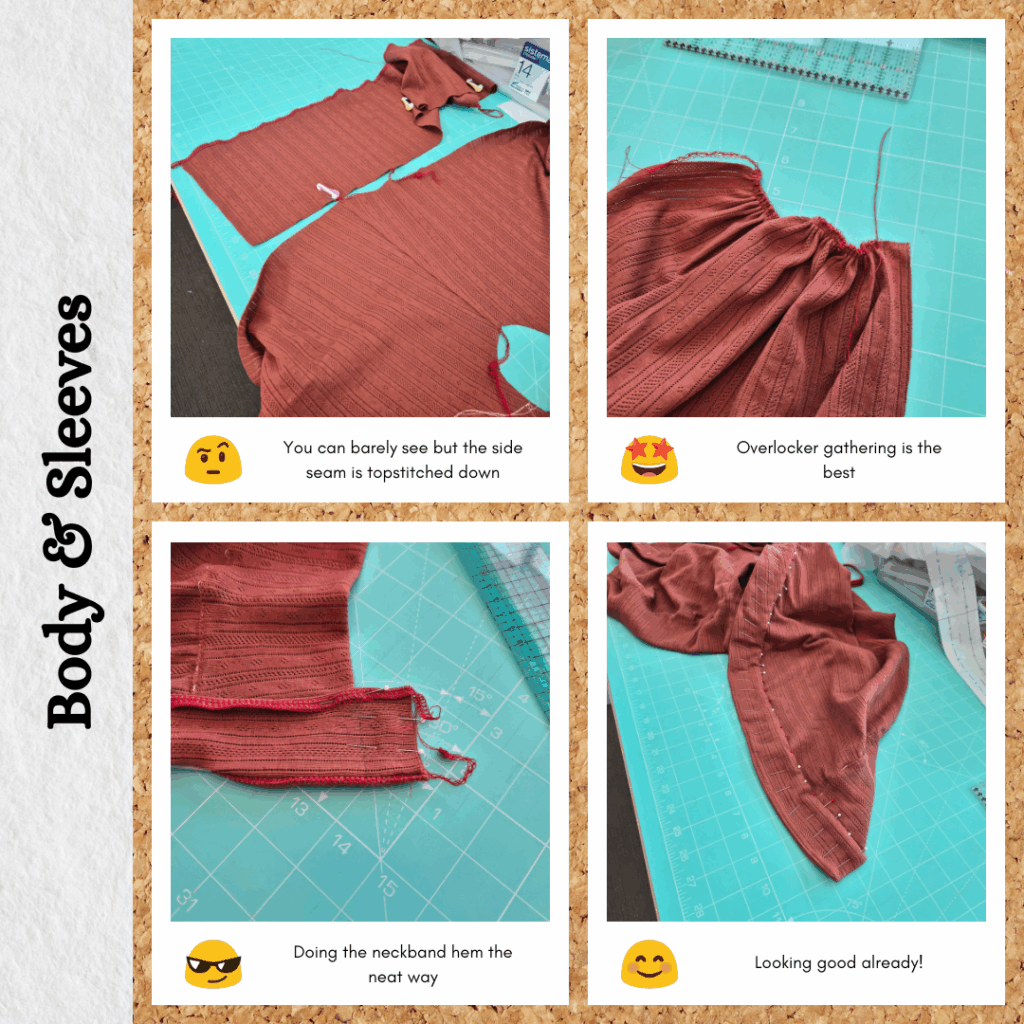
- Topstitch the seam allowances down using the Seraflex. I hate it when you put a garment in the wash and when it comes out the seam allowances are going all directions 😣 So by securing them down I wouldn’t have this problem. I even did it for the cuffs because I find that even though they are encased, they never seem to sit flat and you can sometimes feel it when you’re wearing it…
- Tried to push seam allowances such that they would nest when put together with other pieces. When I make View B I might try to figure out which piece should go which direction and note it down.
- Kept my overlocker tails long so that it wouldn’t unravel as I went along
- Used the overlocker to create my ‘guide stitching’ for the hem and cuffs. This works much better than the Seraflex as it is much stretchier.
For the sleeves, I used my overlocker to gather (after messing up and following the wrong instructions – I was referring to the sleeve head gathering erroneously. Luckily I remembered from the overlocker Master Class how to easily remove overlocking stitches haha). I tried to be smart and left one side free so that it wouldn’t get caught in the seam allowances, but it turns out when you sew the sleeve seam it cuts the overlocker threads and they start unravelling straight away. I was doing this because I thought I would need to gather it even more to fit in the cuff, but it was the other way around. So a step I can skip next time.
For the hem band, I basted the inner side down with a running stitch in water soluble thread but it caused issues when I went to topstitch it (probably because not stretch), so for the cuffs and neckband I did a whip stitch instead and that worked much better.
For the neckband, I folded it back over the body and sewed along the hem line so that it would be encased. I really dislike WBM’s method of just folding it over and stitching it down. So ugly and bulky!
Choosing to encase all of my seams within the various bands meant this took a lot longer but it also made me very happy to see how neat everything was so worth it 😊
Buttonholes
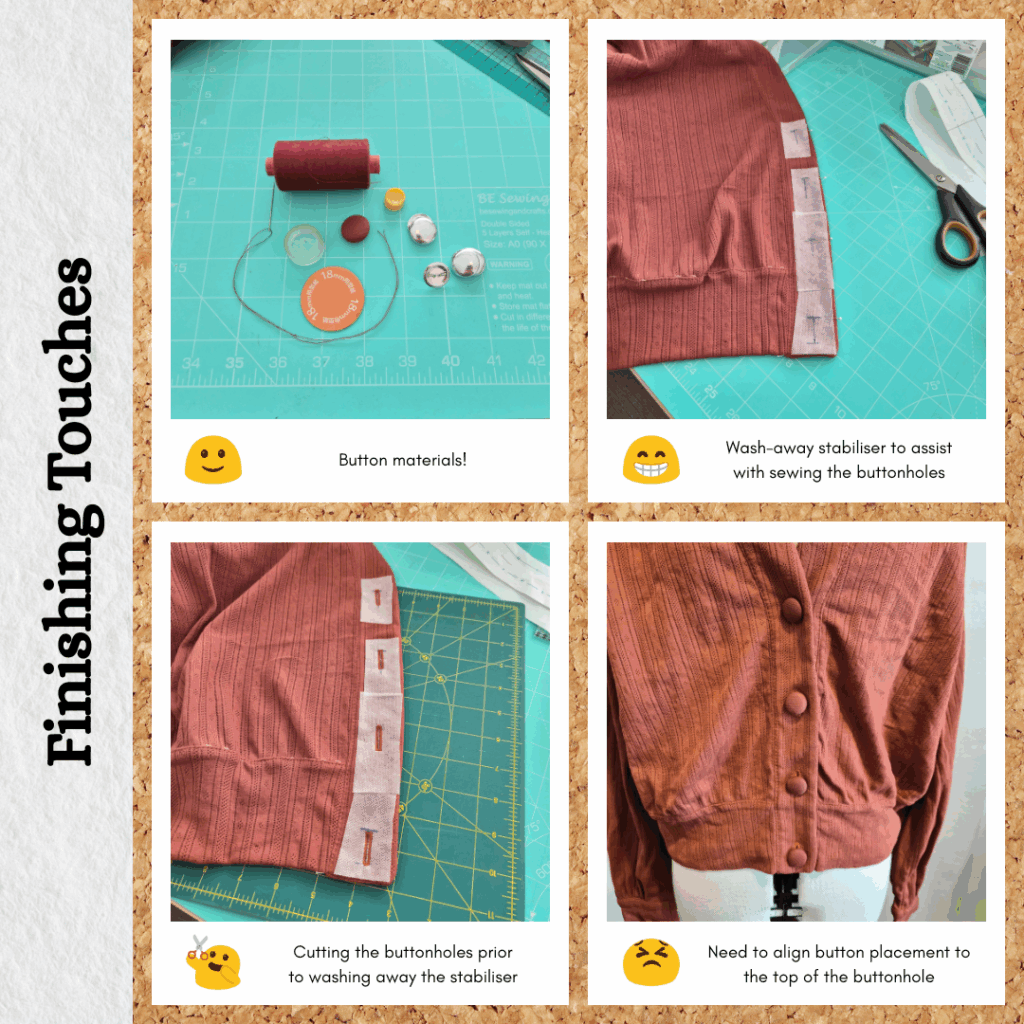
So while testing for size, I wasn’t very happy with how ‘wavy’ the buttonholes ended up despite the interfacing. I guess the interfacing is not sturdy enough. I also was having issues with the Seraflex shredding, so I switched to a jeans needle and slowed the machine speed to 2. And I decided to use offcuts of my Sulky Stitch ‘n’ Sew on both the front and back of the band, to wash away later. This meant that I ended up cutting the buttonholes before adding fray stop, but then again this is a knit so it might be ok? I’m happy with how nice and straight the buttonholes ended up. And it did end up washing out properly so I call that a success.
Reflections
This is actually really nice. It doesn’t look great in static photos (my poor posing probably doesn’t help) but I think it looks quite good in person. Plus it’s really light and the pointelle lets the breeze through which makes it really good for summer layering (I’m weak to the strong aircon that gets blasted in the office haha). The natural fibres feel nice too. Very pleased with this and glad I took the effort to make the insides nice and secure 😁
Things I learnt:
- I don’t think I’m a perfectionist, but I do think I am pedantic about certain things haha. In this case, securing seam allowances and encasing seams.
- Reminded that gathering sleeve heads is a thing I can do with my overlocker and I should use this function
- Reminded of where the instructions for the gathering stitch is in my overlocker manual (the second page LOL)
- It is possible (although difficult) to self-cover buttons with ribbing
- Using washable stabiliser for buttons on knits works well
- You can see the stabiliser and overlocker thread colour through the pointelle knit a bit. Not a big deal, but something to keep in mind as it might be important for other projects
- I would much rather trace out a pattern multiple times then sort through pattern pieces to find the relevant ones
- How to not do tailor’s tacks
- Overlocker makes for good guide stitching for knits
Categories: Sewing
Leave a Reply