
Planning and Design
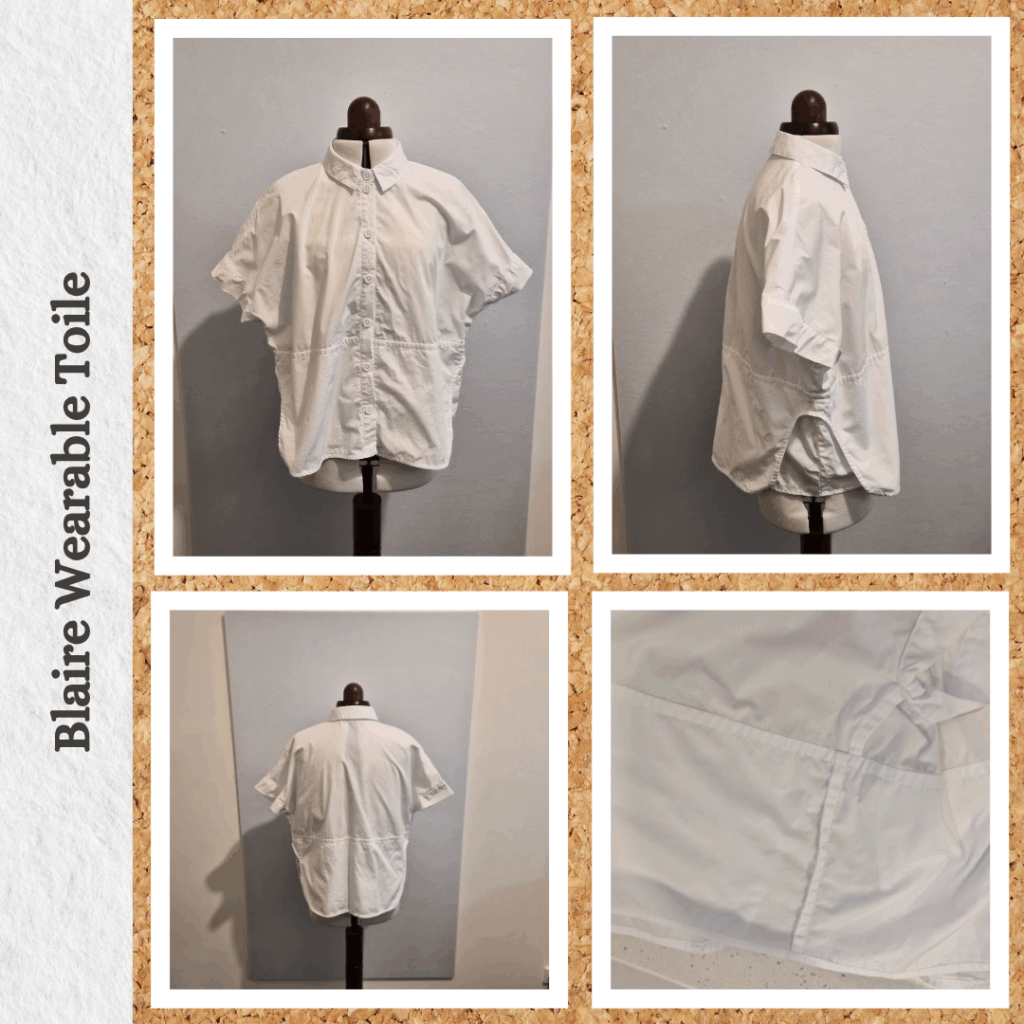
This is the first white cotton wearable shirt toile to be made from the 10m roll I bought from Homecraft Textiles 😁 The plan is to test out new shirt patterns in white cotton, because white shirts are classic so if they turn out well I can wear them as is.
Before tracing out the pattern pieces, I looked up my measurements with my bust falling in a size 8 and my waist and hips matching a size 10. Since it’s quite a box shape, my plan was to go with a size 8, but I decided to look at the reviews on the Style Arc site first and there was one comment mentioning they sized down for one (the top or dress version, I don’t remember which) and sized down two sizes for the other. So size 8 seemed like the go.
I planned to do french seams for most of this shirt, except maybe joining the top and lower parts of the front/back. So made sure to include 1.5cm seams for everything except the collar related stuff (yup even the shoulder seams which I forgot when I made my white Roxy Shirt haha). I gave the shoulder cuffs 1.5cm seam allowance too even though I think it should be 1cm based on my scan of the instructions. But since its easier to remove extra that add it back gonna go with this for now.
I luckily had just enough woven interfacing after making the Cinnamoroll Makers Tote Bags in the correct direction too. I thought about only interfacing half the front band, but decided to try it as intended first. Especially since this is the first time I’m doing this type of band with woven interfacing.
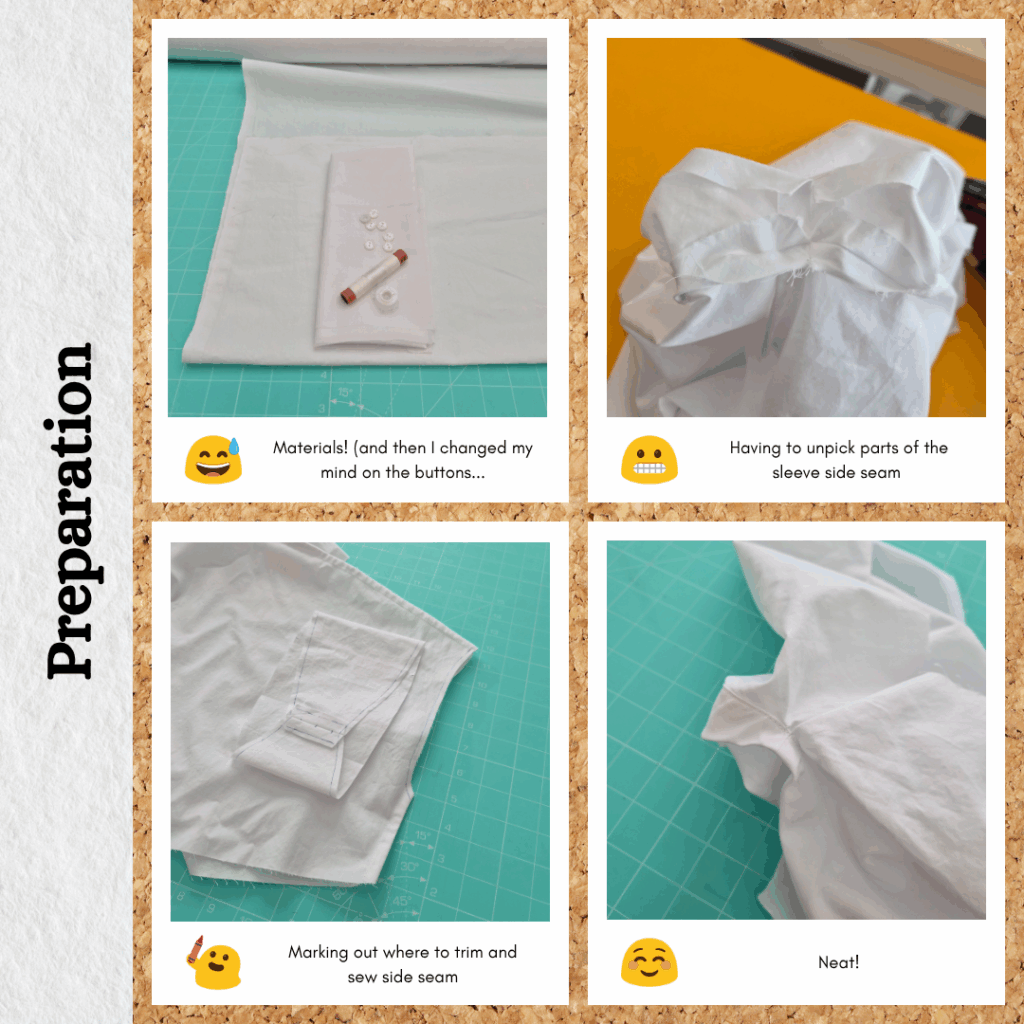
For buttons, I needed 7 so looked at my Stash Hub records and there was actually one set of white buttons that had 7 buttons. No orphaned buttons is good, even though I don’t particularly like these buttons haha. They are leftovers from the very first Roxy I made and are plastic because I wasn’t going down the sustainability rabbit-hole at that point.
The listing for the fabric calls it “Cotton / Homespun / Cotton Poplin”, the poplin part which made me wonder if I needed to use a microtex needle, but figured I would try a normal universal first and see how that goes.
Materials
- Pattern
- Blaire Top (Style Arc)
- Fabric
- Quilters Own™ Premium Cotton Solids – White (Homecraft Textiles)
- Buttons
- Salvaged white rimmed button
- Thread
- Rasant col. X2000
- Interfacing
- G710 Woven and Fusible Interfacing – White
Sustainability Check
👍 Fabric is 100% OEKO-TEX and biodegradable
👍 Interfacing is cotton (woo!)
🤏 Rasant is OEKO-TEX but not biodegradable
🤏 Buttons are plastic but are repurposed from another project
Construction
The first part where I needed to reduce to 1cm seam was the sleeve cuff. It was a bit awkward to sew and I remembered Louise from the sleeve Master Class recommending to use 1cm seams for sleeves in general. Also in order to encase the sleeve cuff seam, it is probably better to not sew the part of the seam allowance that joins with the bodice side seam.
So as a test I reduced all seams to 1cm for other side. By doing this, the raw edge of thr bodice french seam ended up not quite caught in sleeve seam. Not sure if this is because I post-trimmed all seam allowances or do I need to adjust the pattern piece itself…something to investigate. But otherwise, the reduced seam allowance and changes to the way I sew the seam allowance helped a lot.
When it came time to attach the bottom bodice pieces to the top, I ended up confusing myself quite a lot. So for future reference:
- Underlay wrong side up
- Bodice right side up
- Overlay wrong side up
I should also consider pushing bodice side seams to the front so that I can nest it between the underlay/overlay with their french seams pushed to the back. For this I did it this opposite way, but ideally the bulk should go backwards. I trimmed the seam allowance to 1cm seam, graded it and then sandwiched and secured with topstitching 1cm from seam from the top. I will adjust the relevant pattern pieces for this part to 1cm for future versions.
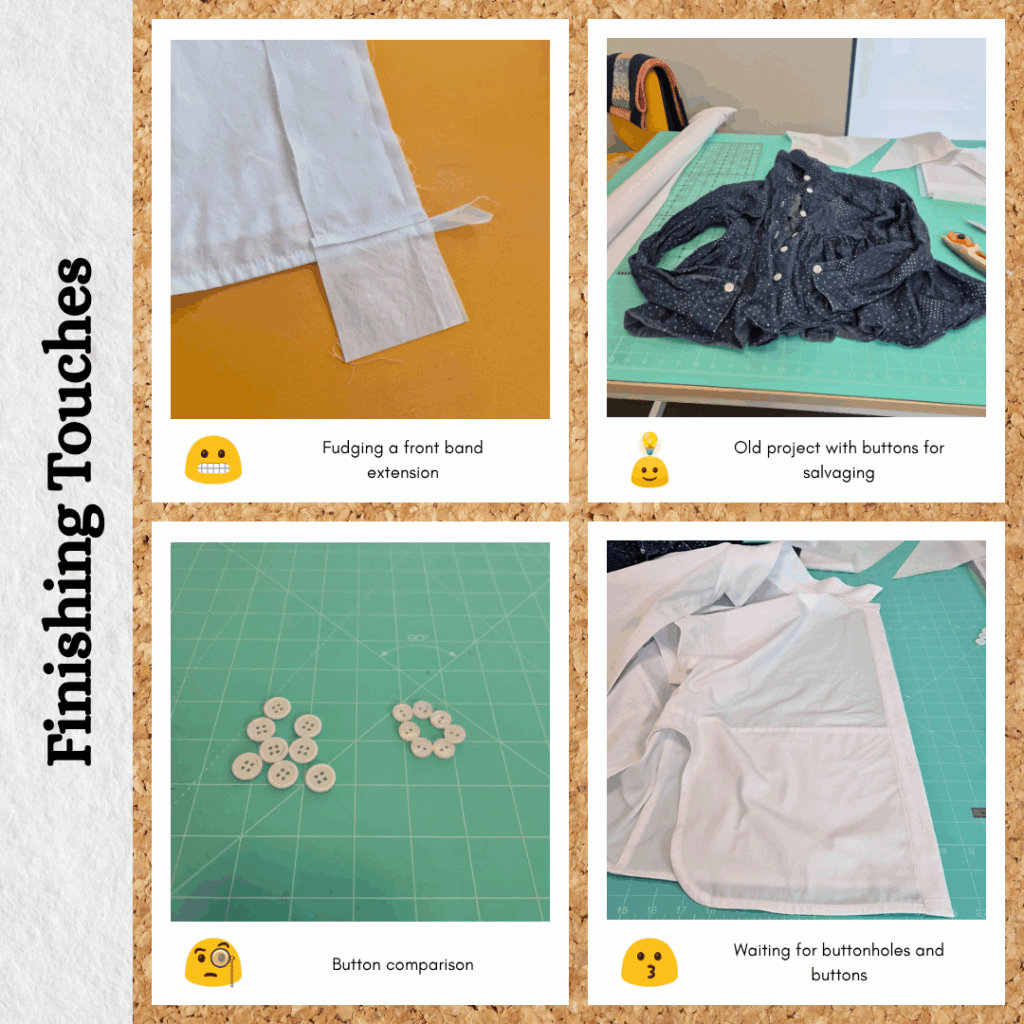
When it came time to hem I looked at how pronounced the curve was and decided to bias bind it like the Kalle shirt. This changed the length of the overlay so I had to fudge the front band by adding extra length. Another pattern piece to adjust, this time making it longer by 1cm.
I interfaced all collar and collar band pieces as instructed (both sides). In future I will only do one side as I feel like it will make the burrito method easier. Luckily the ‘bad’ side is the one that will have the buttons and be hidden when buttoned all the way up.
I really wasn’t feeling the buttons I had assigned to this project, then remembered I had an old shirt waiting to be taken apart. So salvaged the buttons from this and feel like it’s a much better fit. But there will be one orphaned button. Thought this might not be the case if I added a button right under the collar band as is my usual approach, but ended up not needing an extra button.
Reflections
The construction order for this was different to most of the other shirts I’ve made and it felt odd ending with the collar and collar band 🤨 I worry this means my hem lines might not match up on the left and right sides once the buttons are added (like in this wearable toile) but I don’t really see a way to get around this.
But other than that I think this is really cute! I’m glad I sized down as well. When I first tried it on I worried the neckline was just a tad too constrictive, but after wearing it a full day I think it’s fine. I also wondered if it wasn’t boxy enough but I don’t think it’s meant to be a tent and going one size up probably wouldn’t give that effect anyway.
Things I learnt:
- How to fully encase curved sleeve cuff seams
- It’s important for me to make wearable toiles, especially the first time making a pattern, because I end up changing the plan as I go LOL. Now I can tackle the actual Blaire top I want to make with confidence. Originally I felt a bit bad (wasteful) for making so many garments, but it really is so beneficial in many ways (testing a pattern/fit, practising construction methods, gaining confidence, also sewing toiles with bedsheets does not bring me joy LOL) that I think it’s worth it. My ‘compromise’ is to make it as well as I can so I have no qualms about giving it away to other people.
Categories: Sewing
Leave a Reply