Planning and Design
At my first job I was given a work chambray shirt which I wore all the time because it was so comfortable. After I left that job I obviously couldn’t wear it anymore (it was getting a bit worn anyway) and I haven’t had any work wear as good since (especially since everything is polyester nowadays…). Then when Modern Makers did some talks on Style Personality, one of the activities that was suggested was to think about what the most well-loved (in my case comfortable) pieces of clothing were. And I thought of the chambray shirt.
Then I saw that Remnant Warehouse had three shades of blue chambray fabric. I had by this point already short-listed three patterns for the chambray shirt replacement and so this fit in well to become this project. There was a small hiccup in that I ordered the fabric during one of their sales and they cancelled the Evening Blue, but I saw it became available again later so bought it without the discount, this is how attached I was to having the three versions haha.
I originally was going to make a separate post for each shirt, but the construction for each got intertwined thanks to my lack of preparation and some injuries. So big post it is.
Materials
- Patterns
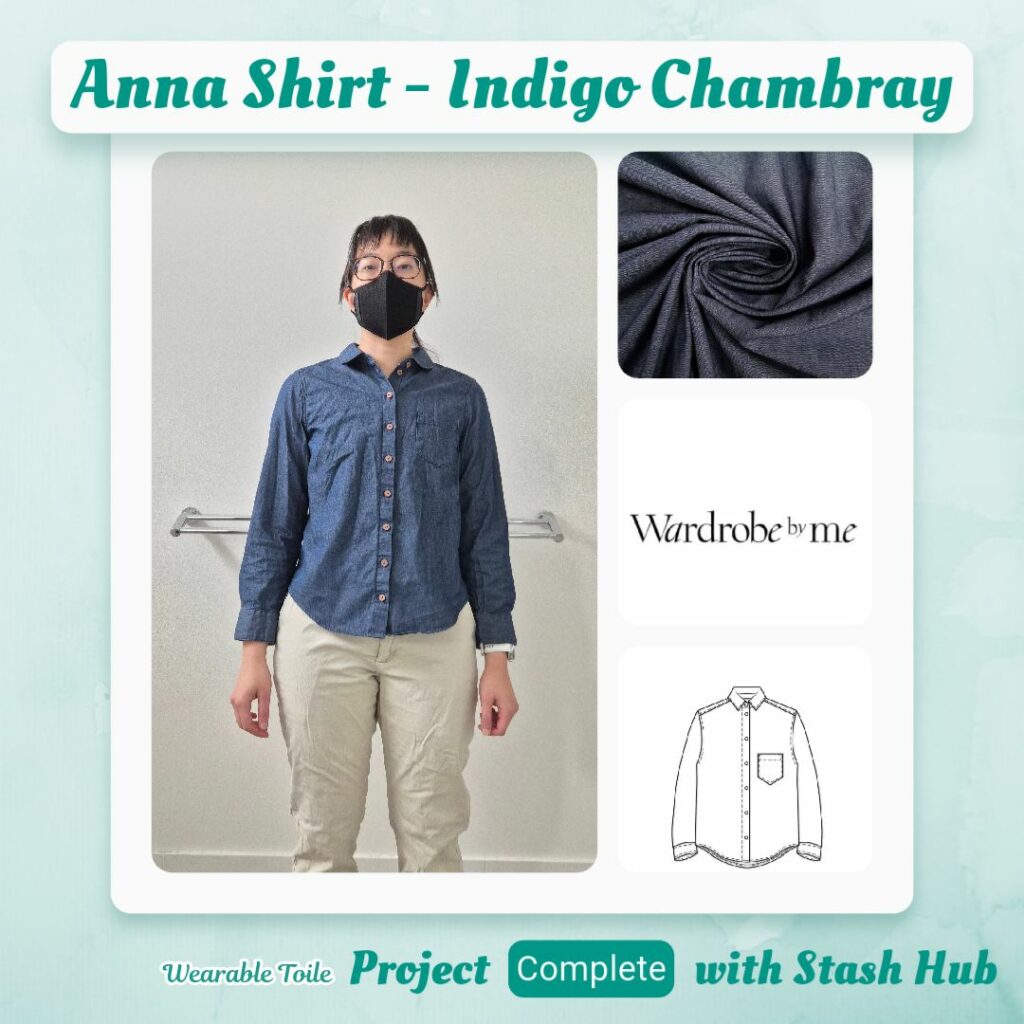
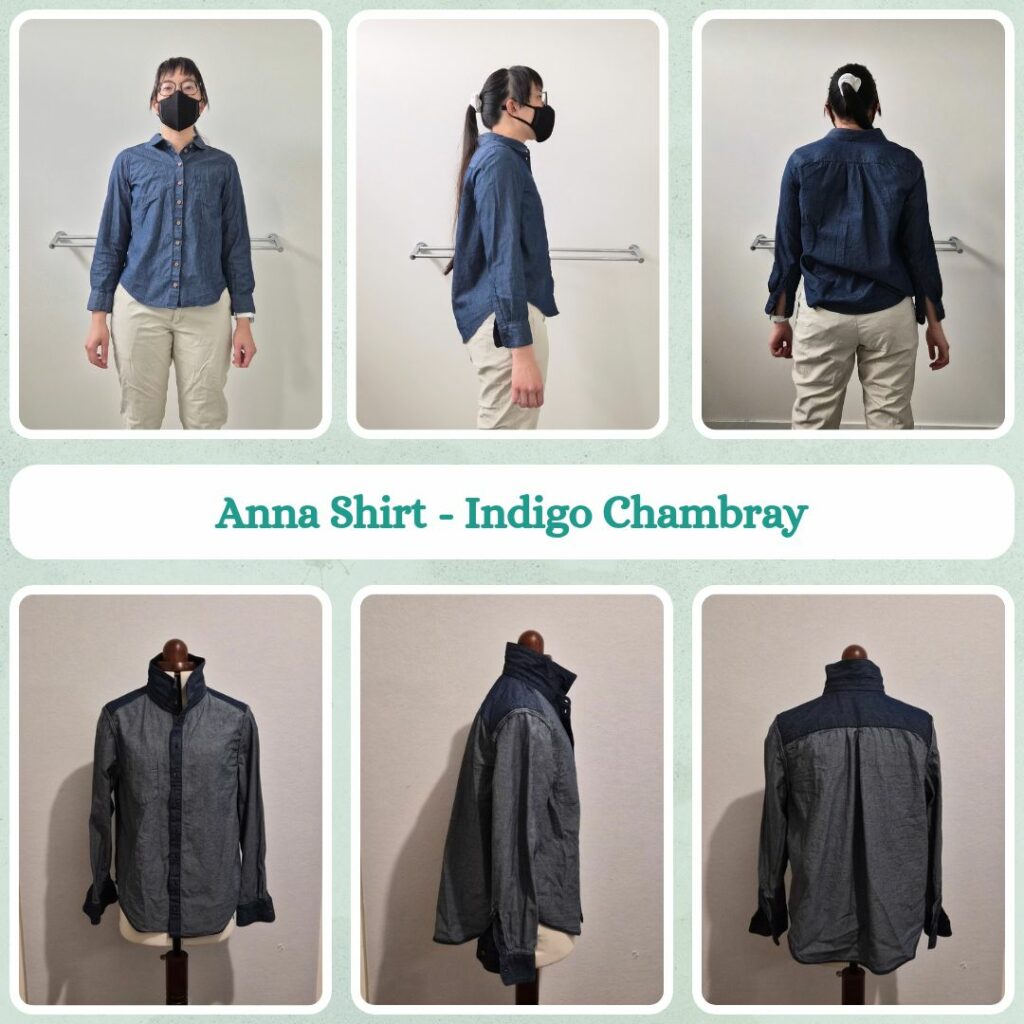
- Anna Shirt (Wardrobe By Me)
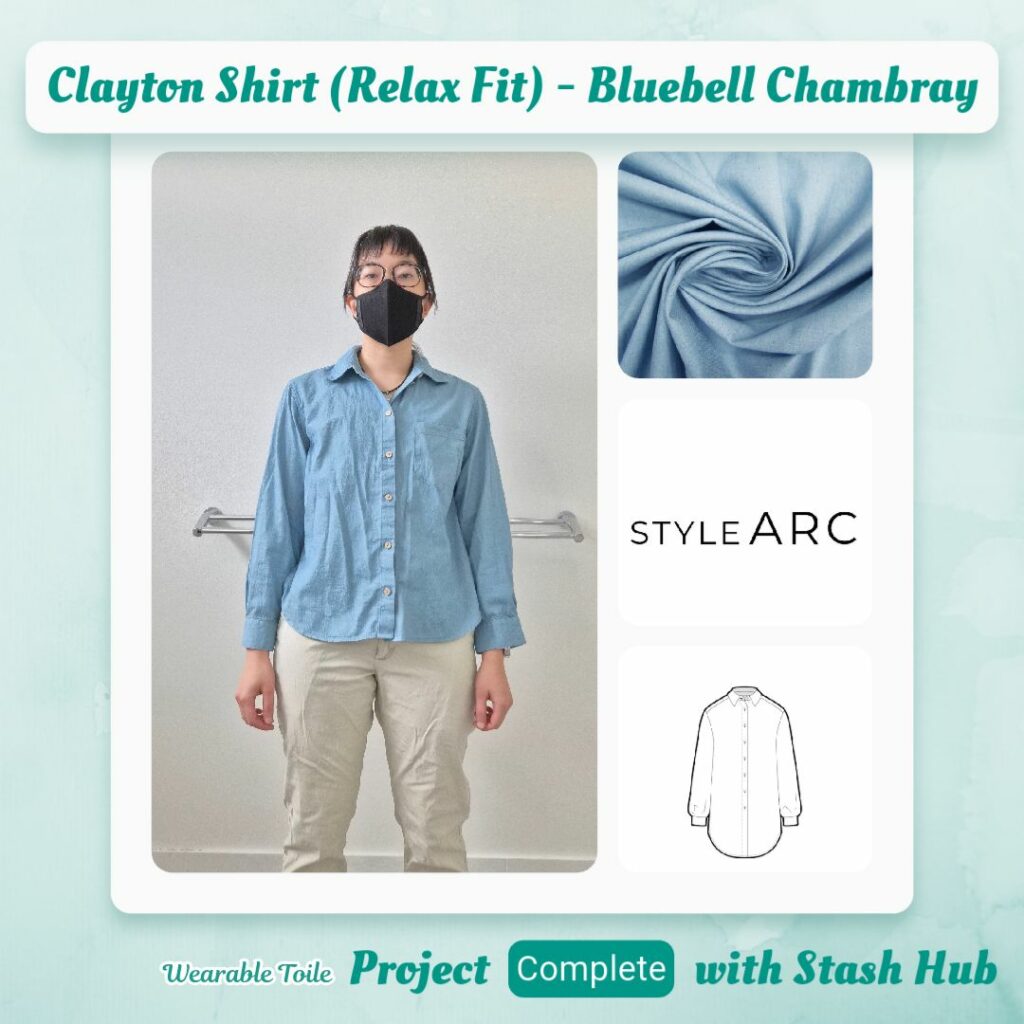
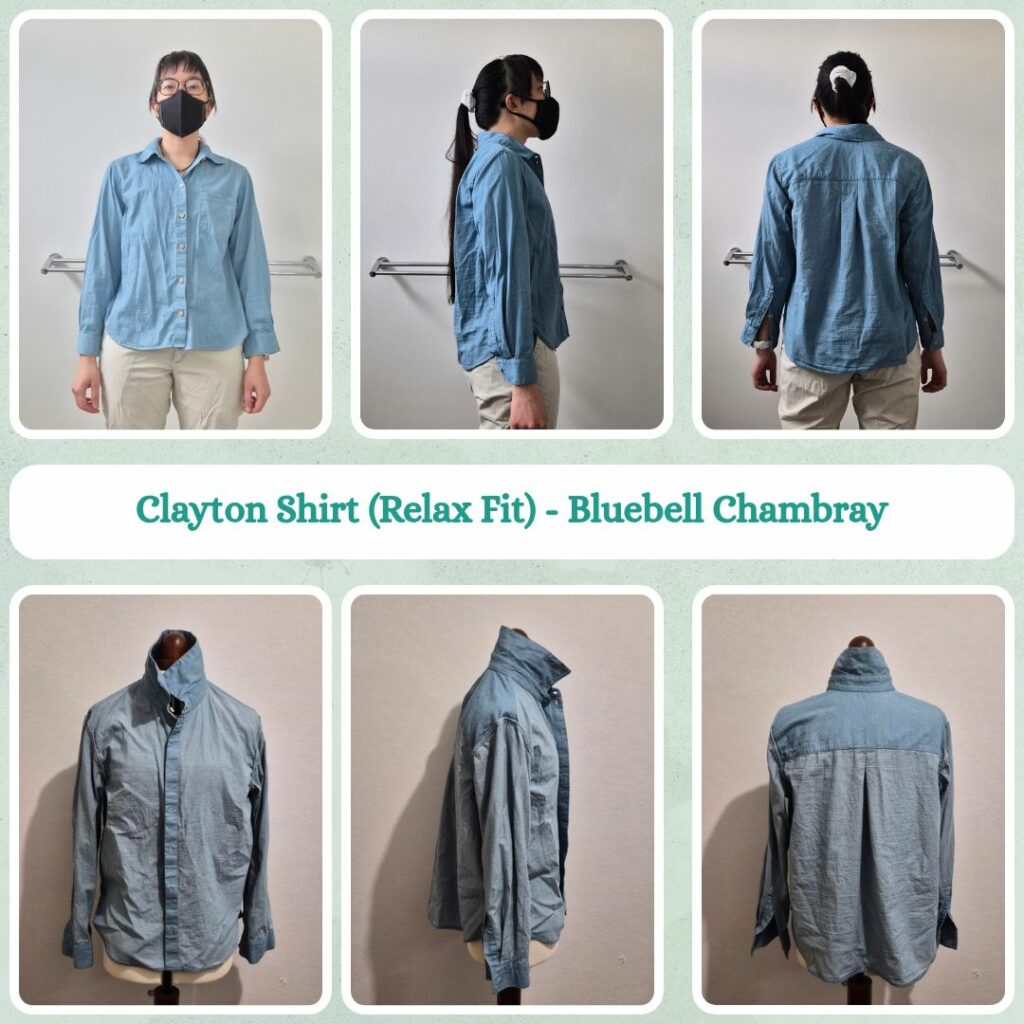
- Clayton Shirt – Relaxed Fit (Style Arc)
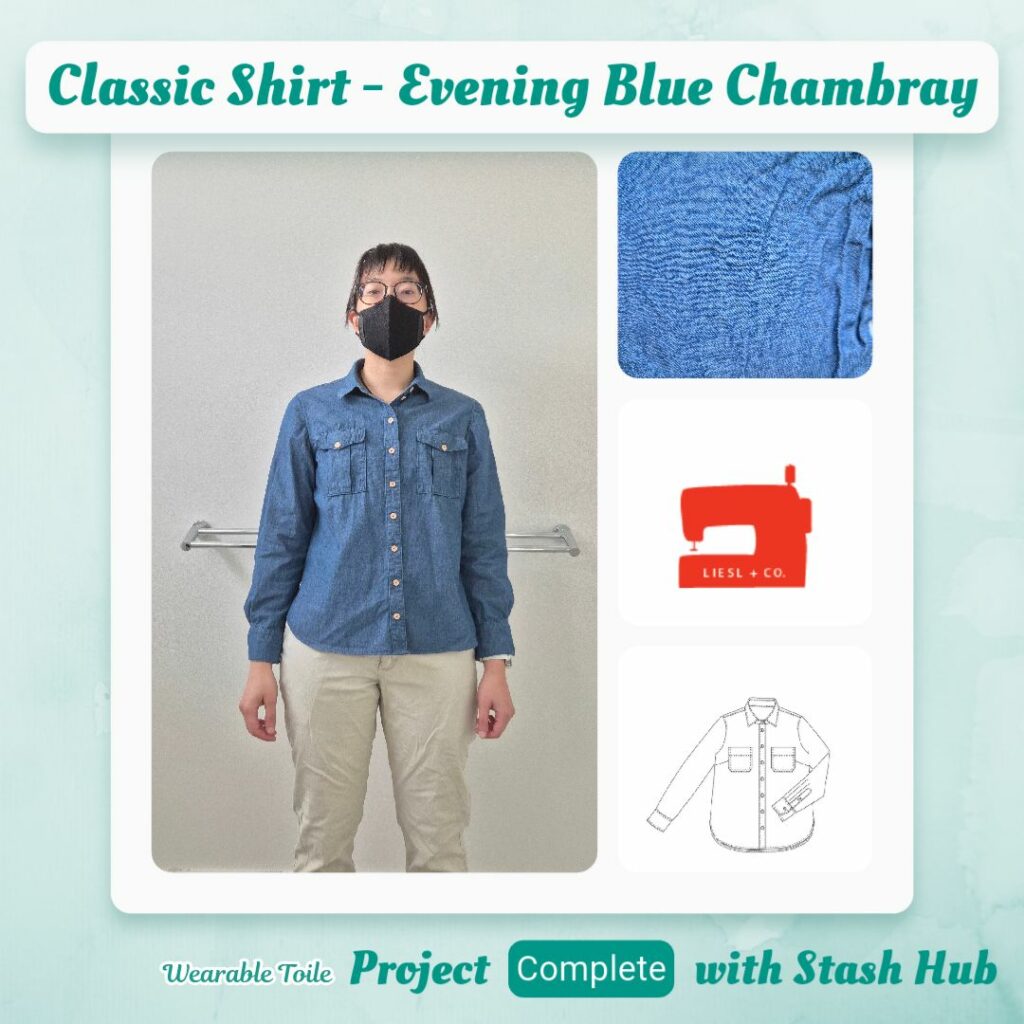
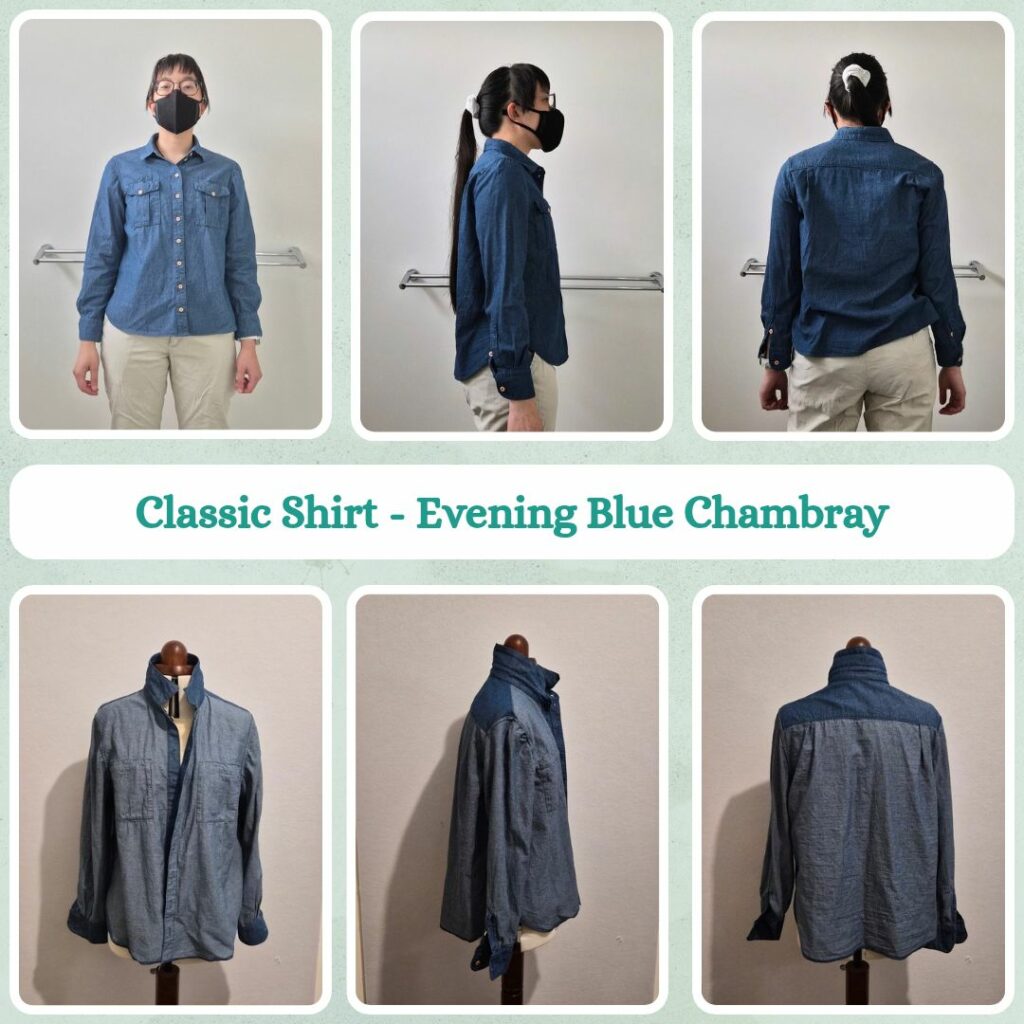
- Classic Shirt (Liesel and Co.)
- Fabrics
- Cotton Chambray – Indigo (Remnant Warehouse)
- Cotton Chambray – Bluebell (Remnant Warehouse)
- Cotton Chambray – Evening Blue (Remnant Warehouse)
- Buttons
- Curb Cotton Button – Old Rose 11mm (Paper Scissors Frock)
- Curb Cotton Button – Dune 11mm (Paper Scissors Frock)
- Curb Cotton Button – Rose 11mm (Paper Scissors Frock)
- Thread
- Rasant col. 3447
- Rasant col. 1342
- Rasant col. 3644
- Notions
- 100% Cotton Lightweight Fusible Shirting – White
Sustainability Check
👍 Fabric is 100% cotton
👍 Buttons are 100% cotton
🤏 Fusing is 100% Cotton although the glue apparently isn’t biodegradable. This is the best I can source at the moment as an Australian so I’m not going to be too harsh on myself
🤏 Rasant is OEKO-TEX but not biodegradable
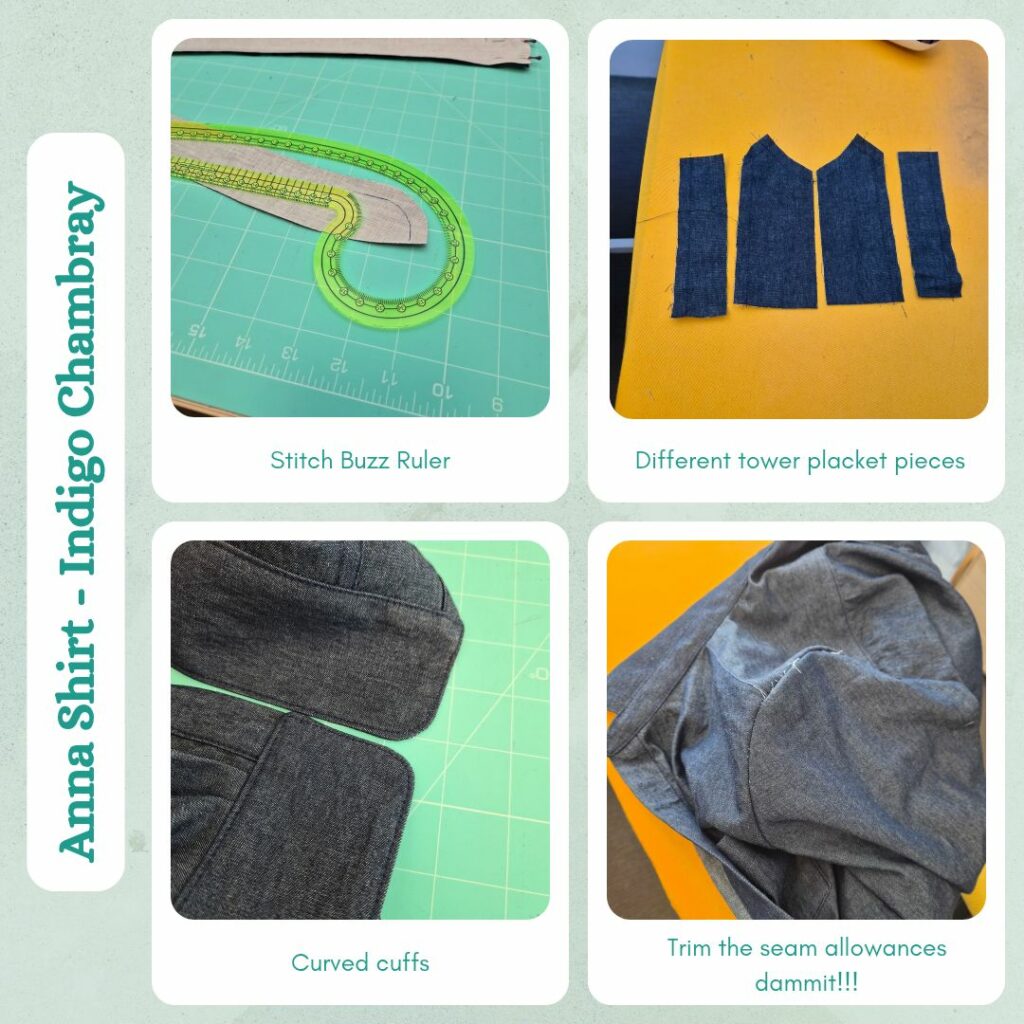
Construction – Anna Shirt
Preparing the Pattern
Size guidance said to go with one that matches my chest and hip measurement so went with Size 38 which was closest to my hip measurement. I know from previous shirts that I need to shorten the body length so measured the Corduroy Kalle and Safari Sam which were both 55cm long from the collar to hem. The pattern uses 1cm seam allowances and has a very narrow hem (5mm + 5mm) which means I need to shorten the body pattern pieces to 57cm. I also did a comparison of sleeve lengths (51cm from shoulder seam to cuff) and identified that I needed to remove 4cm from the sleeve length as well. I greatly dislike the way WBM overlays their sizes on the multi-size. It is immensely difficult to figure out where the notches are meant to be for the different sizes. I missed a couple and had to add them back afterwards.
Cutting Fabric and Interfacing
When I bought the various blue chambray fabrics from Remnant Warehouse, I wasn’t sure how much I needed to so bought 3m. Which is waaay overkill, especially once I reduce the length of the body and sleeves haha. So I tried very hard to maximise how much remnants I would have so I could use it on another project 😝 I managed to fit almost all the pieces on 1.25m length, just had to do the pocket separately which hopefully isn’t a big deal.
I applied the interfacing with my iron and had issues with it bubbling. I wondered if it was because of the way I was applying it, so looked up instructions (I guess that’s what happens when you buy by the metre and not in discreet packs – no included instructions for easy reference). I think I need to be more precise in my methodology (predominantly making sure to adhere to the timing instructions). But I also learnt that apparently you’re meant to pre-wash your interfacing??? I suppose that makes sense for wovens? Too late for this project but I guess I’ll try it for the next shirt… Also I totally forgot to cut the interfacing to exclude the seam allowances, oh well.
I also learnt that the Vilene G170 woven cotton interfacing is different from the B170, which has biodegradable glue. But it doesn’t look like I can buy B170 in Australia… This was yet another blow to my attempts to be sustainable. Once again, I can only do what is available to me at a retail level (with the additional constraint of being in Australia where the range is so much smaller).
Sewing
I’m not sure if it’s the fabric or the pattern drafting (or some fail at my end in adding seam allowances), but it felt like I needed to ease in pieces when usually they should just line up? Because of this I sewed the yoke to the back and front in parts (usually I would just do a fabric sandwich, but I was worried about things not lining up). One thing that was definitely the fabric was I couldn’t turn the corners on the pocket when overlocking because the fabric was too soft. And then it was kinda hard trying to thread the overlocker ends so I just gave up haha.
For the inner collar band, I guide stitched 1/2 inch along the top instead of 3/8″ like I usually do (to match the seam allowance). And this ended up much better in terms of not having too much overlap on the inside. I also used my new Lite Steam-A-Seam tape and I think I’m going to switch to this from wonder tape for most use cases. Because I often don’t actually need the tape to wash away, and because it’s ‘Lite’ I don’t think it’ll add much bulk. Plus it comes on paper backing so not only can I rip by hand (so no need to keep scissors close by), but because it’s paper I also feel better about it.
I usually copy/paste the Kalle Shirt sleeve placket onto all my button-up shirts, but since this is a more oversized fit, it also has a wider placket, so decided to try following WBM’s instructions. Although I do have a preferred order of construction so didn’t follow their order. Because I didn’t cut the interfacing down for the collar band I drew it on with a Frixion Pen. And then forgot multiple times and ironed over it and had to reapply it 😣 I am totally going to remember to precut the interfacing down next time… As for the sleeve placket itself, it wasn’t too hard to follow the instructions, but I think that’s because I’m quite familiar with the process now. For a beginner I think it would be very confusing…
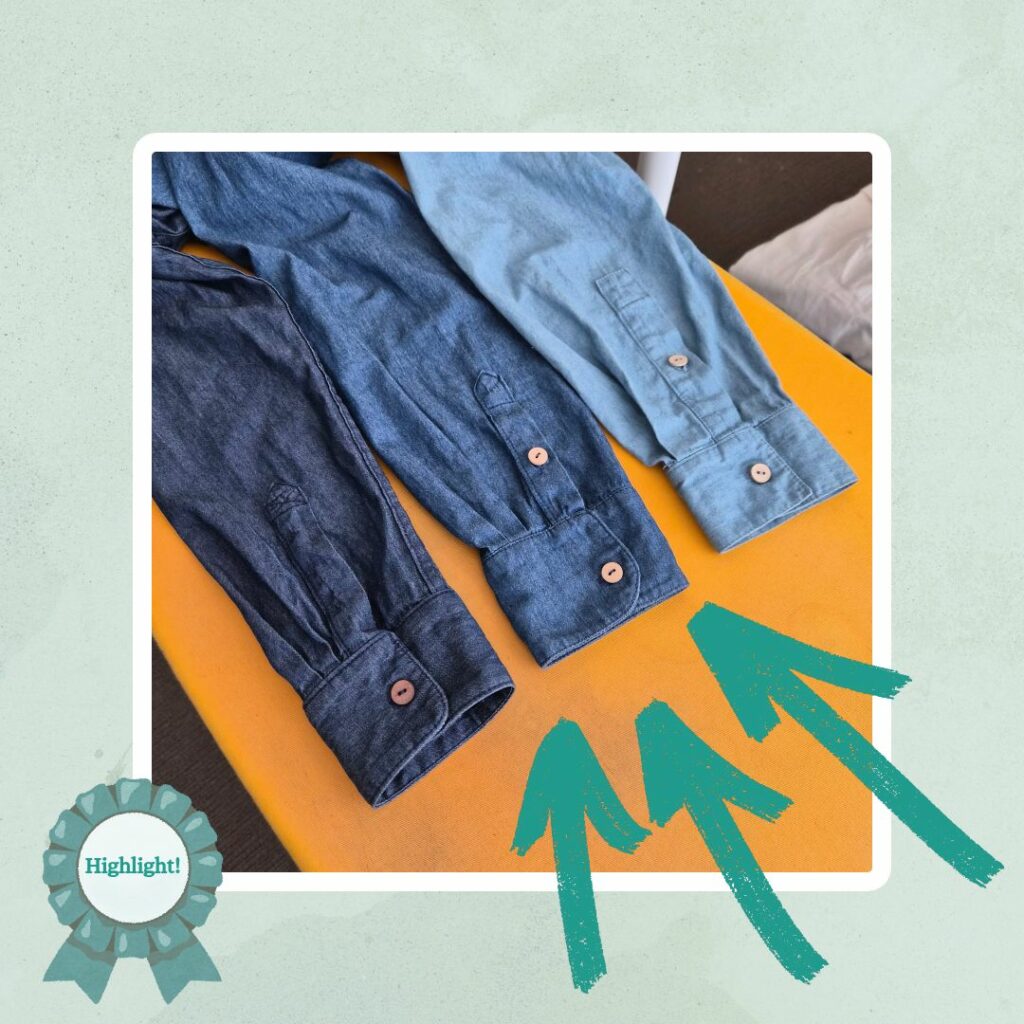
I tried to apply the same guide stitching principle to the cuffs and I think this worked pretty well too. I do feel that since I’m using Steam-A-Seam now that it takes a lot of pressure off trying to make sure my topstitching is perfect. Because I have the reassurance that the fabric is secured even if I don’t catch everything with my topstitching. I also tried offsetting the notching on the curve of the cuff (something I learned from the Closet Core Coat 101 course) to try and get a smoother curve.
I made sure to overlock my sleeve heads before applying the placket and I think it did help with easing it in. I’ve gotten over the urge to make sure I use the same finish throughout a garment, so did french seams for the sleeve instead of flat-fell, because it’s kind of annoying doing flat-fell on curves. I thought since I was sewing 6mm and then 1cm that I wouldn’t need to trim the seams, but I was super wrong because I ended up having a bunch of frayed ends show up on the right side. I managed to trim them down well enough, but it wasn’t the time-saver I thought it would be LOL.
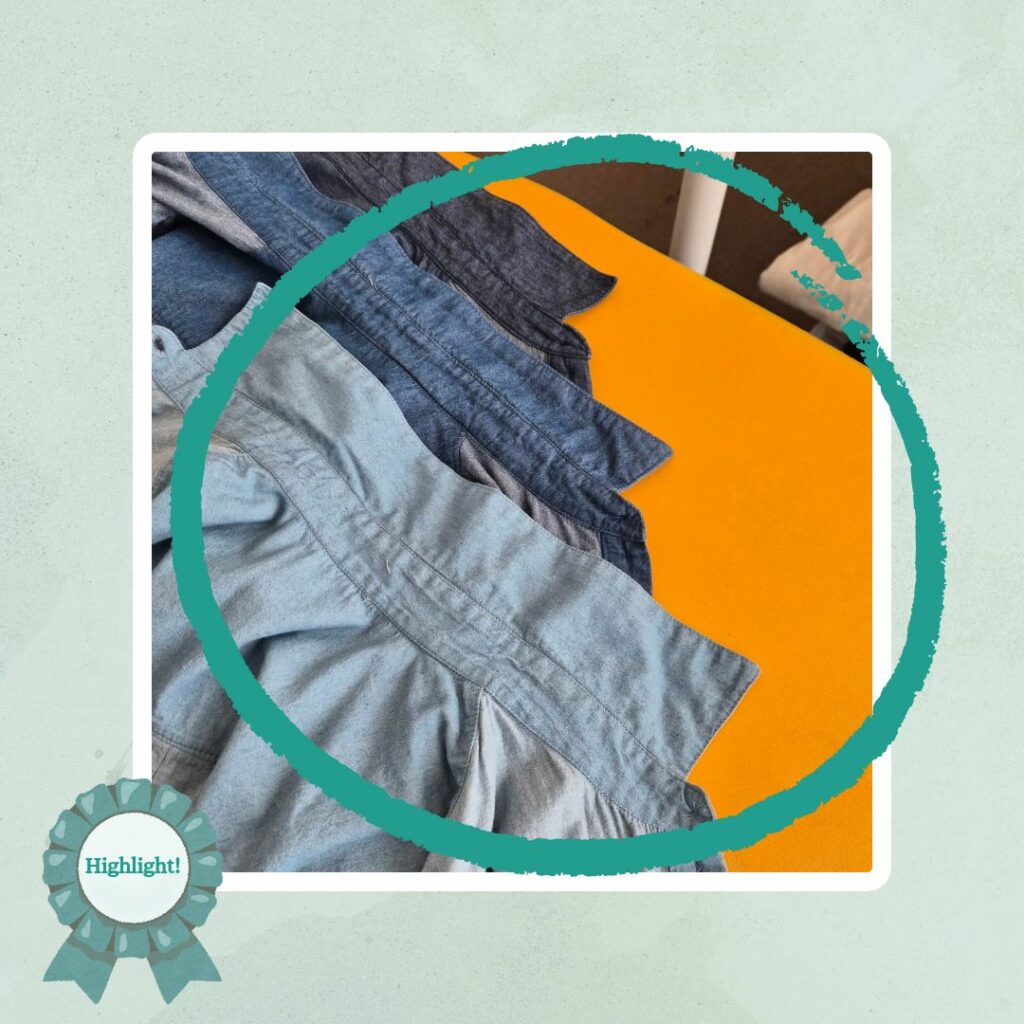
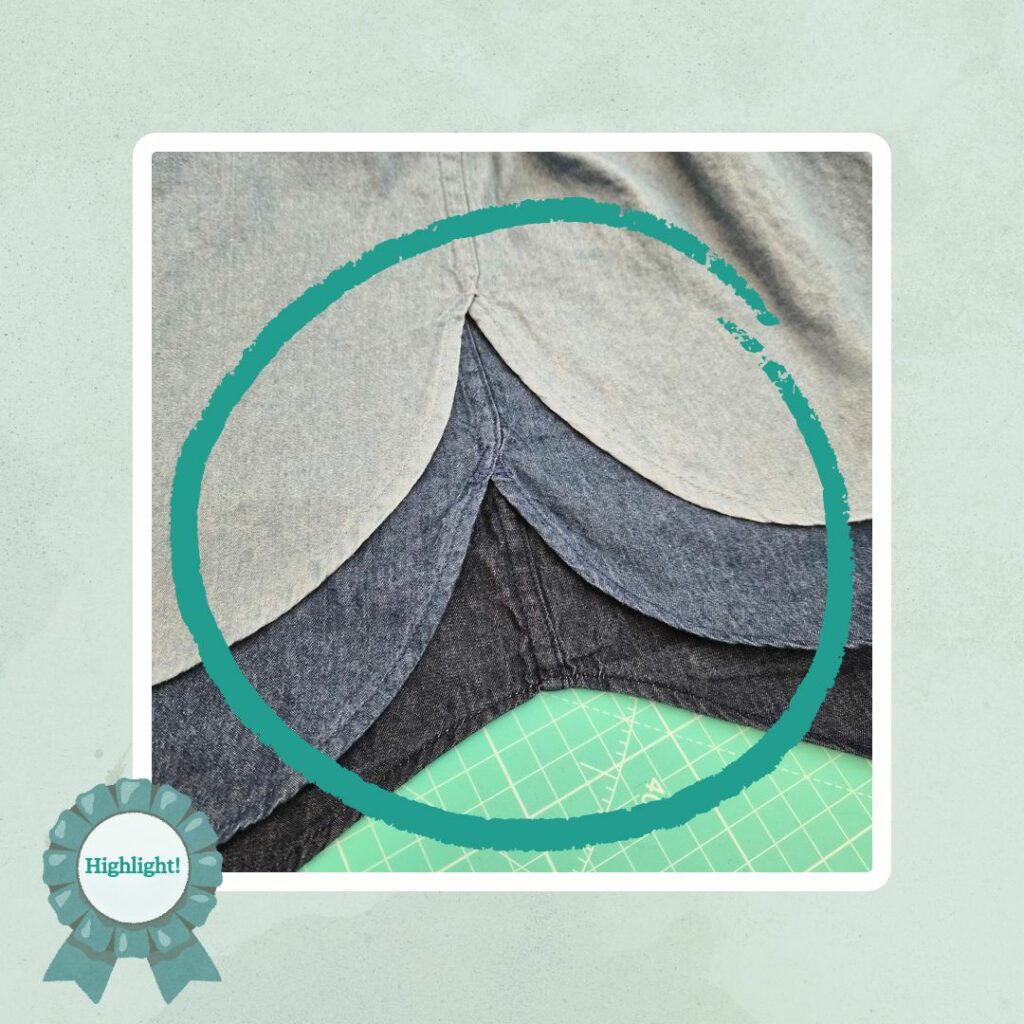
I also decided to follow their instructions for the curved hem instead of applying the Kalle bias binding method. I feel like I need to extend/straighten the bottom of the back and front pieces at the side seam so that the double fold will actually conceal the raw edge in the side seam allowance.
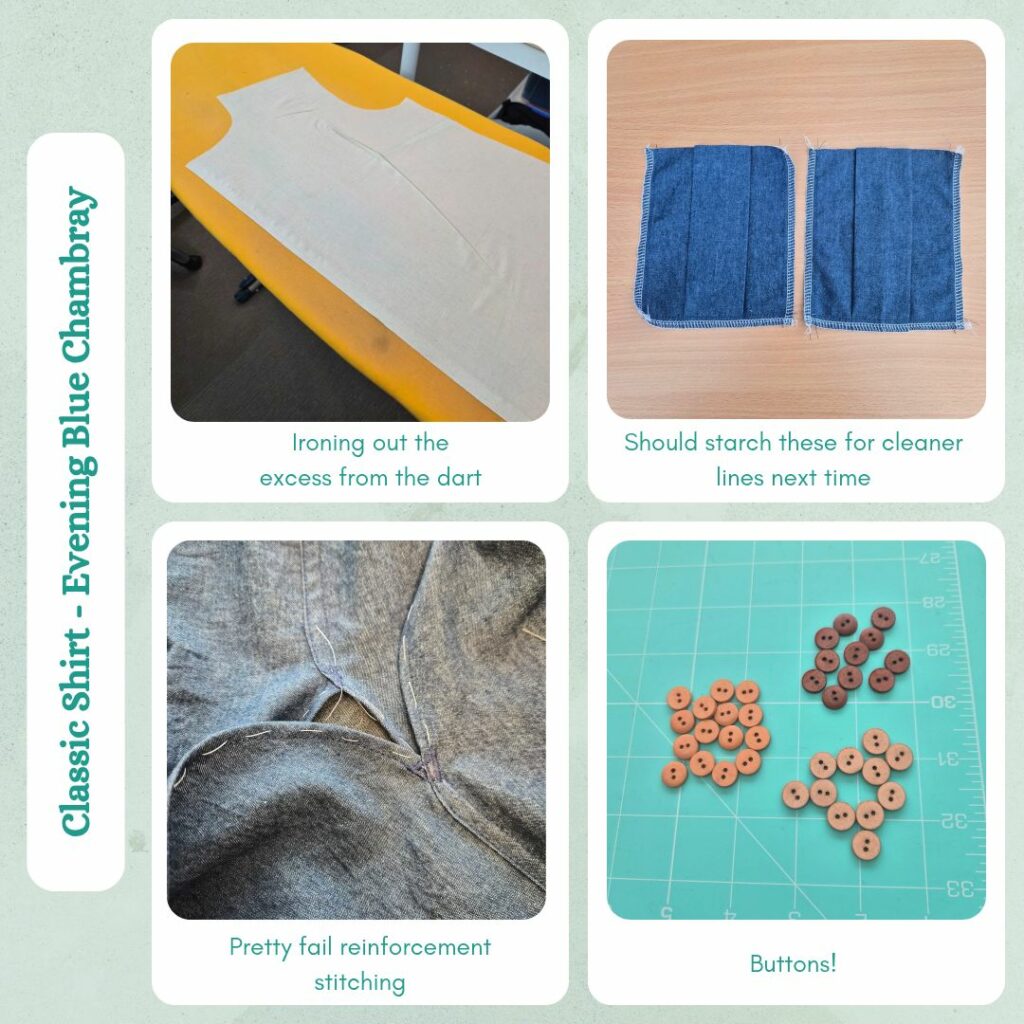
I took a break at this point because I didn’t have the buttons I wanted. I had originally looked at my button stash and saw I had bought multiple shades of brown in the Merchant and Mills cotton buttons and was like ‘woo hoo go past me’. But when I went to match the different shades against my three chambray fabrics, the lightest shade was actually a bit more orange and didn’t suit the light blue chambray at all. And I recalled that I had bought it to go with some orange checked fabric, so was already accounted for (I need to assign it in Stash Hub, I didn’t have the app back when I bought that fabric and buttons). So went to see if Merchant and Mills had another light brown cotton button but the closest they had was ecru and I feel like that was too light… So started looking into other corozo buttons but they didn’t really come in many shades of brown. Plus I was hung-up on getting the same type of button for all three shirts. I then had the thought to try looking for blue buttons instead, although my expectations were low since I thought brown buttons would be easier to find. And found that Mind the Maker had three perfect shades of blue (faded blue, ocean and indigo) in their Curb Cotton Button range! So went to buy those but the store I had found them on didn’t have enough stock of the faded blue in 11m and none of the 11m in indigo… So went to see if anywhere else stocked it and found a non-Australian site, but they didn’t have enough of the ocean and no indigo either. Arrgghhh! The Australian site had enough of all the buttons in 18mm though… But I knew from the Kalle Corduroy Shirt that I don’t like 15mm buttons, let alone 18mm for shirts 😣 Back to the drawing board I thought, but I had the cotton button search results up for the Australian site and realised they had some brown-ish shades…well actually it was old rose, rose and dune, but they didn’t seem super pink for a colour with the word ‘rose’ in them and dune is further from white than ecru so decided to go with that instead. I dunno if the process sounds frustrating but I actually find it kind of fun to finally get a solution to my very restrictive requirements LOL.
Construction – Clayton Shirt
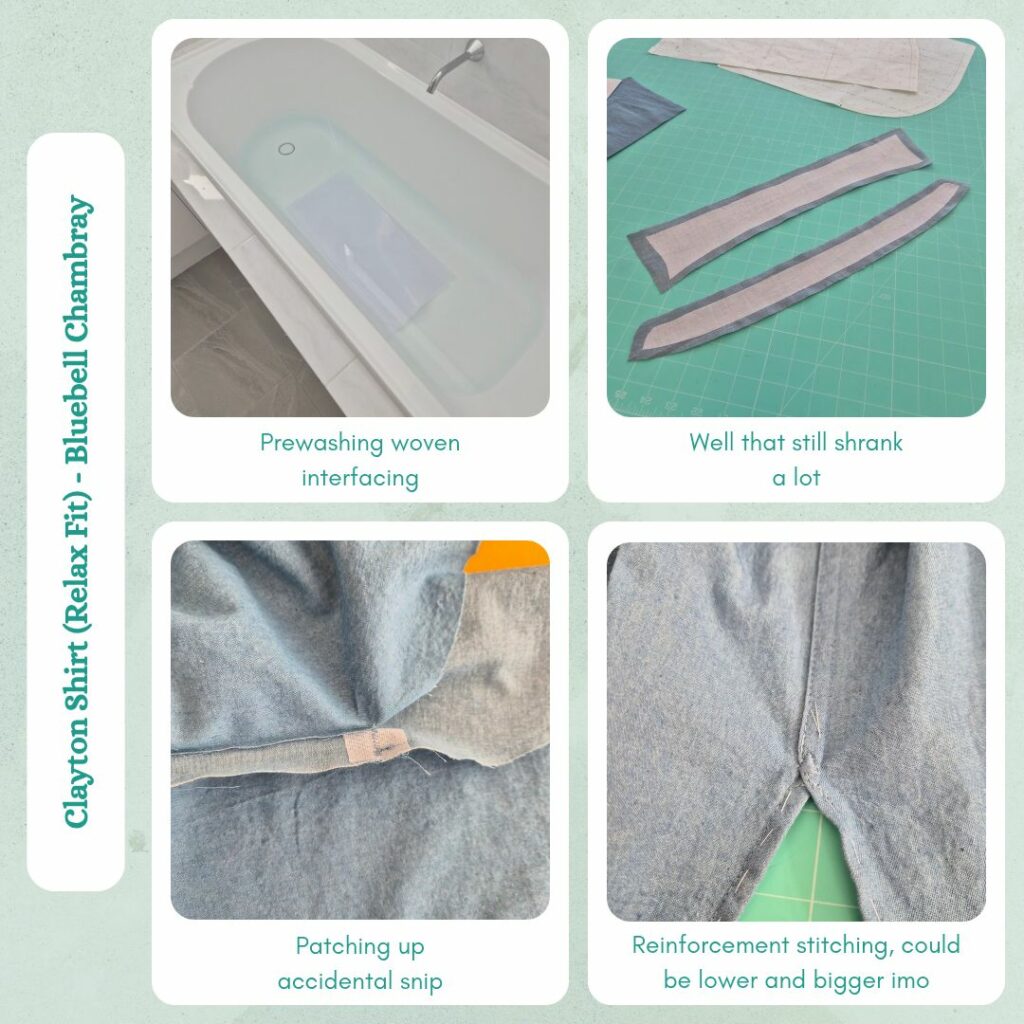
Pre-washing the Interfacing
So after the interfacing woes with the Anna Shirt I cut off some of my bulk G710 interfacing (I think I bought like 5m) to pre-wash. I cut it shorter in case I ruined the interfacing but also because the instructions say to dry it single layer and I don’t think I’ll be able to do that for anything longer than 1.5m…
I was glad for our bathtub lol. Made the soaking-while-folded part easier. And it meant I ended up cleaning the bathtub of all the fluff from drying my fabric on a clothes horse in the bathtub as well 😅 I ended up drying the interfacing on said clothes horse, I was a bit worried since the interfacing was dangling off the flat surface but ended up fine.
Preparing the Pattern
This is my first time making a Style Arc pattern since I started paying attention to measurements properly LOL. So I was a bit bemused that you can’t figure out your size from the pattern instructions? They only provide AU sizing comparisons to other countries. In the past I’ve always gone with Size 10 for Style Arc, but sometimes this ended up quite oversized. And since is oversized by design, I decided to check the finished measurements for the Size 8 instead. And my measurements fell within these. As a double-check, I did a rough measurement of my shoulder breadth and this also fit well within the Size 8.
It’s nice that the Clayton comes with so many variations, but I don’t think they make it particularly clear which ones to use for which. Which is a bit of a problem since this pattern spans 5 A0 sheets which makes switching between pages kinda difficult. I had to get a notepad out and write it down haha. TBH I think this would benefit from a flow-chart LOL. I wasn’t sure which pocket I wanted so prepared pattern pieces for both. Although once I saw the size of the large pocket I immediately decided against it, but still prepared the piece for future haha.
- 1 – Relaxed fit back
- 2 – Relaxed fit front
- 3 – Relaxed fit back yoke
- 6 – Collar stand
- 7 – Regular collar
- 14 – Sleeve (1) for relaxed fit only
- 19 – Single cuff for sleeves (1) & (2)
- 22 – Under bind for sleeve placket (tab) for sleeves (1) & (2)
- 23 – Optional sleeve placket for sleeves (1) & (2)
- 25 – Shaped pocket for both fits – cut 1 or 2 main
- 27 – Large pocket for relaxed fit only – cut 1 or 2 main
I also adjusted the body length by 13cm (to ~55cm long from collar) and sleeve by 3cm (to ~51cm from shoulder to cuff) and adjusted seam allowances so all the ‘small’ parts were 1cm (Style Arc likes to use 6mm) and the side seams and shoulder seams to 1.5cm so I can either flat-fell or french seam them. Although it will be interesting to see how to do this given the way they have designed the curved hem….
Preparing the Fabric
I tried to be economical again since it was the same yardage situation as the Anna Shirt (I wanted to save as much as possible for another project) and managed to fit all the pieces on around 1.3m of fabric. Then it came time to adhering my pre-washed interfacing. I consulted the official instructions but wondered if I could use a steam iron instead of covering with a damp cloth. Well max steam was a total failure, it shrunk the interfacing A LOT, distorting it and still caused bubbling. So I switched to low steam and it did a good job. I used the timer on my watch to do consecutive 12s countdowns haha.
Hmm and then I double-checked my interfacing to see if it was G700 or G710 but it’s actually Freudenberg, not Vlieseline. My understanding is they are the same company though? I don’t know why Freudenberg is less than half the price of Vlieseline on Jackstock Haberdashery though??? Which is why I bought it and not the G700 or G710.
I think I have a good workflow now that can be split into discreet tasks that I can tackle in smaller time chunks if need be:
- Prepare pattern
- Cut fabric
- Preparing interfacing/thread/overlocking
- Sew front bands and yoke
- Sew collar band and collar
- Sew flat-felled side seams and hems
- Attach pocket
- Sew sleeve placket, flat-felled sleeve seams
- Sew sleeve cuffs
- Attach sleeve to body with french seam and topstitch down
- Sew buttonholes
- Sew buttons
Sewing
This was the first time in a long time I sewed the back yoke pleat. So of course I did it from the wrong side at first. Other than that the yoke and front plackets were no issue. Same with the collar and collar band. Then it came time to flat-fell the side seams. I sewed the seam to the notch and then clipped through both layers and realised my mistake. Because I’m flat-felling I only need to clip the back. So used some interfacing and a zig-zag stitch to patch the front snip back together. The curved hem meant that I needed to change my usual order of construction. So guide-stitched 5mm on the back hem and double folded this and topstitched it down. Then I could guide stitch and double-fold the front hems too, but tapering a bit towards the side seam notch so that it would continue on into the flat-fell seam. I topstitched these down separately though.
I got pretty confused with the sleeve placket and I blame the diagrams that Style Arc use. One of the diagrams has the sleeve coloured like it was the wrong side, but it was still the right side, I think they just wanted to highlight the placket since that’s where the work was required. But it just confused me because I thought they had flipped the sleeve piece over and it made so sense with the previous and subsequent diagrams. Once I figured that out though it was ok. This was my first time doing such a big rectangular placket-not-tower (because it’s not pointy). I don’t mind it. But I think I would starch the placket piece first if I was using a very soft fabric again.
The cuffs attached with no real issues. I think maybe somehow the corner of one was fraying a bit for some reason??? so I just applied some fray-stop just in case. I was pretty careful when trimming and turning out so I was a bit disappointed. But at least the interfacing was a good guide for the inner cuff, no guide-stitching required here.
I had eased the sleeve head in advance with my overlocker but it wasn’t enough to ease it in. But since I used the overlocker, the stitches were already in place so I could just pull on it to form some gathers. The gathers made french-seaming it a bit tricky. I remembered to trim the seam before doing the second lost of stitching for the french-seam. And then topstitched this to the body. I don’t think it looks great. But it also kinda didn’t look great before topstitching anyway so no harm done, at least it’s secured down this way.
Then again, time to wait for buttons to arrive. Or so I thought…I decided to try it on without buttons to check the fit and it was obvious I had put the sleeves on the wrong sides. Wow! I haven’t done this in a long time! What went wrong??? I went back to check the markings and realised that only the front sleeve had a marking. I’m so used to there being either markings for both or just the back. And obviously went on auto-pilot based on the markings. Shouldn’t I have realised when I had issues easing the sleeve in? I think it was probably a combination of expecting it to be difficult (because it’s a Style Arc pattern 😅), wanting to finish it in a day and also not feeling so great due to congestion causing ear issues… So I had to unpick and redo it all. I still applied french seams by using 6mm seams for both stitch lines (instead of 6mm then 1cm) but even though I did trim the seam allowance back even more before the second lot of stitching, a bunch of the frayed edges showed through to the right side. And at this point I was like screw it and sewed another row of stitching at 1cm. It still fits so I guess it’s fine lol. Also, I didn’t line up the side seams correctly for the first sleeve I reattached, but the 6mm offset or so actually made it easier to ease the sleeve in on the front and the sleeve seemed to sit fine so just made it symmetrical. Luckily it’s a loose fit shirt so it probably won’t be all that noticeable, I hope 🙃
Construction – Classic Shirt
Preparing the Pattern
I was excited for this pattern because it comes with different front pieces for different bust sizes. Except that A/B cup are lumped together and I know I’m actually an AA cup soooooo, could I get away with an SBA or not was the question. Looking at the dart I was fairly certain I couldn’t, so toiled just the front piece on some calico. And yeah, I think it would be better without a dart. Since I used calico I decided to try the SBA method of just ironing out the excess LOL. I think it worked ok. I transferred the adjusted edges to my pattern piece and then used my circular rulers to make sure my shoulder and sleeve edges weren’t drastically different from the original. It wasn’t exactly the same but it was within 5mm so thought that should be ok.
I already knew that for Liesel and Co patterns that I would have to do a lot of seam allowance adjustments because she uses half inch. Except for some pattern pieces…but unlike some other pattern companies, the exceptions aren’t noted on the pattern pieces themselves. So I had to skim the instructions to figure out where the differences were. I think it was just for the sleeve placket, although I still had to adjust this because I wanted it 1cm, not 6mm.
Like with the Clayton Shirt, I traced all the pocket options. I was going to just go with the simple pocket like the Anna and Clayton, but decided to try the pleated pockets. Because this pattern also has a set-in placket option, which I think will look nice with the blue chambray fabric, so it already won’t be matching the other two shirts stylistically.
Preparing the Fabric
I tried to be economical but this shirt ended up using up 1.75m plus a bit for the placket. When applying the woven interfacing, steam on low seemed to do the trick.
I also realised I shouldn’t have done guide stitching for the placket piece as it potentially can show at the front due to the way this is attached. Also, I think I don’t like this method as it means the ‘back side’ of the fabric shows on the right placket if you have the top buttons unbuttoned.
Sewing
Around this time I injured my wrist and had quite a bit of trouble doing anything, let alone sewing. So I made some accessibility changes, like finally installing the presser foot knee lift, using my Clover thread cutter that I usually only use when separating chain-sewed quilt blocks, dropping the height of ironing board so I wouldn’t have to lift the iron so much and using my light weight fabric scissors instead of my fairly heavy Gingher duck-bill scissors.
I split the shirt up into very small tasks so I could recover if I happened to put any strain on my wrist. I came to quite a few realisations while making this shirt:
- I should starch pockets next time, probably for anything that isn’t a super crisp poplin, so the sides will become super crisp. And topstitch the pleat folds.
- I didn’t like the pocket top hem method as it would leave raw edges so folded them in and secured
- I should stay stitch curves for all shirts even if the instructions don’t call for it. Something to make routine.
- Matching pocket placement on both sides is annoying. I will probably only have a single pocket on the left side for all shirts from now on LOL
Two things I didn’t follow from the instructions were I didn’t like yoke attachment method so used the burrito method and I didn’t split the placket piece because I didn’t think it was necessary. Although I understand why you would if you were using a contrast fabric for the smaller placket binding. In addition to using my own collar and cuff methods. Although I confused myself and ended up having the finished edge on the outside instead of the inside collar band. Not a big deal imo.
Finishing Touches – All
In a way, having to wait for the buttons meant I could bulk sew the buttons and buttonholes haha. This process isn’t so annoying anymore, I guess that means I’m pretty used to it. Also it’s the kind of task I can do before work. I think one of the main reasons I hated this part was because I would always run out of time to ‘finish’ the shirt on the day I dedicated to sewing it so it felt like I was failing. But deliberately delegating it to another time slot means I can take my time and not feel rushed doing it.
I also decided to follow the tip in the Classic Shirt instructions for reinforcing the side splits for this shirt and the Clayton, since they both have an area of weakness. I tried doing a triangle with all three sides made up of a zig zag stitch, but I wasn’t very accurate so it looks wonky. So I decided to try the decorative triangle stitch for the Clayton. I think I both needed to have the triangle lower down but also bigger, which isn’t possible with the decorative stitch on my machine. But the upside is I did quite a bit of experimentation with different decorative stitches which I can hopefully use in other projects (I’m thinking particularly holding down side seams near the tops of jeans/sturdy pants).
Reflections
All of the shirts were comfortable to wear and they layered fine under a sweater as well. But I did think that when buttoning them all the way up, they didn’t sit quite right… I also removed too much from the sleeve length, probably need to add back another 2 cm. But I’m not too fussed as this type of shirt is the kind I prefer to roll the sleeves up for.
Things I learnt:
- Woven interfacing needs to be pre-washed
- Settings to use to properly adhere the cotton interfacing
- ALWAYS TRIM FRENCH SEAMS
- Stay-stitch all curves
- Consider starching soft fabrics for detailed parts of the garment
- Consider topstitching all pleats
- Only do one pocket for shirts (because making sure they match is annoying)
- Add a gusset for curved hems (for both strength and looks)
- Really need an undercollar piece. The two (Anna and Clayton) without had collars that just kept raising up. Something I’ll take the time to adjust on any shirt patterns moving forward. I had a bad experience trying this on the Roxy Shirt but I think I have a better understanding of shirt making now to get it right
- Cotton buttons are nice but don’t really play well with the steam/iron function of my washing machine… It might be ok if I just try to avoid doing up the buttons after they come out. Or not bother steaming these at all because…
- …the narrow hems need manual ironing. Which means more maintenance haha. Not sure if this is because of the fabric or the fact that it’s a narrow hem.
- I understand the concept of tower plackets now hooray!!! I don’t want to count how many shirts it took me to get to this point LOL
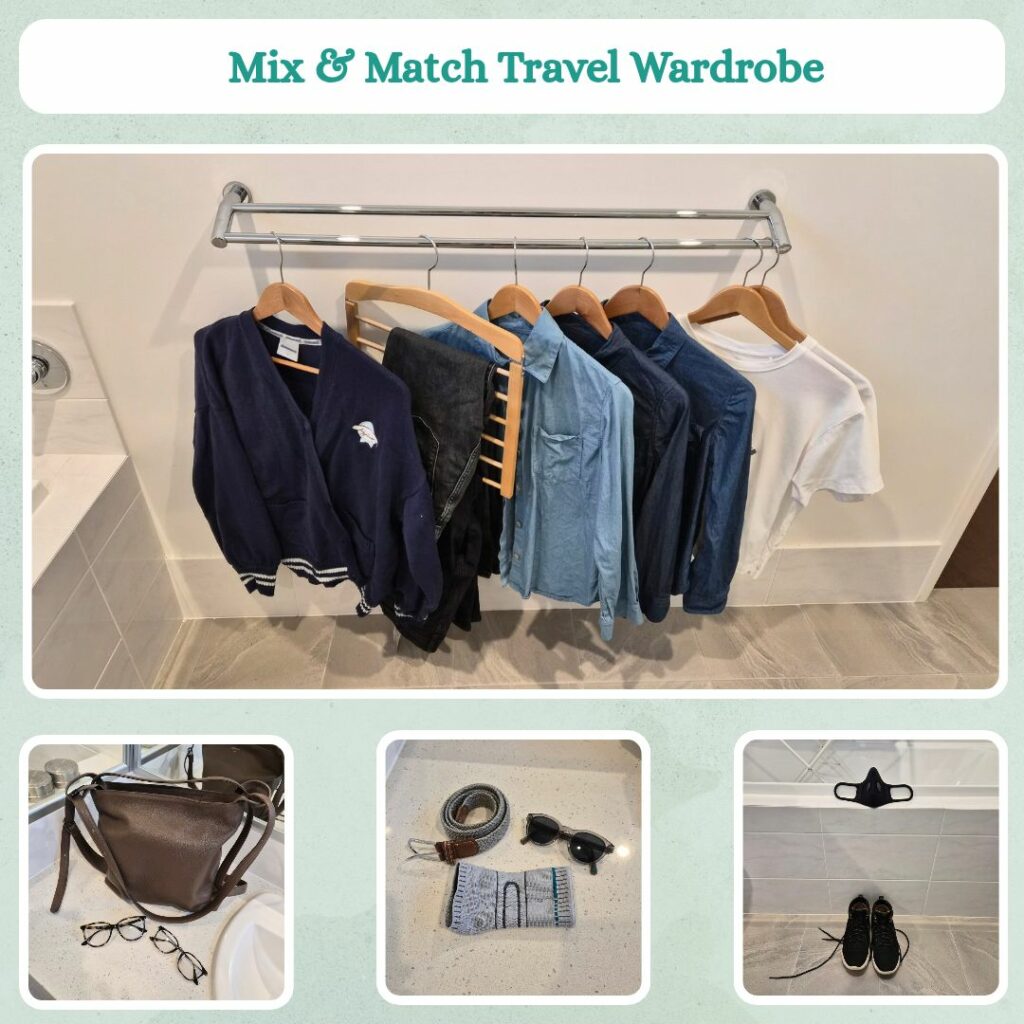
Slightly related (and I can’t bothered doing a separate post on this), I decided to make these shirts for my Japan trip. I wanted to make a mix & match travel wardrobe and thought this would fit in well with my grey and black jeans. I was quite happy with what I came up with, especially since I thought the sakura would pop nicely against whatever outfit I decided to wear…but I completely misjudged the weather and ended up buying an oversized grey sweater that I wore on top of the chambray shirts the entire trip 😅 But this is what I came up with 😊
Categories: Sewing
Leave a Reply