Planning and Design
When I made the Hovea Jacket, I was originally going to the bias bound version, but I had zero motivation to make bias binding. And this project wasn’t even on my radar. I even had the fabric ear-marked for a Clover Cape wearable toile (with See You At Six viscose linen lining…which kinda would be a waste, which is probably why I was on the fence over this combination). But I think going to work and seeing that I have rust and black coloured outerwear but no sage made me think about making something out of this. I was going to use the green from the Bliss fat quarter pack I bought many years ago but the colour didn’t quite suit. But the sage flower cotton I bought in Singapore in April did! And I figured since I’m motivated to learn how to use my Simplicity Bias Tape Maker I should just do it 😂
Materials
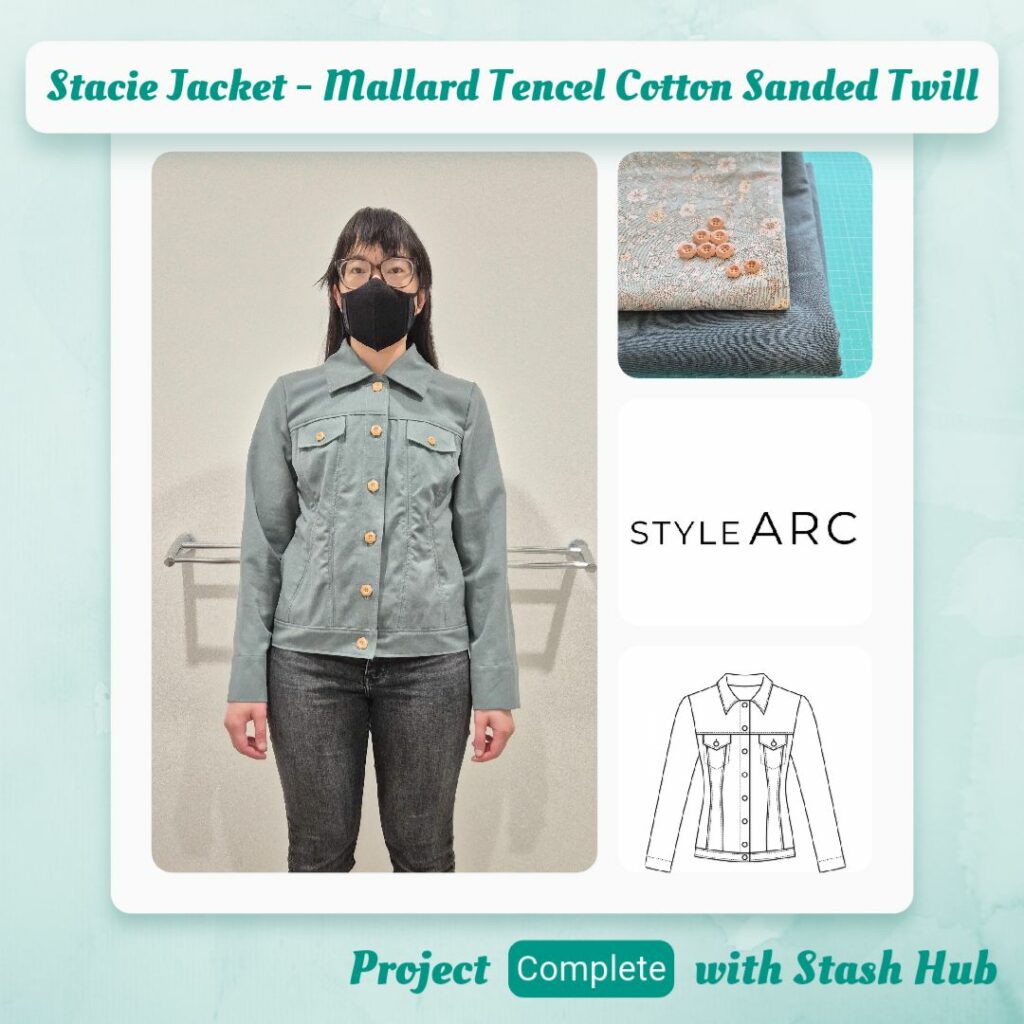
- Pattern
- Stacie Jacket (Style Arc)
- Fabric
- Tencel Cotton Sanded Twill – Mallard (Miss Maude)
- Flowers on Sage Cotton (Brighton Accessory House)
- Thread
- Rasant col. X0651
- Notions
- Wooden Flower Button 19mm (Yamayo)
- Wooden Flower Button 13mm (Yamayo)
Sustainability Check
👍 Fabric is a cotton tencel blend and quilting cotton, both of which are biodegradable
👍 The buttons are wooden so biodegradable
🤏 Rasant is OEKO-TEX but not biodegradable
👎Unsure on the composition of Steam-a-Seam
Construction
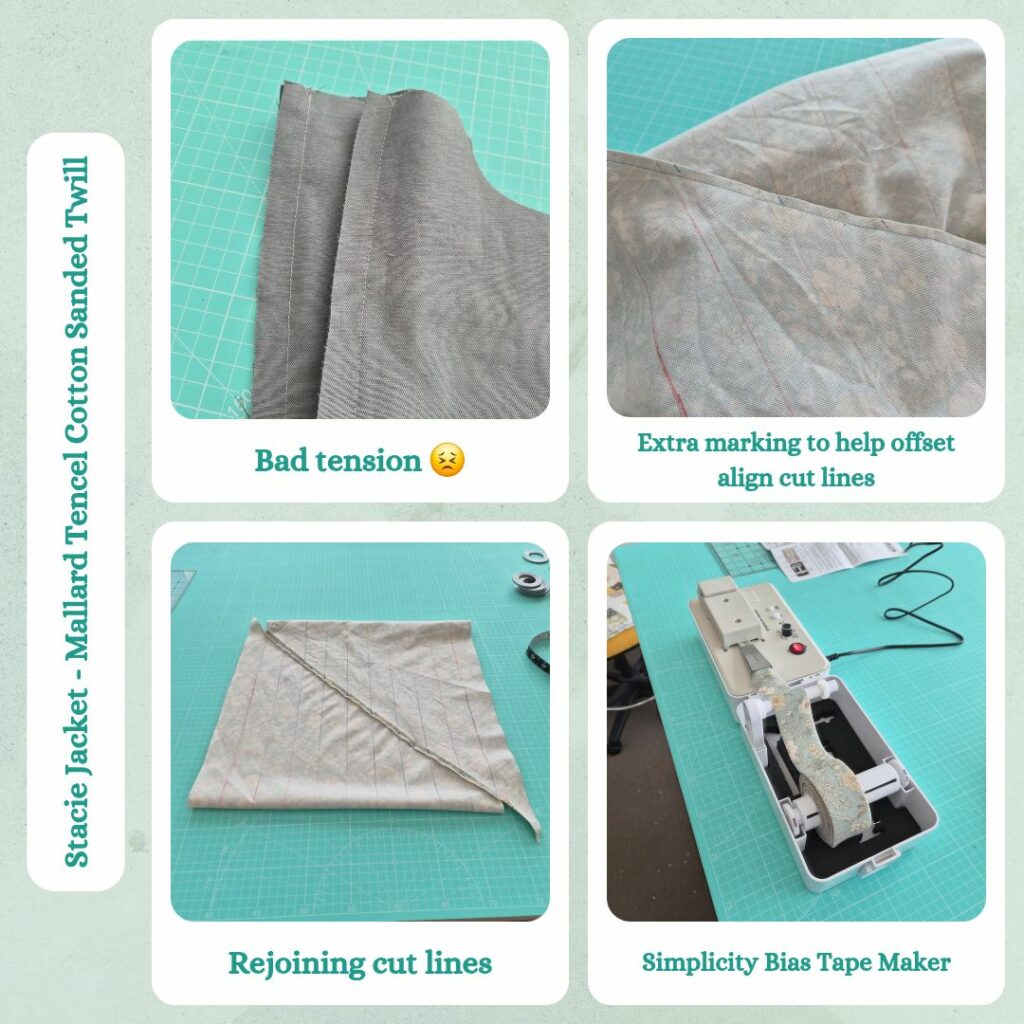
So reminder to myself to check the tension settings at the beginning of each project haha. I don’t even remember why I changed it, but I noticed the stitches didn’t seem quite right, so luckily caught it early and didn’t really have to redo anything.
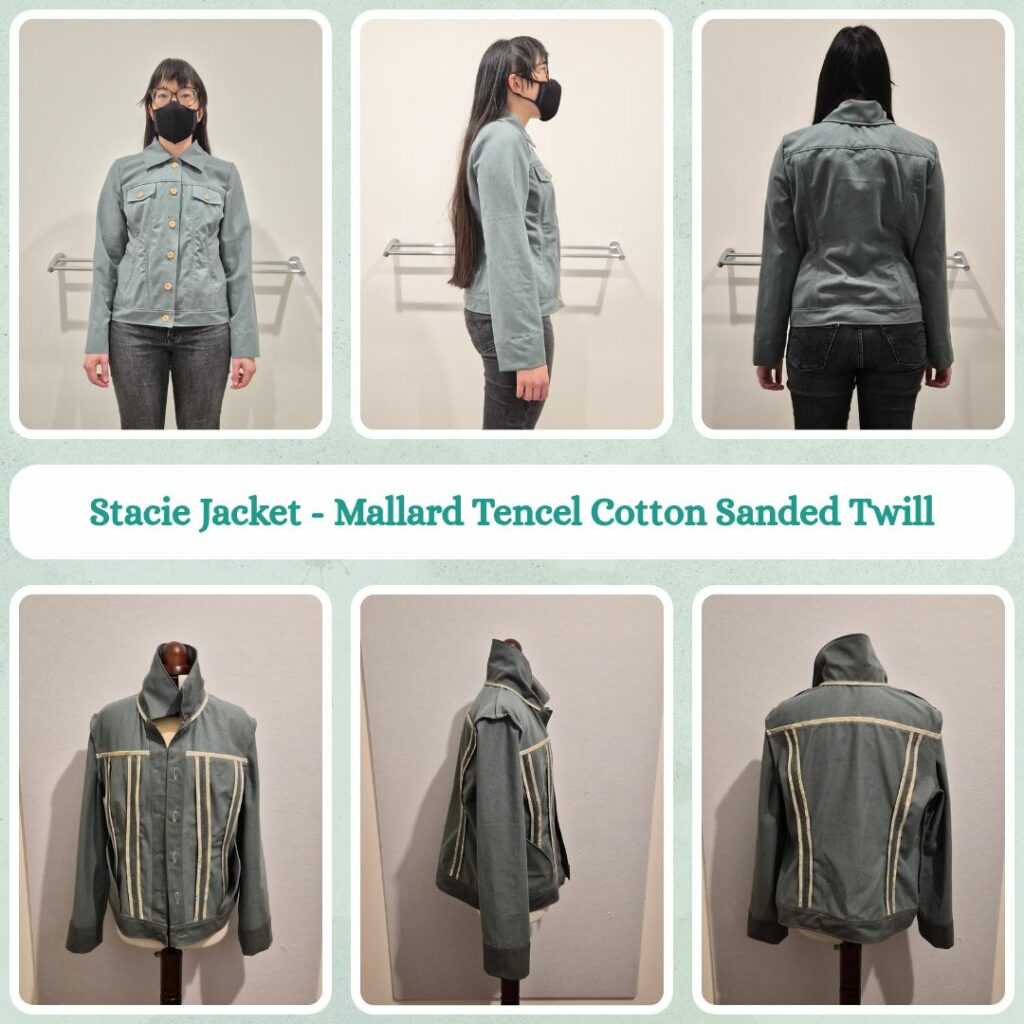
Since this is my third time making this I have a pretty good idea of the order in which to assemble things and also what my preferences are in terms of seam finishes. I sewed all the front and back panels together and pressed open. I also assembled the pocket flaps and collar. I decided to use the topstitching foot at the maximum left position which is probably around 4mm.
Then I went down a bit of a rabbit hole trying to figure out how to prepare the fabric strips for the bias binding as well as how to use Simplicity Bias Maker. I measured each of the seams I want to bias bind and calculated I needed around 7.5m of bias binding. And then I used trial and error in this calculator to figure out how big a square I needed to cut to get a continuous bias fabric strip. Turns out I need a 22m” square, cut at 1.5″ width to get 3/4″ wide bias binding. This is also my first time preparing continuous bias fabric strips so I tried to find a tutorial that laid things out in the manner I prefer.
Preparing the bias fabric strips wasn’t too bad. I was worried about having to align the markings 1/4″ offset from each other but then realised I could just mark 1/4″ offset on one side and line those marks up with the other side. I also had a thought while I was marking out the 1.5″ widths that maybe I shouldn’t be using a Frixion pen since it would disappear when I pressed the joining seam together, but then figured it would be fine, I could just remark it to make sure it was nice and continuous the whole way across (just in case I didn’t line things up perfectly). When I went to join the original lines, I used 1.0 wide pen instead and it was much easier. Creating the parralelogram tube took less time than I thought, but cutting the continuous bias from this did take longer than I thought haha.
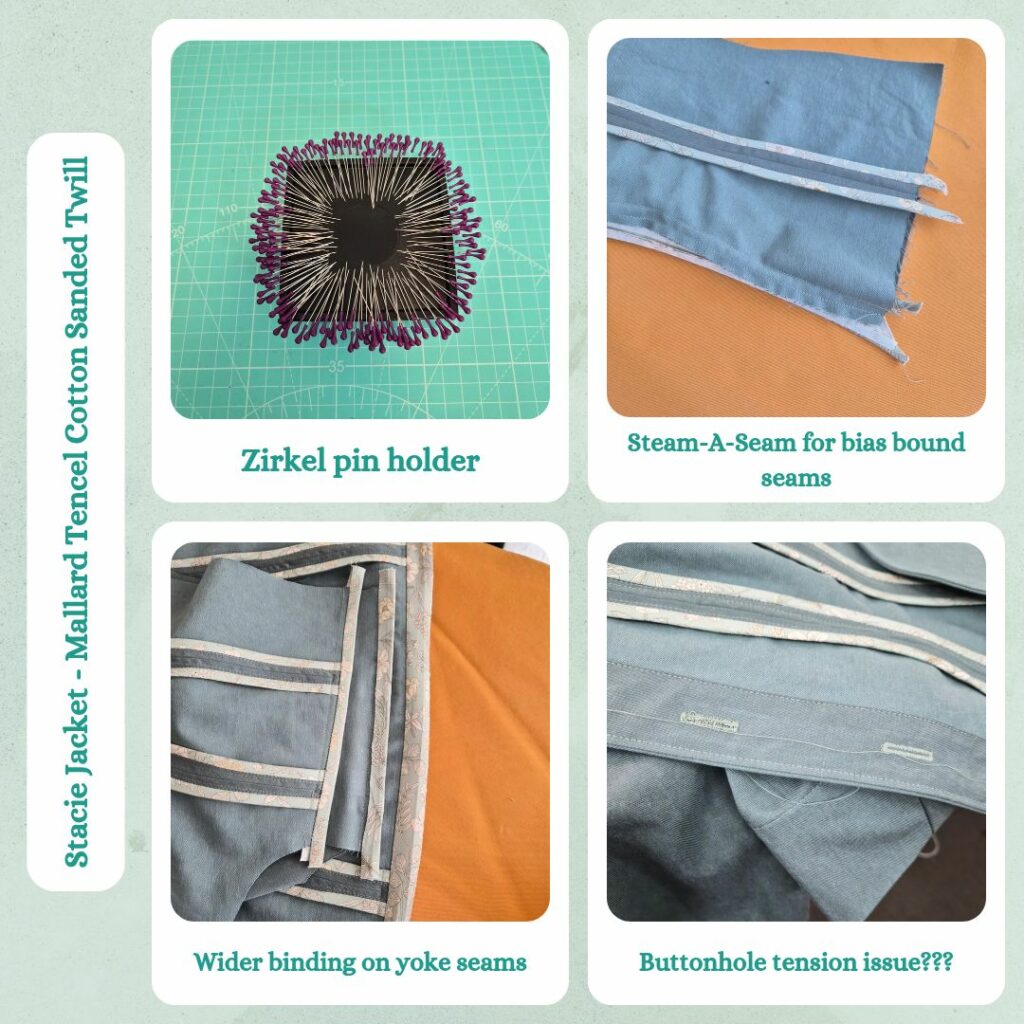
As for the Bias Maker itself, after overthinking which direction to wind the fabric strip I got it set-up and was impressed with the first 10cm or so out of the machine. Then it got stuck and I had to stop the machine. Turns out it didn’t like the seam joins very much… I made do by pulling a bit to drag it through but it pretty much didn’t press the bias properly at any of the seams. I inspected it afterwards and the seam ended up being pushed to one side, even though I pressed them open as part of prep. Maybe I need to use a clapper to really keep it down? At this point I’m pretty sure it’s user error and I need to figure out the tricks to make it work without interference from me. For my purposes though, I was able to work around the seam joins and where I couldn’t I manually re-pressed it properly.
Applying the bias was an enjoyable experience, after I remembered that I’m not meant to stitch right in the centre of the fold, but slightly offset. The Steam-A-Seam made it really straightforward and this time I made sure to secure the bias to the seam allowance and then topstitch separately. This time the topstitching is even narrower than last time so I really needed to make sure the bias was secure.
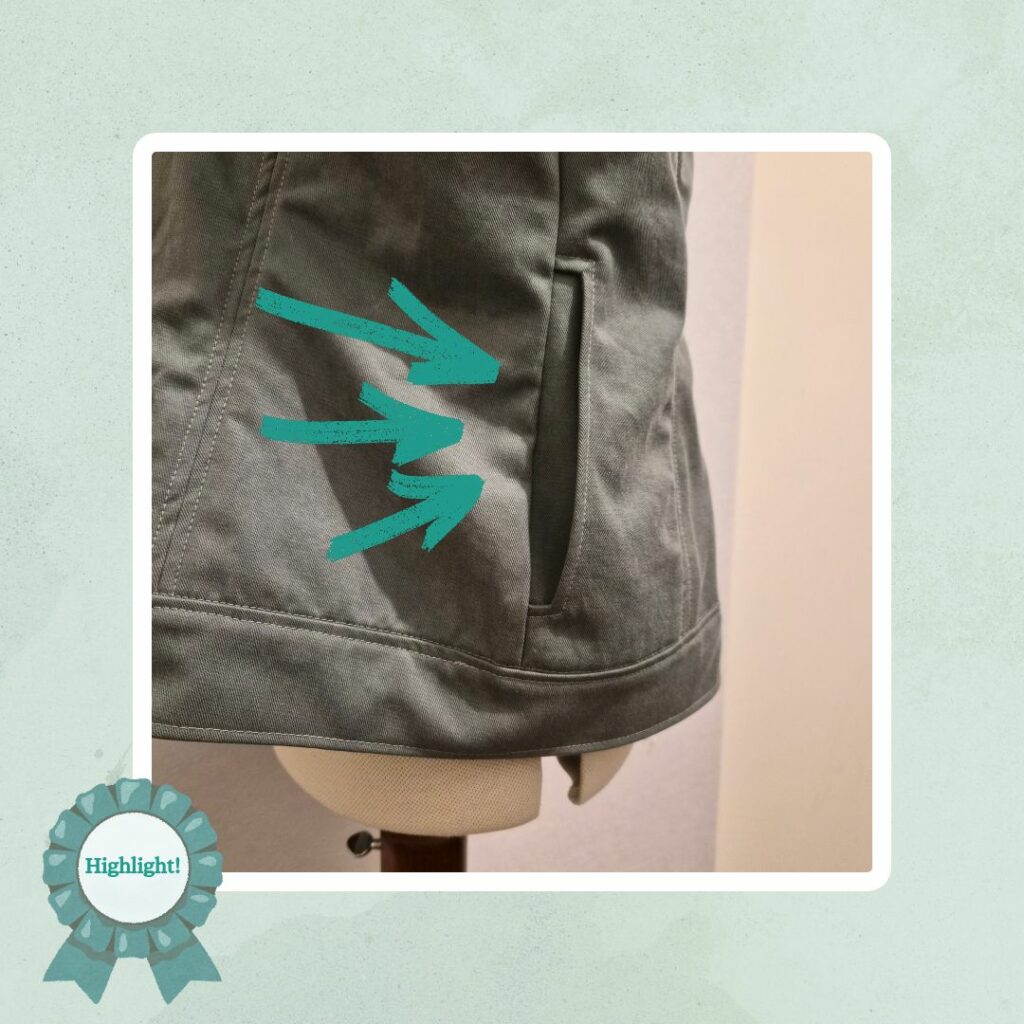
I made a fake buttonhole on the pockets and realised that I probably made them too small by using 1cm seam allowance instead of 6mm. One of the older traced patterns where I hadn’t standardised my seam allowances…I should probably update the pattern piece for this. But I don’t think anyone will notice since the pocket still lined up nicely with the centre panel.
When it came time to bias bind the yoke, I decided to sew at 1cm instead of 6mm and unpress the other bias fold. I figured this part of the garment didn’t need the extra bulk from the bias fold over but also 6mm didn’t really secure the tops of the panel bias binding for some reason. I did wonder if I should have done double topstitching for the yoke, but figured it’s secured with Steam-A-Seam, bias stitch in the ditch and topstitching so hopefully it should be ok.
Then I added a pocket, but instead of making it in-seam I used the Peppermint method since I realised that I don’t really like in-seam pockets. Shoulders were joined withe french seams and then I attached the collar and bias bound this too. When I attached the front facing I made sure to stitch from the main body side so I could join up the stitching to the collar stitching.
The sleeve and side seams were also french seamed and I undid some of the stitching to avoid having the french seam in the sleeve cuff. The Steam-A-Seam didn’t hold the sleeve hem very well, I wonder if it’s because the diameters were probably not quite the same (I turn 1cm under to have a clean finish but don’t adjust the main pattern to account for this). It did a slightly better job with the waistband, however I probably shouldn’t have pressed so hard since if you look closely you can see the iron mark 😅 But I realllly wanted it to stay put!
Almost no troubles doing the buttonholes. I did have one inexplicably have horrible tension, even though the one before and after were perfectly fine…at least the loose tension meant it was really easy to unpick. And I decided to hand sew the buttons, partially because I wasn’t sure if the odd shape (flower shaped but also slightly domed and with the holes inset in the centre) would work well with my button foot but also because I only had a little bit left on the bobbin and figured I could use it up (if I did it by machine I would have had to use a new bobbin).
Reflections
This fabric is beautiful. I’m so happy I have it in another colour already haha. I went and checked Miss Maude and they only have one colour left. It’s slightly drapey but with enough structure and really soft to the touch. Tencel blends are the best! I’m also happy with the construction of this. Third times the charm I guess. I’m confident this time my bias binding isn’t going to come undone haha.
Things I learnt:
- How to make continuous bias binding
- How to use the Simplicity Bias Tape Maker
- 1.0 Frixion pen is easier to mark straight lines on fabric with
Categories: Sewing
Leave a Reply