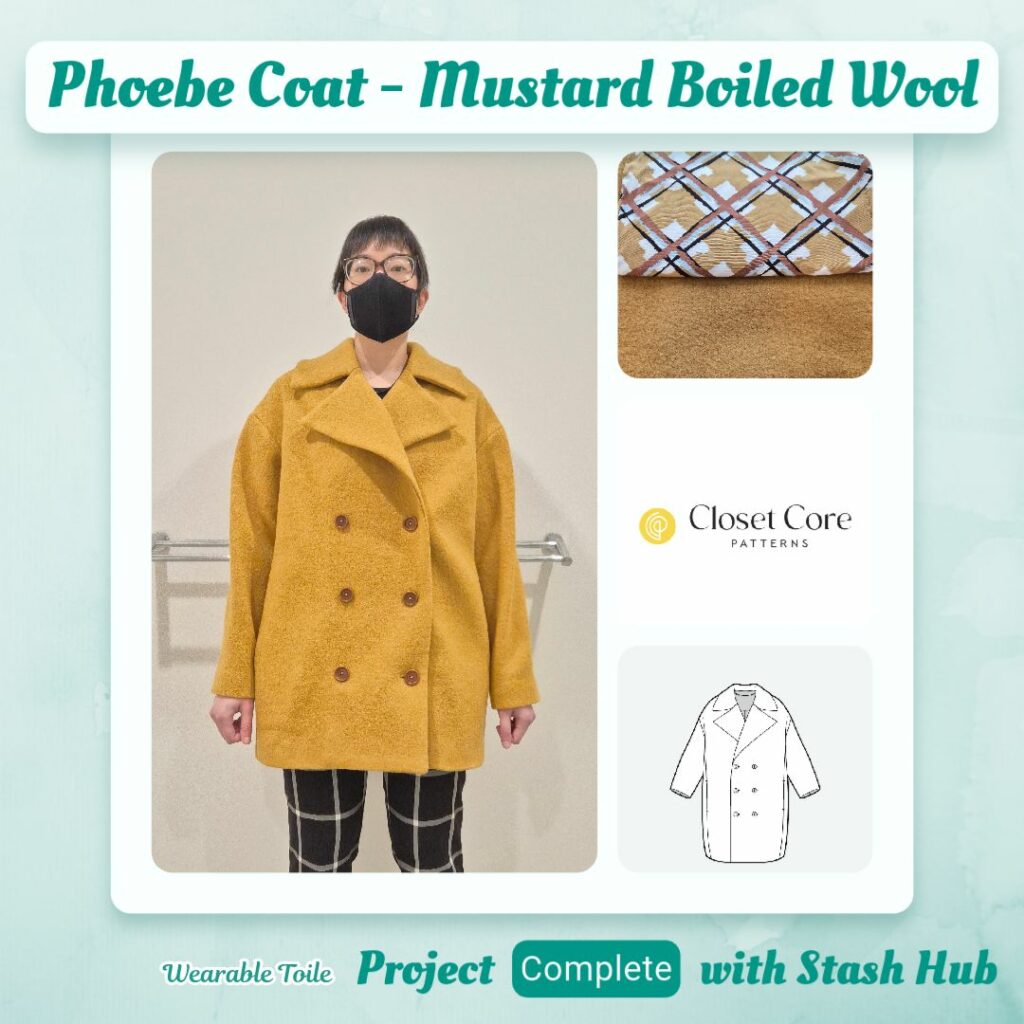
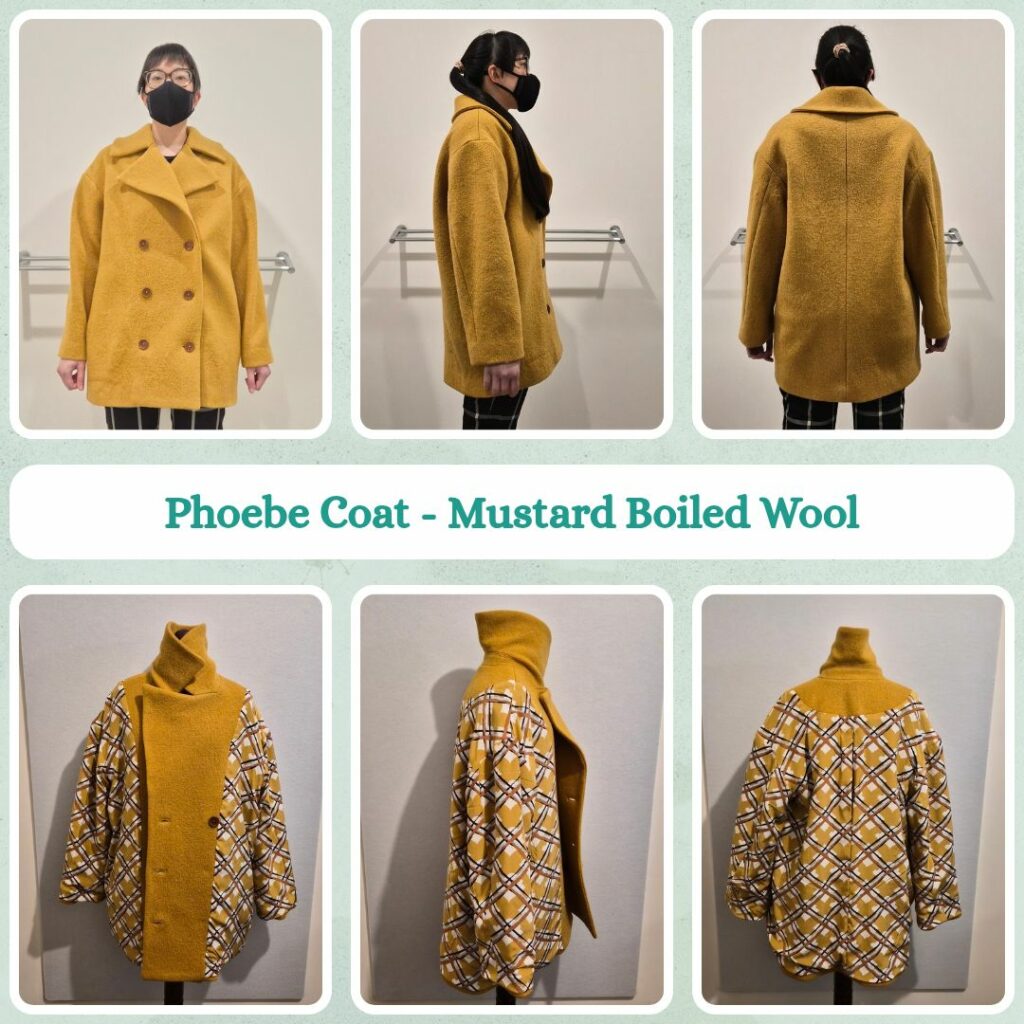
Planning and Design
I was quite motivated to make this after watching the Coat Making Course videos. But then it felt like I kept coming up with excuses to postpone starting it…
For starters I was super indecisive about how to preshrink the wool. I was mostly leaning towards using the dryer method but I kept chickening out 😅 in the end the main reason I went with it was because it would save me lots of time, something in short supply.
The other hang up I had was over the weft interfacing. There were surprisingly quite a few options available to me, but it was a little tricky telling the composition and in some cases the width 🤨 I was also trying to find a mostly biodegradable option that wouldn’t shrink but I don’t think that exists. I finally decided based on being able to bundle it together with other items from the same store to save on shipping 🙃 Although my first option fell through (they ran out of stock) so I had to go with one of the remaining back up options. Then, because I needed to preshrink the weft interfacing, I had a proper excuse in that we adopted a kitten, who lived in our spare bathroom for the first 3 weeks, which is the one with a bathtub. But even after we set her free, I decided that I needed more clothes horses in order to dry the interfacing flat, which meant an IKEA order and waiting for that to arrive.
The third procrastination issue was I decided that I might as well invest in a sleeve roll tailors ham. Heather used a wooden dowel in the course and I did ask my husband to buy a rod, but I feel like it would be easier to use a tailors ham and I would definitely use it for pants making. Jackstock was out of stock of the one I wanted (and I needed to contact them about dimensions cos the listings didn’t mention any) so had to wait for stock of that and then subsequent shipping.
Anyway, now the actual design story for this make lol.
Materials
- Pattern
- Phoebe Coat (Closet Core)
- Fabric
- Boiled Wool – Mustard Yellow (MaaiDesign)
- Viscose Print – Crossroads Mustard (Fabric Box)
- Buttons
- meetMILK® Dish Corozo Buttons 25mm – Pecan (Pattern Scissors Frock)
- Plastic Buttons 12mm – Clear (Stash)
- Thread
- Rasant col. 1504
- Notions
- Whisperweft Interfacing – Black (Punch With Judy)
- Cotton tape 6mm – Black
Sustainability Check
👍 Boiled wool is 100% wool so biodegradable
👍 Cotton tape is 100% cotton so biodegradable
👍 Corozo is from the corozo nut so biodegradable
🤏 Rasant is OEKO-TEX but not biodegradable
🤏 First time using viscose and honestly I kind of assumed since it’s derived from wood pulp it would be biodegradable. But it seems the chemicals used to produce the fibres complicates things…So not an as environmentally friendly option as I thought (apparently the production process is also very power intensive) but probably still better than a polyester lining
🤏 Plastic buttons are at least reused, I think my mum salvaged them from old school uniforms
👎 Whisperweft is 79% Viscose, 21% Polyester. I chose this one because the viscose content meant less polyester but it seems viscose isn’t that good for the environment anyway… But I did look at a bunch of weft interfacing options and I couldn’t find any made of natural components.
Construction
To-Do List
One thing that was very apparent from the course was that a large part of making a coat is the pre-work. And then during sewing, it’s probably best to split the components up so it doesn’t become overwhelming. Since I had ‘wasted’ so much time faffing about just preparing the supplies, I thought I’d better map out the process I intended to follow so I wouldn’t lose momentum.
Pre-shrink Weft Interfacing
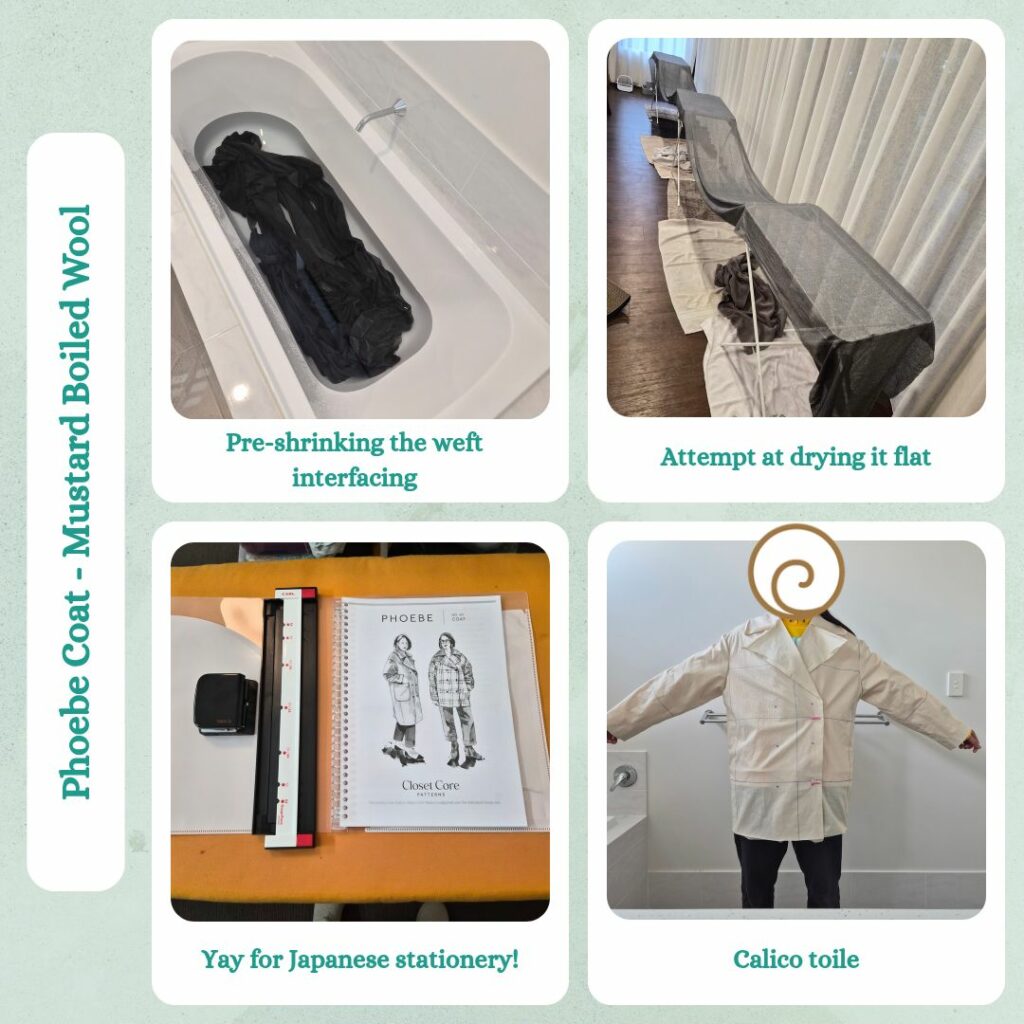
Once again, a good motivator to give the bath tub a bit of a clean 😝 I bought Whisperweft from Punch With Judy and received very detailed instructions on how to preshrink the interfacing. In future I’ll probably not bulk wash it like I did this time (draping it over 3 clothes horses), but that would require me to know how much interfacing I need for the project so I cut the right amount for pretreatment 😅
Review Instructions
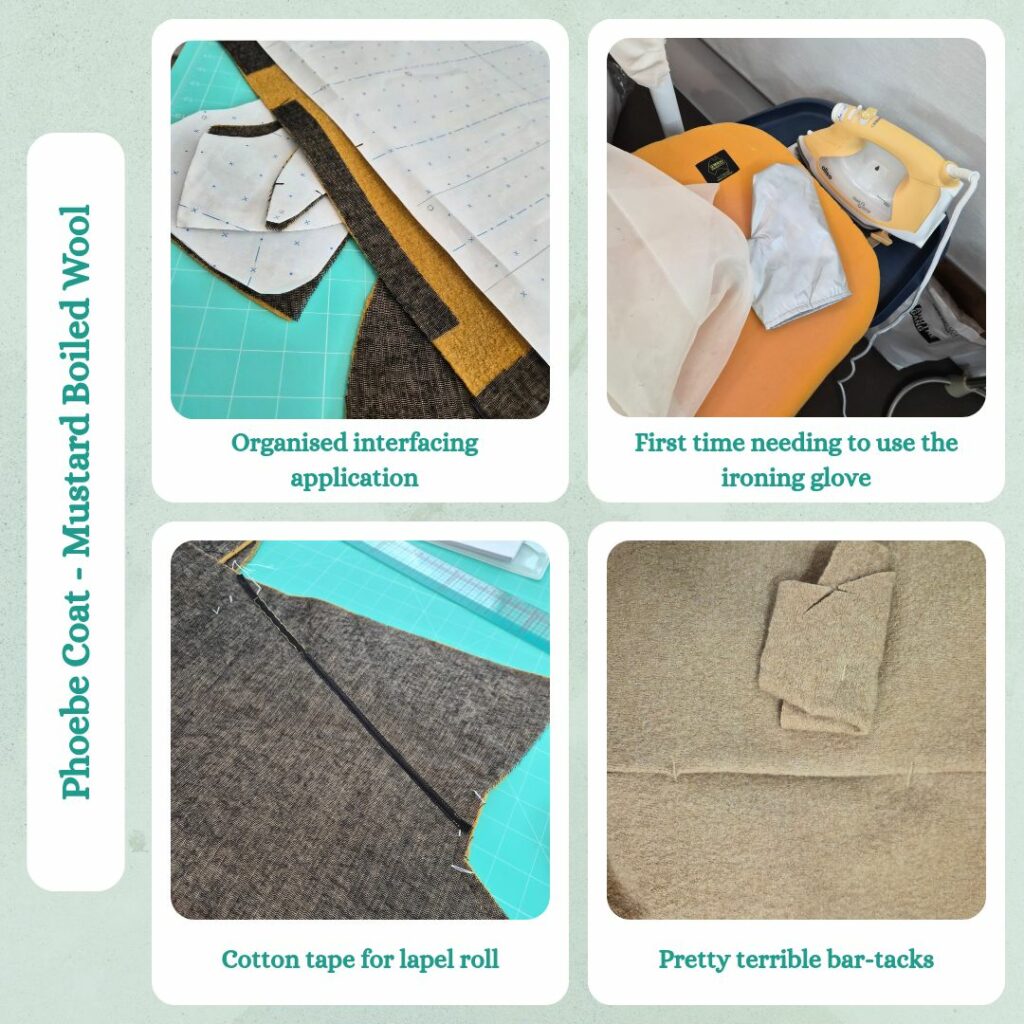
Since I wanted to refer to the detailed instructions I decided to actually print them out and put them in a binder. Japanese stationery is the best. Being able to flick back and forth (and have the pages be stable unlike with a 2 ring binder…) is very handy. One thing I picked up in my review was I had to pre-shrink my cotton tape as well.
Trace Pattern – Part 1
I did this in two parts. The first I only traced the parts to make a fitting toile. Wrangling 6 A0 sheets is kinda tough lol. And pressing the creases out of the dot-and-cross pattern paper required ended up taking quite a lot of time haha.
Calico Toile
I also printed out the coat fitting guide and put this in my binder. The toile process was kind of good to ensure I had transferred all the markings from the A0 print…I did miss a couple. I made the markings according to the guide and pressed up the hems/seam allowances. I wore it over my sweater and I couldn’t see anything absolutely terrible that needed to be altered? So full steam ahead I guess 😝
Trace Pattern – Part 2
Since I knew I didn’t have to make any adjustment to pieces I was then able to trace out the rest of the pattern pieces at size S. The print out came in handy again to cross-reference against the pattern piece list – I had missed lining piece M and had to go find that. Then I went through the printed instructions and highlighted all the seam allowances. Because when I made the calico toile I had to keep searching for the correct seam allowances in the instructions. I would usually transfer these to the pattern pieces but for now I wanted to keep them ‘clean’ so I wouldn’t miss transferring any markings.
Pre-shrink Wool
I ended up using the dryer method. I had some towels that needed washing after using it to dry a wool scarf for blocking so put these on a cycle to ensure they would be damp but not dripping wet. Then took 3 of these and put into the dryer with the fabric on the Towel setting with maximum heat and put on a timer for 45 minutes. I probably should have measured the width to see if it shrank much. So have just assumed it did the trick 😅
Thread and Needle Preparation
Boiled Wool and Viscose are both new fabrics to me, so I checked the Minerva Fabric Guide. It suggested jeans needle for Boiled Wool but didn’t have an entry for Viscose. So instead I referred to this website which recommended Microtex and using a walking foot, which might help with the Boiled Wool as well. Also I realised it was a fabric website too so might end up buying stuff from them in future…guess it goes to show that informative blog posts can win you extra custom haha.
I prepped two bobbins of Rasant in addition to the part used one I already had. And figured I could probably use the Denim thread I bought for future jeans for topstitching (spoiler – I didn’t end up using this).
Cut Wool
My plan was to block fuse for the Front, Front Facing and Collar-related pieces, but my Whisperweft is only 90cm wide so I actually couldn’t… Maybe this worked out, since I ended up having to cut the front facing (requires interfacing) next to the top sleeve (only partially interfaced) and block fusing the remainder after cutting the sleeve piece would have been awkward.
I feel like there was a slight nap, hopefully won’t be a big deal if I got the direction wrong (but at least all the pieces will be consistent). It was also quite easy to tell right side from wrong, the selvedge helped for starters but after comparing the two sides I think I’ll be able to tell it apart when I no longer have the selvedge for reference.
It also wasn’t hard to cut. I guess because it’s not that dense? I could cut through 2 layers just fine with my Fiskars rotary cutter. The only thing was the loft meant at points I sort of damaged the paper pattern pieces a bit, even had to patch one piece up with washi tape. In order to get into the corners I used my duckbill scissors.
Cut Interfacing
Definitely going to try and buy 150cm wide interfacing next time. The 90cm width made cutting pieces quite awkward. Lots of cutting single sides out at a time, like the front facing didn’t fit if I folded it. I used my pattern weights to align the selvedge with the lines on my cutting mat which assisted in placing the pattern pieces on grain.
I also find that this interfacing sheds it’s fusible really easily… To the point I’m kind of worried about inhaling it. Not sure if it’s a weft interfacing thing or a Whisperweft interfacing thing. I’m guessing pre-washing it made it worse, but I haven’t encountered this issue with my pre-washed cotton interfacing sooooo…
I cut all the interfacing pieces on the same day as the boiled wool and then thought I’d better take a break before trying to apply it. I did dig out the instructions that Punch With Judy helpfully sent with the Whisperweft though, to review the settings I needed to use.
Apply Interfacing
Heey I almost managed to apply all the interfacing in one work night session! Everything except the front pieces (yes leave the hardest for last…). I did have some hiccups at the start… I have tried to ‘purge’ my iron a couple of times, mostly by using the steam button to try and get fluff out of the holes. But using this a couple of times is totally different from using it on max steam for a extended period of time. So, very glad I was using a pressing cloth because my poor iron did spit out more fluff as well as a whole lot of calcification 😣 I was too ashamed to take photos LOL. I also had to use the glove that came with my hand held steamer (that I have never used until now) because damn does the iron put out a heap of steam once I had it on the max steam setting for a little while.
The interfacing application process went pretty well though. I didn’t get ‘pressure’ marks of the iron’s outline on the wrong side unlike when I was ironing some of my t-shirts in the t-shirt investigation. And the Whisperweft did seem to adhere well, if it didn’t I just have to reposition the iron and apply more steam. And the process wasn’t boring, I managed to get through two Modern Maker’s event recordings, go multitasking heheh.
Another learning was I shouldn’t have marked the pieces that needed to be partly interfaced. Basically I should leave the marking of all the pieces until after the interfacing has been applied so I don’t have to redo any effort.
A fair bit of adhesive ended up on my pressing cloth. Time to put it in the washing machine to see if it can be salvaged haha… (it couldn’t).
Marking the Wool
The first piece I marked I did multiple pass throughs with the basting thread, but then realised since I’m using proper basting thread I don’t need to do this. I probably made them a bit longer than necessary, I was worried if I made them too small they’d fall out, but too long and they start to catch on things…there is probably a Goldilocks zone I haven’t figured out yet.
Cut Lining
I was mentally prepared to need to use tissue paper but it didn’t end up being necessary. Since it was very slinky, I lined up the folded fabric along the grids of the cutting mat and used the pattern weights to hold the fabric down along the edges. I cut it with my LDH rotary cutter (I’m thinking of making the Fiskars one for knits and thicker fabrics, and the LDH for everything else). and marked these in the same way as the wool with the basting thread.
Finally! Sewing Time! Day 1
Planned to spend half of Saturday sewing but went to Craft Alive and came back quite late so only started around 3.30pm. Sewing wool isn’t too different from anything else, I guess I’m just more conscious of making sure to press the seam, press the seam open from the back and clap and then press from the right side too.
I found that my pocket markings didn’t really match up and I think that’s because the pieces shrunk a bit when I applied the interfacing (lost around 1.5cm). So when I put the markings on I sometimes aligned from the top and other times the bottom… not a big deal, the front pocket marks matched the front, so I just matched the back to the placement of the front pockets. For the bar tacks, I looked up my manual and found the tacking stitch that I’ve never used. Did a test and thought 3 wide was a good size, and also shortened the bar tack length. But I ended up having issues with the bulk of the pocket when it came time to do the real thing. The last one I used the hump jumper and it turned out correctly. But figured not worth unpicking and redoing the other ones. I think on the actual coat it would probably be better to use 4 wide stitch.
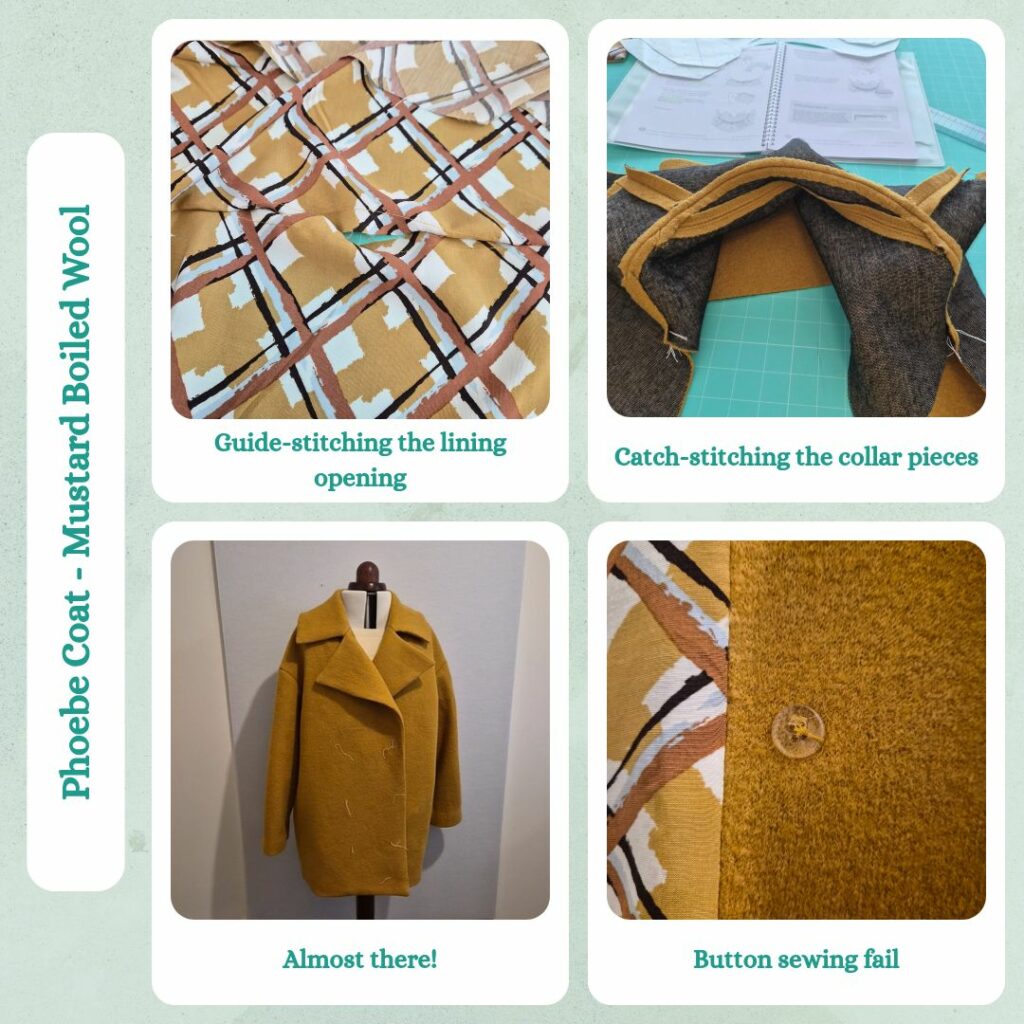
I assembled the front and back and the sleeves but then put these aside because I wanted to do the collar the next day when my brain was rested haha. So moved onto the lining instead. I switched to a micro-tex needle and it seemed to work fine on the viscose. Because it wasn’t super light and airy, it wasn’t too hard to sew. The only issue was the basting thread wasn’t that secure in it, it was fine up until I had to set the sleeves. The extra handling of the pieces meant quite a few fell out. Then it was really tricky to try and remark the pieces….especially since the front and back were all assembled already.
Sewing Day 2
Sewing the Prado Trench Coat definitely prepared me for the collar on this one. I did fail to transfer some markings on one of the collar pieces onto my pattern, which means it wasn’t on my fabric, but luckily the other collar did have those so I was able to adjust my pinning so I didn’t screw up (and add it to my pattern piece at the same time).
Then the rest was mostly like other lined coats. I did wonder if I missed a step in pressing the hem allowance up before attaching the lining (like for the sleeves) but turns out I hadn’t, I just felt like it was a bit…not useful having the thread tacks on the inside between the coat and lining for where you’re meant to turn the hem. Maybe next time (if I remember) I’ll put the hem markings out of the seam allowance so I’ll be able to see them from the right side of the outer shell. The other part I got confused by was the lining pleat/hem at the facing, but I followed the instructions to clip into the marked ‘circle’ and things fell into place and suddenly made sense.
I umm-ed and ahh-ed about topstitching the whole coat edge, but decided I wanted to try the ‘clean’ look.
Buttonholes and Buttons
I decided early on not to do bound buttonholes for this. Not just to reduce the number of ‘new’ things being tackled in this project but because I honestly thought it wasn’t necessary. I felt like the materials I was using didn’t justify such a fancy finishing haha.
I did still have to psyche myself up for the normal buttonholes a bit though. Was not looking forward to sewing buttonholes on wool. Fortunately I had discovered the buttonhole foot stabiliser piece (thanks to reading the manual when I was doing my sweater modifications haha) so thought I’d try this out. And it turned out to be essential lol. I also widened the buttonhole stitches/opening (also learnt during the sweater modifications). Luckily the coat only needed buttonholes on the edge, the way the stabiliser plate is attached means I can’t use it if it’s not right on the edge which is a shame. I used my new buttonhole scissors from Core Fabrics to cut open the buttonholes, I really didn’t want to use the chisel (because high loft) and the thickness would have made it tricky to open with a seam ripper.
I originally wanted to use some of the super duper fancy coat buttons I bought in Japan, but I only had 4 and the pattern called for 7. Although I realised after I had purchased the buttons that the 7th button was actually to close the jacket at the collar, which I don’t plan to ever do. Doesn’t hurt to have a spare I guess, I decided to use it as the stabiliser/inner button on the top right. And grabbed out some plastic buttons from my stash to stabilise the ones along the coat edge. The thread tack markings looked pretty accurate when I sewed the buttonholes, but after adding the buttons I realised that they probably needed to be raised about 1cm. I did this with the top right button then measured to make sure the rest of the decorative buttons aligned. I also used my learnings from the Beatrice Peacoat to ensure that my functional buttons had thread shanks.
Post Project
I forgot to add seam allowances when I traced the pattern pieces so planned to do this at the end when I could sanity check myself based on what I remembered doing. But in the end I decided not to because it might distract from all the markings that need to be transferred and because I doubt I’ll ever make this from memory, I’ll always refer step by step to the instructions, where I highlighted the seam allowances.
Reflections
I’m very impressed by this pattern. The copious markings meant it was really easy to put the pieces together and have confidence that I was doing the right thing. The instructions were also really detailed and included a lot of things that I questioned after I made the Beatrice Peacoat and made me think that this really was trying to help make the garment as professional as possible.
I somehow managed to finish this in time to wear it on a super cold day and it really was very effective. But I did learn that if I wear it to work and put it on my chair, the lapels are so large that they fold down and if I lean back I ‘press’ them into the wrong place LOL. So I’ll have to steam them back again and then next time…I guess just not put it on my chair (my desk is big enough to put it to the side, which probably isn’t great for creases either, but at least it won’t have body weight on it).
I think the positioning of the inner button is not quite right, the coat does seem to bunch a bit when I use it. So I can either not use it or just not get hung up on it, it’s not like I’m going to be standing still modelling this thing, so it will be creasing and folding in other places as I move too.
Next time I might not use a fusible interfacing. It seemed quite secure but when it came time to attaching the collar and sleeve and I had to handle the pieces more, it started to detach. Also I’m still dealing with finding little bits of weft interfacing around the place from when I trimmed parts. So I feel like it’s more effort than it’s worth. I’m thinking of going old school and using a cotton fabric (poplin? batiste? I need to do more research). I didn’t really enjoy the interfacing application step, I would probably be happier basting sew-in lining instead. The only issue would be the partially interfaced pieces…maybe I can get away with Steam-A-Seam there instead.
Things I learnt:
- Dryer method for pre-shrinking wool is probably okay
- Remember to press the wool before applying the interfacing so it hopefully doesn’t shrink
- How to cut slinky fabrics
- Use basting thread to transfer pattern markings onto viscose but then immediately also mark with a pen
- Stabiliser plate for automatic buttonhole foot for wool fabrics
Categories: Sewing

Leave a Reply